Sequence / Record Item / Control Item / Common Settings / Popup Menus / Console to Skip/Extend / Adjust Interval / Edit Traces / Menus
Create more flexible record as sequence, consisting of multiple operation records and/or controls, in Edit Sequence screen. Concatenate records for longer replay, add control for reproducibility, and complete your sequence as item list. By tapping sequence or [+] Create Seq. in Manage Traces will show this screen with the sequence data.
By tapping top (or top-right) record information will open Display Settings, Replay Settings, or Preview as Manage Traces screen.
Sequence as Item List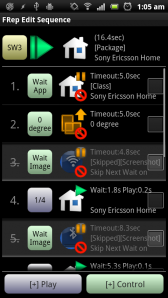
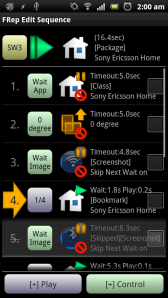
In the list of Edit Sequence, each operation record or control is shown as single item with #No., label button, icon (with small icons), description, and checkbox.
– #Sequence No.
The sequence will be played from 1. to last number. The Loop range or other control’s destination are described as this. Tapping switches skip, long-tapping switches bookmark (see below).
– Label button (gray:record, green:control, yellow:proc.)
With Notify Play Process options, the label will be shown in popup when the playing process reaches the item. If the label is empty, the process will not be notified.
Active as button when Use Popup UI menu is OFF: Tapping will open the setting panel.
– Icon, superior small icon
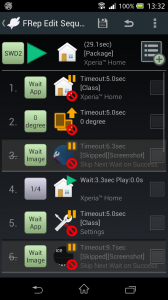 For operation record, the app icon or the screenshot on which was recorded will be shown (switchable by Show Preview Icon in menu), with small green triangle icon.
For control, each control will be shown as specific icon, app as its setting, image region for Image Match. If Show Console to Skip/Extend is ON for the control, superior icon will be orange pause icon.
Active as button when Use Popup UI menu is OFF: Tapping will show Edit Traces dialog (see below) for operation, the setting panel for control.
– Subscript small icon
Shown when any destination (#No., Abort or Return, see below) is set for replay finish or for control success/fail. If the setting is Next, no icon will be shown.
Left icon (green): destination for On Finish or On Success settings.
Right icon (red): destination for On Fail settings.
– Description of 3 lines
The playing seconds or timeout, and item settings summary. To reorder the item in the list, long-tap here and drag to upper/lower row.
– Right-side checkbox (in the list)
To Delete, Copy&Append, Clip Checked, Toggle Skip, Set Wait Time, check and select menu/push button. By checking before adding operation record or control, the added item will be inserted at the checked items position.
 Operation Record Item
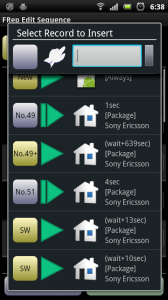
To append another operation record for sequential playing, push upper right or bottom [+] button and choose the record. If any checked items exist, the record will be inserted before them. Appended items are independent, so edit / deletion of them do not affect the original record.
If there are many records, the filter will be shown at the top.
Left button: filter the type of the records. By default, the normal records and sequences are shown. By choosing Procedure, the procedures can be appended*.
App icon: filter the base app of the records as the same app of editing one.
Text: filter the label of the records which contain the text.
The right button will recall the last condition of the filter.
*Note that appended items from procedures are also independent. So editing the appended items, or editing the original items, do not affect each other.
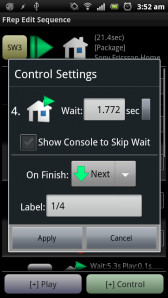
By tapping the gray label button of the operation record item, setting panel will show up. To preview/edit operations, tap the icon to open Edit Traces (see below).
Wait: initial wait time (second) before the first operation starts. By pushing right-handed button, the value will be reset.
Show Console to Skip Wait, On Finish: optional common settings (see below).
Label: name of this item.
 Control Items
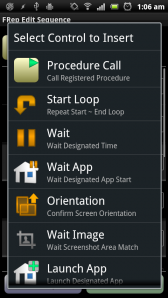
To append any control, tap upper right or bottom [+] button and choose control or shown control list directly. Function and specific settings for each control will be described here. As for common control settings, see section below.
– Procedure Call
To create complicated sequence, you can clip a part of the sequence as Procedure. Once you clipped as procedure by Clip Checked menu, it is stored in Proc tab in Manage Traces, and you can call it as single control from any sequence.
– Loop / Section
Append Loop or Section Loop controls before and after checked items. If there is no checked items, they are appended at last position. Loop control will repeat sequence from start to end with designated Loop ~ Times (Default: 3 times) or Endless. Loop: 0 Times will be also endless loop.
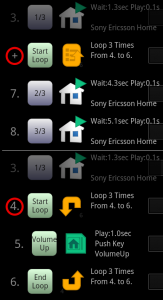 The items enclosed by the Loop / Section controls can be collapsed / expanded by tapping the #Sequence No. (or + as collapsed sign) at left side. The collapsed items can be moved, checked, deleted together.
To label different name of start and end items, tap the icon at the right of label text box to unlink them.
– Wait
Simply wait designated seconds.
Wait: wait time (seconds)
– App Change (Wait App)
Check current (front) app is selected app (in the sequence) or not, and wait until the app is front. By default, check 6 times for each second (total timeout 5 seconds).
Match Packages: check app package match (rough)
Match Class: check app class (Activity) match (strict)
– Orientation
Check current screen orientation is selected one or not, and wait until the orientation matches. By default, check 6 times for each second (total timeout 5 seconds).
Orientation: either of 0, 90, 180, 270, 0 or 180, 90 or 270 degree*
*degree is based on device default orientation as 0 degree.
– Image (Wait Image)
Check current screenshot contains with designated area of selected image or not, and wait until they matches. By default, continue screenshot and image matching test in timeout (Trials:) 10 seconds.
[Choose Image, Set Image Match Area]
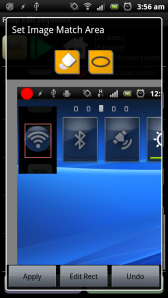 Image Match From List: select screenshot from operation records in the list
Image Match From File: select screenshot from png/bmp file*
*file must have same size of screen, and need to designate rotation.
Set Image Match Area/Edit Rect: From (left, top) To (right, bottom)
Drag background or rect: adjust position
Pinch-in/out: adjust size of matching rectangle (width/height will be fixed by initial 2 point position)
Set Image Match Area/Edit Mask: Paint/Erase, Rectangle/Oval/Square/Circle
Tap: paint/erase mask* around tapped area
2-point touch/drag: paint/erase mask by selected shape
*masked region will be ignored in image matching test.
**To remove the previously saved mask, tap Undo button after moving Edit Mask page.
Set Image Match Area/Adjust..: Auto Frame detection/adjustment, set Mask by Color range
Tap: set location of core frame or base color for each button function
[Control Settings]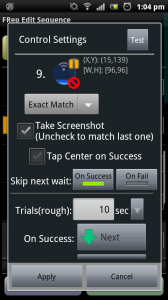
Exact Match: success when all pixels in the area have the same colors.
Match Pixels Rate: success when the rate of the same color pixels in the area is over the threshold.
Color Similarity: success when the color similarity in the area calculated from color distance is over the threshold.
Search(Exact): success when the area matching all pixels is found in current screenshot, and keep center position of found area. *If multiple areas found, only first one is used.
Search(Similarity): success when the area, which has similar edge points and color similarity over the threshold, is found in current screenshot. *If multiple areas found, most similar one is used. Search Area setting is recommended.
![]() [Reference Screenshot Path] (Requires Unlock Key, available with Exact Match, Match Pixels Rate, Color Similarity)
[Reference Screenshot Path] (Requires Unlock Key, available with Exact Match, Match Pixels Rate, Color Similarity)
To replace the matching image with the file on replay, set the path of another screenshot file. For details, refer the section below.
Take Screenshot: newly take screenshot for this control. If OFF, last screenshot will be used and tested only once.
Tap Center on Success: tap center of the matched area on success. (Calibrate Input is required) By long-tap, offset from the matched center can be designated. (The offset coordinates are based on device standard orientation. Check preview to confirm the offset.)
Skip next wait/On Success: if image matches, skip next initial wait.
Skip next wait/On Fail: if image does not match within timeout, skip next initial wait.
By tapping Test button at top-right corner, you can test the current settings on other screenshots. Note that testing Search method on multiple screenshots by selecting directory may take long time.
Edit Image button at the bottom is for replacement of the source screenshot or its match area. Note that if the source screenshot is deleted, you cannot choose Edit Rect to change only the match area.
With Take Screenshot control, FRep will detect the screen (part) change in replay.
[EXAMPLE: At step N, check if the same object (image) exists from initial screen (at step 1).]
1. Take Screenshot; with (Pictures or such folder)/screenshot [Overwrite (No Date in filename)*1] [Rotation 0° (For later reference)]
(snip)
n. Wait Image; with ![]() [Refer File] (Pictures or such folder)/screenshot.png (same path with step 1, added file extension ‘.png’ *2)
[Refer File] (Pictures or such folder)/screenshot.png (same path with step 1, added file extension ‘.png’ *2)
*1: By setting Overwrite, FRep will overwrite the file at every take.
*2: If the file does not exist or is not readable, the prepared image (for setting the areas) will be used for image matching.
– Launch App
When this control is played, launch the designated app or shortcut from FRep.
Clear Task/All: launch app with clear all task flag. (default)
Clear Task/Top: launch app with clear top task flag.
– Kill App
When this control is played, finish the designated app. In next launch, the app starts newly, instead of resuming the last state. When the current app is finished, the Android will show home screen.
Force stop: Stop app forcely, even the home app.
– Push Key
When this control is played, push function key.
Key: Home, Back, Menu, Enter, PageUp, PageDown, Space, (arrow key), VolumeUp, VolumeDown, VolumeMute, MediaPlay, MediaRecord, MediaPause, MediaStop, MediaNext, MediaPrev, MediaFFWD, Camera, Camera Focus, Search, (cursor)Home, (cursor)End, Tab, ESC, BS, Del.
Margin after Push: 0.3s~
– Touch Screen (Calibrate Input is required)
When this control is played, tap designated position.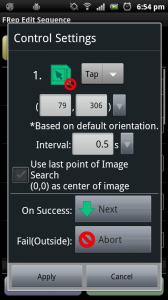
Touch Image From List: select screenshot from operation records in the list
Touch Image From File: select screenshot from png/jpg file*
Edit w/o Image: designate tap position manually
*file must have same size of screen, and need to designate rotation.
Set Touch Point: tap the position or drag green tapping point.
Designate Action Type*: Select from Tap / Long-Tap / Double-Tap / Swipe.
*Long-Tap, Double-Tap and Swipe require Calibrate Input.
(X, Y): coordinate of tap position based on device default orientation.
Interval: 0.04s~ (after Calibrate Input)
Use last point of Image Search: if ON, the last result of Wait Image control will be used to tap found center + (X ,Y) coordinate.
– Type Text (Does not work on Android 12)
When this control is played, type keyboard as designated. Note that to use this control, the target editable area must be activated and designated keys must include IME operation keys such as enter.
Text: texts to be typed. Available characters are limited to ones in keyboard.
– Set Clipboard (do not use on Android 4.3)
When this control is played, clipboard text will be set as designated.
Set Clipboard: texts to be set. All characters are available.
– Take Screenshot
When this control is played, take screenshot and save to designated path.
Select Destination to Save: path to save screenshot.
Prefix: file name prefix. Saved screenshot name will be (Prefix)-(date)-(time).png.
Overwrite (No Date in filename): if ON, date and time will be omitted as (Prefix).png and the file will be overwritten at every take.
Rotation 0° (For later reference): if ON, save screenshot of device-default rotation. The saved file can be used for ![]() [Reference Screenshot Path] of Wait Image control.
[Reference Screenshot Path] of Wait Image control.
Use As-is File (Fast): if ON, save raw file in screenshot process, without rotation or format.
Do Not Save: if ON, screenshot will not be saved. Only for followed Wait Image control of Take Screenshot:OFF.
– Vibrate
When this control is played, vibrate device.
Type: selectable 1 or 2 vibration type.
– Variables, If Statements, Switch Statement
Store the current state to variables, or branch by conditions with them. See here for detail.
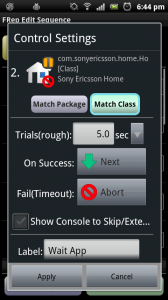 Common Control Settings
Controls have common settings of destination on success/fail, manual skip console availability, and label. Destination will be one of #Sequence No. (go to specific No.), Abort (finish with aborted signal), Next (go to next sequence), Return (finish successfully).
On Success/On Finish: destination when this control finishes successfully. Destination is shown in green icon at bottom left of the item’s icon. Default is Next (Next is not shown as icon).
Fail(Timeout): destination when this control finishes NOT successfully. Destination is shown in red icon at bottom right of the item’s icon. Default is Abort.
For Success or Fail, variables can be set by choosing [Set variable] for each case.
Show Console to Skip/Extend: With the check is ON, console for manual control will be shown within this control processing. See section below for detail.
Label: Shown label for the control.
Popup Menus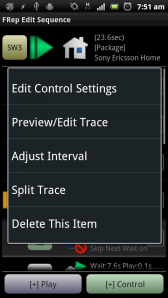
With Use Popup UI in Manage Traces is ON, each tap on listed item will show popup menu for edit / setting / preview / delete the item.
Edit Control Settings: Open Control Settings.
Preview/Edit Trace: Open Edit Trace.
Adjust Interval: Open Adjust Interval.
Split Trace: Open Split Trace.
Copy&Insert This to Checked (when 1 item is checked): Duplicate the tapped item to (before) the checked 1 item.
Copy&Insert Contents to Checked (when tapping collapsed section, 1 item is checked): Duplicate the contents of tapped section to (before) the checked 1 item.
Delete This Item: Remove the item in the list. Note that the deletion will be reflected on app change or Save from menu.
Skipped/Bookmark, Manual Console
By tapping #Sequence No. of item, the item state switches between Active and Skipped. Long tapping will set it to Bookmark.
– Active (default state, no decoration)
Used in playing sequence.
– [Skipped] (gray-out, strike-through No.)
Do not used in playing sequence and skipped to next item. When recorded with Progress recording mode, generated Wait Image controls are all skipped by default.
– [Bookmark] (background arrow)
Mark for edit or target of manual destination in Manual Console below.
To change active/skipped state of multiple items, check items and select Toggle Skip menu.
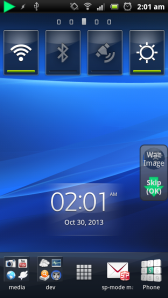
In processing controls with Show Console to Skip/Extend, the another floating console will be shown. It contains 2 buttons to operate current processing control. By this console, the process can be forced to skip as success/fail, or to ignore timeout for extend.
– Upper button: choose operation
Shown the control’s label, and matching image as background if the control is Wait Image. By tapping/flicking upper button, selected operation in lower button will change.
– Lower button: determine operation
By tapping lower button, the current process will be skipped/aborted as shown on the button.
Skip(OK): Force success (initial state)
Skip(NG): Force fail (tapping upper button once)
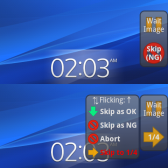 Abort: Force abort this playing (double-tap upper button)
(Bookmarked item): Go to the selected item (flicking upper button)
To extend current control’s timeout: Once tap or flick upper button, the upper button has pause icon which mean the timeout is ignored*. In this state, control continues its process. Note that once it succeed, soon the sequence goes to item designated in On Success:
*To restore to normal timeout, tap upper button again.
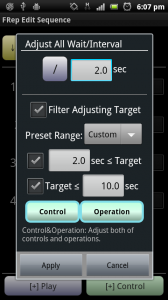 Adjust Interval
To change replay speed with shorten/set/extend the waits/intervals in operations, call from popup (for single item) or menu (for checked items).
(Sign and seconds): Divide(/), Set(=), Add(+), Subtract(-), Multiply(*) the waits/intervals of the target item(s) by the seconds.
Filter Adjusting Target: If checked, open the filter settings below to limit the adjusting waits/intervals. If this is not checked, all adjustable waits and intervals in the item(s) will be set or recalculated.
Preset range: Some presets for following time range filter, Custom (load last settings), >2 sec (adjust only longer than 2 sec), 2-10sec (adjust only between 2 and 10 sec), <2 sec (only shorter than 2 sec), All (no time range filter).
(Lower limit)sec ≤ Target: Lower limit to ignore shorter waits/intervals than designated seconds.
Target ≤ (Upper limit)sec: Upper limit to ignore longer waits/intervals than designated seconds.
Control, Operation: If Control is ON, wait of Wait controls and intervals of Touch/Push Key controls will be adjusted. If Operation is ON, initial wait and intervals in operation records will be adjusted.
Edit Traces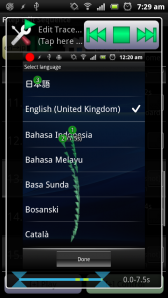
Preview and edit the strokes of the touch-screen trace on the screenshot background. The traces are separated as strokes, and shown in green point and direction triangles.
To edit, select strokes by bottom slider and drag or open submenu to adjust wait/interval, to clip or split strokes. To close and/or save, tap screen or push Back button. Saved trace will be stored separately from the original one, which will be set [Skipped].
– Bottom slider for stroke selection
Slider shows time range of the strokes. By dragging 2 slider tab of start and end, strokes in the range will be selected. Or, by tapping Prev/Fwd button of the top-right console, each stroke can be selected.
Colors in selected range: Each stroke has wait time as cyan, and touching time as green.
– Drag screen to move strokes
To move selected strokes, drag any position in the image.
 – Tap title icon/message to set wait/clip strokes
To open submenu, tap top-left icon or message.
Adjust First Wait: Set only first wait in selected strokes.
Adjust All Waits: Set all waits in selected strokes.
Clip Selected: Keep only selected strokes.
– Top-right 3-buttons of Prev/Clear&Play&Pause/Fwd
Prev/Fwd: select and show previous/forward stroke. When Prev in first or Fwd in last, select whole traces.
Clear(square): Clear drawn traces and reset.
Play(triangle): Start playing preview of selected strokes.
Pause(orange): Pause current playing.
Note: in playing, tapping top-left icon will change the preview speed as 1x, 2x, 3x, 5x and 10x.
Menus
– Save
Save current state. Note that FRep will save on screen change or on sleep.
– Load
Load from last saved.
– Copy checked/Paste (only for Android 4~, requires FRep Unlock Key)
Copy/paste checked items. *Cannot be pasted to other sequences.
– Clip Checked (Clip as Proc)
Store checked items as a Procedure sequence, which can be called by single control: Procedure Call. Note that stored Procedure is listed in Proc tab in Manage Traces.
– Delete Checked
Delete checked items. Note that deletion will be realized on saving.
– Copy&Append
Copy checked items and append them to current sequence.
– Toggle Skip
Change Active/Skip state of checked items.
– Collapse / Expand
Switch the collapse / expand state of all or checked section / loop.
(*For support use, choose this to show all if there are any unexpected hidden items.)
– Clear Checked Label
Set empty the labels of checked items, to omit the popup for them in replay.
– Adjust Wait/Interval
Set/add/subtract wait time of Wait controls and/or initial wait of operation records, intervals between strokes of operation records, in checked items.
– Check All / Uncheck All
Check or Uncheck all items in current tab.
– Inspect If Exportable (Android 4~)
Check if there is item which has too large image data to be exported, and mark the found ones.
– View Last Log (Requires FRep Unlock Key)
Open the log of the item on which last playing finished. See here for details.
[Editor Settings]
– Show Preview Icon
If checked, the icons for operation records will be shown as screenshots for each record.
– Last Matched in Preview
If checked, parts of last matched images in last playing are overlaid in preview.
– Indent Loop / Section
If checked, the items surrounded by Loop or Section controls will be shown with indent.
– Auto section
If checked, the appended record will be surrounded by Section control when the record is a sequence which has some or more items.
– Include .jpg (only for Android 4~)
If checked, the jpg files will be shown in list for screenshot file selection. In addition, the Color Similarity will be used as default settings of Image control.
– Hide Duplication menu (only for Android 4~, requires FRep Unlock Key)
If checked, the menus of Copy&Append, Copy&Insert will be hidden.
– Use Popup Dialog (only for Android 4~)
If checked, the menu or the list shown by tapping will open with dialog type instead of anchored popup type. This switch is applied to Manage Traces, too.
– Use Short Items
Switch for smaller list items. If ON, the listed items will be drawn shorter. This switch is applied to Manage Traces, too.
Tips/Notes
– To suppress popup notification for specific item, set its label as empty.
– In recording with Progress recording mode, try waiting the popup of “Ready to Continue Recording..” at the timing when you want to check screenshot, current app, or orientation before next operation. FRep will generate each control in the record, and you can easily activate/deactivate them by tapping the #No. of the Wait Image or other generated controls.
– If Launch App results in increase the app process, try Clear Task: Top setting. It may occur on apps which have separated activities of launcher and main.
– To create switch ~ case statement by using image match, place Save Screenshot first, and then put Wait Image controls with Take Screenshot:OFF and On Success: destination. If some trial count needed, check them and add Loop Start control.
– To create long sequence, these are useful: Procedure (Clip Checked menu/Procedure Call control), Active/Skipped/Bookmark state, View Last Log menu. Insert Wait control with Show Console to Skip/Extend check at first, then you can choose testing part by manual console. Of course Android’s Developer options | Show touches is very helpful.
– If coordinate with negative value set at Touch control, the value is converted to device size + value. i.e. (-1,-1) will tap bottom right corner of the device.
– Popup UI mode and Delete confirmation switches are common in Manage Traces.
– To refer the screenshot image files in the external SD card, you can switch the storage by several tap of “Up” button which will become “Change” button in the file list dialog.
– In file list, you can switch the ellipsis type by long-tapping the button for sort mode.
