Setup Tool / Record & Replay / Screenshot Image / Rooted Device / Tasker Plugin, Shortcut / Uninstall / Contact
See also: Device Specific Info.
If FRep doesn’t work after FRep Setup Tool, please refer here.
If the replay, FRep or strserv stops irregularly, please refer here.
After updated to Android 9; FRep Setup Tool fails with “error: device not found” message,
FRep requests setup again after sleeping device / the Image or Screenshot controls are too slow.
(To leave FRep open beta program, visit here and click Leave the program.)
Setup Tool
– Location of USB debugging in Android Settings
Open Settings from notification bar or from app list, then find Developer Options. After switching ON the Developer options at the top of screen, the USB debugging in Debugging section can be changed.
In case no Developer Options in Settings screen, open Android Settings -> System -> About device (About phone or About Tablet). Then, tap Build number item 7 times
1. Open Settings from notification bar or from app list, then tap About device (About phone or About tablet).
2. In the device information list, tap Build number item 7 times.
Then, the Developer options are unlocked and shown in the Settings screen.
– The script in setup tool failed with “The system cannot find the path specified.” error
If the setup tool is not extracted from downloaded archive file (zip, tgz), extract it and then restart the script (win.bat/mac.sh/linux.sh).
– The script in setup tool failed with “No such file or directory” error
If you never launched FRep on Android -> Once launch FRep on Android, to write binary for initial setup.
If the setup tool is not extracted from downloaded archive file (zip, tgz), extract it and then restart the script (win.bat/mac.sh/linux.sh).
– The script in setup tool failed with “error: device not found” or “error:no devices/emulators found” message
If the device and PC/Mac connected with cable for only recharging -> Connect with cable bundled with your device (or cable capable of data transfer).
If SD card is occupied by PC/Mac -> Change the connection mode by tapping the notification on Android.
For first connection, Android 4.2.2 or later needs permitting connection from your PC/Mac. See your android device and permit that.
– (Windows only) setup tool still says “error:device not found”
It means the Windows does not recognize your Android with USB debugging state. Please confirm your device driver is available, by starting Device Manager on Windows, and check if there are available your Android device (without warning icon) with “ADB”, “Android Debug” or such. If not, you need to (re)install the driver for USB debugging (driver for developer). You can see the steps and maker’s download site in official site.
– (Windows only) setup tool says “error:device not found” after updated to Android 9 from 8
In case the FRep Setup Tool had worked for Android 8 with USB charging this device (Charge this device) setting, but does not work after updated to Android 9 with No data transfer, please confirm the device driver in Windows Device Manager. (Reported on Xperia XZ premium)
If there is ! marked device when you connected Android 9 device with USB debugging ON, please Update driver for the device, with the driver for USB debugging (developer’s driver) from the maker.
2. On Windows, open Device Manager.
3. Connect the Windows PC and Android 9 by USB cable.
4. On Android, open the notification bar and Tap the notification of USB setting of Android System, then select No data transfer.
If ! marked device emerged at step 4, please Update driver by right clicking the device. You need to prepare the driver for USB debugging (driver for developer) by downloading it from the maker and extract it. (Guide to install driver from file in external site: Windows Central, refer section: Installing a driver from the manufacturer)
NOTE: If the installation failed because no proper drivers found from the downloaded driver from maker, it requires another step. From some reports of Sony Xperia users, the driver may not have proper ID which is used on No data transfer and require force installation of the same driver for the ID. Please refer the followings steps.
1. Switch the USB mode to File transfer on Android, then see the Windows Device Manager and keep the device name for USB debugging, which may have “ADB”, “Android Debug”, or “Sony sa” string.
2. Switch back the USB mode to No data transfer, then start updating driver for ! marked device of USB debugging, in Windows Device manager.
3. Choose “Browse my computer for driver..” -> “Let me pick from a list of available drivers..”.
4. Select the same device name with step 1, and push Next button. 5. if “Update Driver Warning” is shown, choose Yes for force installation.
*If the device does not work after force installation, please uninstall the driver of it in Windows Device Manager.
– The script in setup tool failed with “cat: (path)/app_bin/strserv: Permission denied“
Download and use latest FRep Setup Tool.
– (Windows only) setup tool stops with “←7←[r←[999;999H←[6n←8”
On some devices with custom ROM, the setup script stops because of the difference of the protocol. Please retry with following. 1. download and extract this file. 2. put the extracted win_alt_custom(.bat) to the same place with win(.bat) and win_alt(.bat). 3. double-click win_alt_custom(.bat) to start it.
– There is no available official driver of my Android device for Developers (for USB debugging)
As another driver option, you can try third-party’s one developed by Koush.
– My Mac fails to open mac.sh
Try following steps to start and associate mac.sh with Terminal app.
2. In Choose Application panel, select Application | Utilities | Terminal
3. Check ON “Always Open With”
4. Push “Open” to start setup
In next time, double-clicking mac.sh will start setup.
– (Mac only) setup tool says “[: too many arguments” and “frep_setup_mac_ja: No such file or directory”
The extracted folder has white space (ex. frep_setup_mac 2). Rename it to delete the white space (ex. frep_setup_mac2), then retry.
– Setup tool for Android says “Server Script Started”, but FRep cannot start service
Please check ON “Force Restart” in the menu of FRep Setup, then retry the setup.
Please be aware that FRep Setup Tool does not setup FRep on itself.
– Setup tool for Android says “No Device Detected.” / USB debugging notification does not appear on peripheral Android
The devices are not connected with USB debugging. Please confirm the usage. If your USB port of the host device is Type-C, please be aware that most of Type-C cables do not have OTG (USB host) function so they cannot be connected with USB debugging. We confirmed the operations with SAD-CH01/BK which has OTG (USB host) function. Note that we failed to connect by valid microB host cable + conversion connector of microB->Type-C.
In case it may lacks power supply, see also next article.
– Setup tool for Android continuously starts /
USB debugging notifications appear too often on peripheral Android
The host Android device lacks power supply to connect with USB debugging. If it had worked once, the aged deterioration of the battery or connector of device, or adapter cause the problem. Please check with USB hub with power supply function as below. The direct connection by single OTG cable (such as microB-microB, we confirmed by SU2-MCH10MR) may solve the problem, however, please understand that it depends on rate of deterioration.
[Example of connection including USB hub with power supply function]
Host Android(Setup Tool) – OTG Adapter / Cable – USB hub – Cable – Android
– Starting service crashes the app / floating console does not show up
Please refer the workaround here, related with SYSTEM_ALERT_WINDOW permission of Android 6 or later.
Note: some custom ROM require special settings for the floating app.
– After updating Android OS, setup tool fails!
Since Android system update may reset the USB debugging options, please confirm them. If your device was updated to Android 4.2.2 or later, please confirm the “Allow USB debugging” dialog too, which is shown on Android device when you connect your device to the PC/Mac at the first time.
– The script in setup tool failed with “Permission Denied” message
Retry with win_alt.bat / mac_alt.sh / linux_alt.sh / FrepSetup.apk in latest setup tool for FRep 3.2 or later. They work on Galaxy Note 3(SM-9005, 4.4.2) and Galaxy S5(SC-04F, 4.4.2) which the error occurred with previous versions. If they also fails, please inform us your environment shown in System Info.
You can avoid this error by getting root and installing of SuperSU 1.9~ on your device. Note that you must select “Recheck Rooted State” from menu in FRep after getting root.
– The script in setup tool failed with “more than one device and emulator“
Multiple devices are connected to PC/Mac -> Connect only single device and retry.
Only single device is connected -> Some software may interfere the USB debug connection, please stop or uninstall them. (example 1)
If both of above do not solve the problem, please try the following steps.
Otherwise, you can confirm your device’s serial ID, and designate it to the script, by appending “-s (serial ID)” option to the script starting command.
ex.) win.bat -s b02O52166c6688f
2. Type followings in Command Prompt window.
cd (extracted path of FRep Setup Tool)
bin\adb devices
ex.) c:\> cd c:\Users\user\Downloads\frep_win_ja\frep_setup_win
c:\Users\user\Downloads\frep_win\frep_setup_win> bin\adb devices
The results of the commands will list the “(ID) device” lines.
List of devices attached
b02O52166c6688f device
…
*The ID of the list differs depends on your Android device.
3. Try setup for one of the listed ID by typing;
win -s (single ID from step 2.)
ex.) win -s b02O52166c6688f
2. Find Serial ID(ex: b02O52166c6688f) in the Status dialog.
3. On Windows, right-click win(.bat) in FRep Setup Tool, and choose Create Shortcut in the popup menu.
4. Then, right-click the created shortcut, and choose Properties.
5. At “Target:” in Properties dialog, append option of ” -s (Serial ID)”, then click OK.
example:
Before) C:\Users\user\Downloads\frep_win\frep_setup_win\win.bat
After) C:\Users\user\Downloads\frep_win\frep_setup_win\win.bat -s b02O52166c6688f
6. Double-click the shortcut to execute ID-designated win(.bat).
Note that some devices show different serial ID in Status dialog from needed ID for FRep (and/or adb tool). If this workaround does not solve the problem, try also Workaround 1)
Record & Replay
– On Android 8 or later, FRep does not work after Setup Tool finished successfully.
First, download and use latest FRep Setup Tool to eliminate the issue by version.
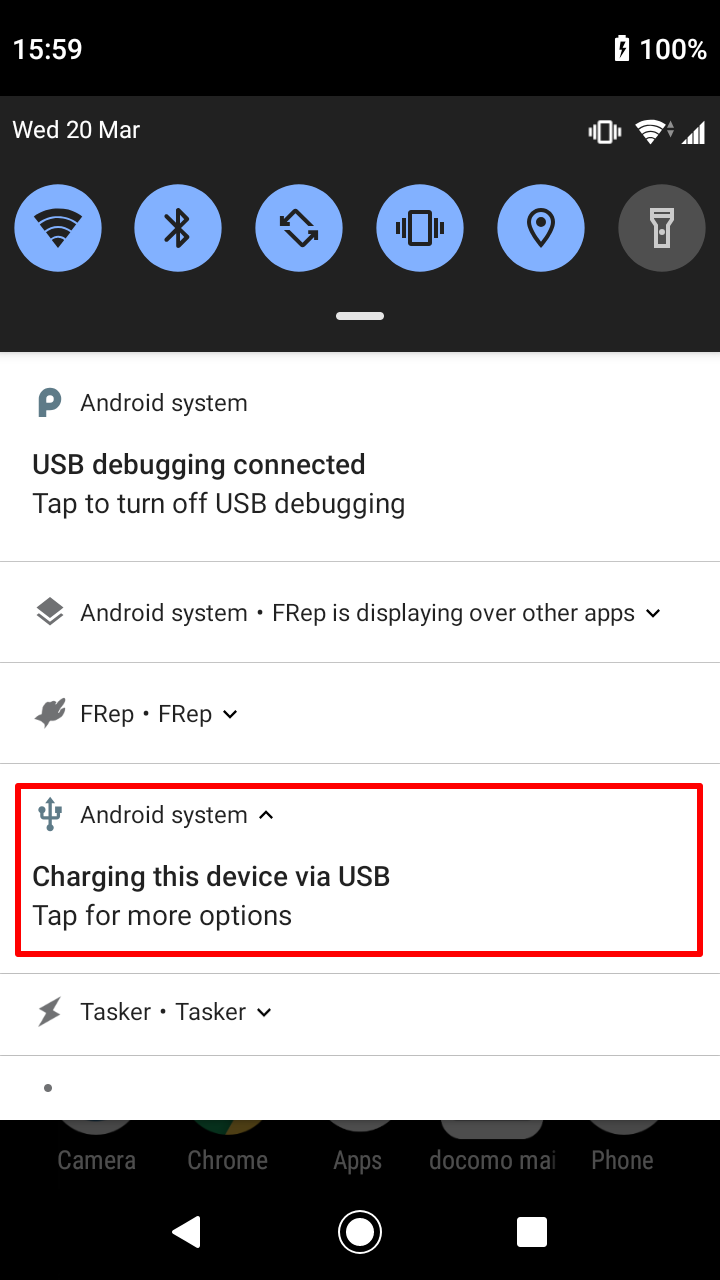
On Android 8~, the setup state by FRep Setup Tool is reset when USB connection mode or USB debugging setting is changed. If the Android device is connected to your PC/Mac/Android with non-standard mode for the device, the setup state is cleared as soon as you disconnect the USB cable. So keep USB connection mode as only charging, and keep USB debugging ON, before and after the FRep Setup Tool. However, depending on the model and manufacturer, it is necessary to use different connection modes and additional settings (described later).
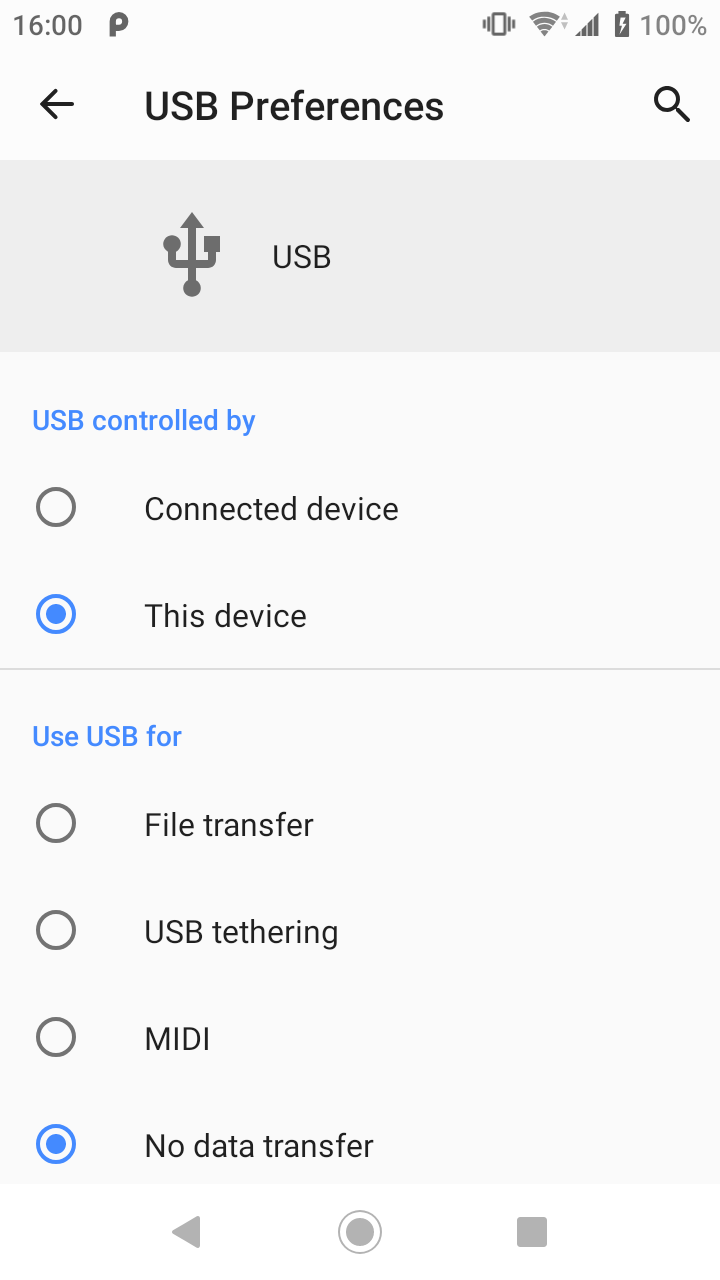
Before using FRep Setup Tool, and after you connected the Android to your PC/Mac/Android, confirm the notification bar has Android System – USB charging this device (Charge this device) [image]. If it has other message such as USB for file/photo transfer, tap it and select Charge this device ([image]), or No data transfer ([image]).
![[image]](http://strai.x0.com/frep/wp-content/uploads/sites/2/2019/03/usb_not_android8.png)
On Android 8~, keep USB debugging ON even after the FRep Setup Tool finishes successfully. The switching off it will immediately clear the setup state, and FRep functions stop.
Some devices have specific configuration about USB debugging by makers. If FRep does not work on your devices with Android 8.0 or later, check the following workarounds by the users (Thanks for reports). If you find other methods, or get results of the workarounds on other devices, we would be pleased if you inform us.
On Android 9~, you can set the default USB connection mode by Android Settings -> Developer options -> Default USB configuration [image]. Try changing it if No data transfer fails, or other mode is required on connection.
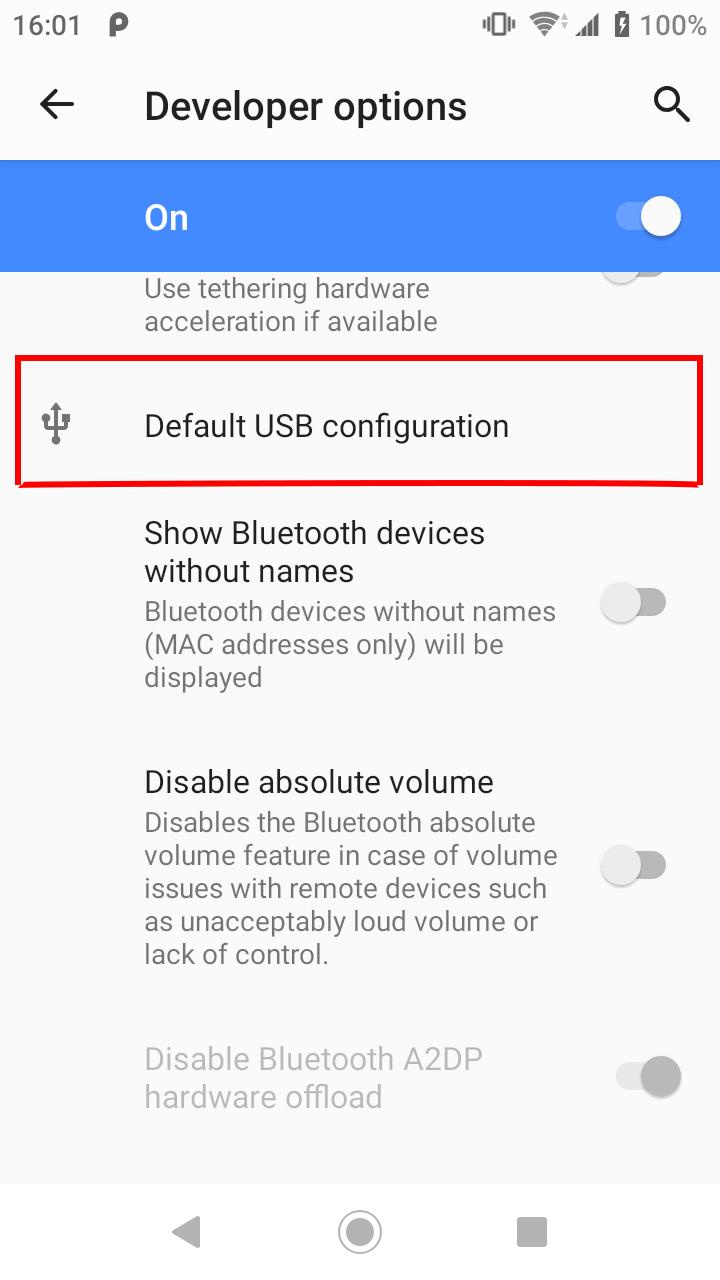
![[image]](http://strai.x0.com/frep/wp-content/uploads/sites/2/2019/03/usb_dev_android9_2.png)
2. Switch the USB connection mode to File transfers (MTP), then start FRep Setup Tool.
*The item name is on Huawei m5. Please check similar item for your device.
2. Connect the Android device with PC/Mac/Android with FRep Setup Tool.
3. Switch the USB connection mode to USB charging this device (Charge this device), then start FRep Setup Tool.
2. Android Settings – (System) – Developer options – Revoke USB debugging authorisations*, then tap OK (or Confirm).
*The item name may differ for devices.
3. Switch ON USB debugging, if it is OFF.
4. Connect the Android device with PC/Mac/Android with FRep Setup Tool.
5. Switch the USB connection mode to File transfers (or other mode which enables USB debugging), then start FRep Setup Tool.
6. On Android, do not touch the panel of authorising PC “Allow USB debugging?”, but with keeping the panel, switch the USB connection mode to USB charging this device (Charge this device). For example, swipe down the notification bar to open the Select USB configuration panel, keeping the authorization panel behind.
7. Push OK of the panel of authorising PC “Allow USB debugging?”.
8. Continue FRep Setup Tool.
9. Try disconnecting USB cable, then check the FRep’s availability.
– After updated to Android 9, FRep requests setup again after sleeping device / the Image or Screenshot controls are too slow.
From some reports, on some devices which Android OS is updated to 9, problems related with USB debugging occur. The reset of USB debugging required to solve them. If you encountered issues after updated to Android 9, please try the following steps.
2. Tap “Revoke USB debugging authorisations” and choose OK.
3. Switch OFF the top of the Developer options and push back key. The Developer options will disappear.
4. Reboot your Android
5. Reactivate the Developer options, by 7 time or such tapping on Build number in About phone (or tablet) of System from Android Settings.
6. Open Developer options again and switch ON USB debugging.
For other case, if you use Windows OS to setup FRep and it does not work with the previous USB connection mode, please refer this section and update the device driver to setup with the previous USB mode. (Reported on Xperia XZ1)
If the Image and/or Screenshot controls are still slow after above, try Screenshot Method: Screen API in Screenshot Settings.
– The replay, FRep Service, or strserv stops irregularly.
If the problem occurs irregularly, it may be caused by battery optimisation setting, which is shown as ‘BatteryOpt’ keyword in FRep System Info. Try setting FRep app in the white list*1 to except FRep to be optimised, and/or switching OFF the device’s global Battery optimisation function*2 (Battery saver, STAMINA mode, Adaptive power saving, or such) of your device.
On Android 8~, open Android Settings -> Apps (and notifications) -> FRep -> Advanced -> Battery -> Battery optimisation. Switch the app list to show all apps, then tap FRep app, and set as Don’t optimise.
On Android 6 and 7, open Android Settings -> Battery. Tap menu icon and choose Battery optimization or such. Switch the app list to show all apps, then tap FRep app, and set as Don’t optimise.
*2: In general, you can confirm it by Android Settings – Battery, and Battery optimisation in its menu. In special cases, it is located in maker specific setting section (for example, Adaptive power saving of Galaxy Tab S4 is in Device care -> Battery -> App Power management -> Power mode).
Only on Android 8.0, there is system internal bug which crashes by the accessibility service, but Google won’t fix it for Android 8.0 because it does not occur on 8.1. We do not have workaround of this issue.
On Android 9 if FRep Service crashes, it may be caused by overlapping popup notifications. Try switching OFF Notify Play Process in Rec/Play Settings.
In some specific situation, the Accessibility service does not recognize the actual app information. If you encountered the problem, please try to switching OFF the FRep’s Keep Screen On in Rec/Play Settings, as a workaround.
If strserv process stops and E icon or message “No reply from strserv” shown on specific situation of Android 7~;
A. on Android 10, try setting of no lock screen in Android Settings. Some devices stop strserv process when they show lock screen (reported on Galaxy S10(+), Xperia 1).
B. on Android 9, see this article first.
C. try switching On detecting unknown access in System Settings to Ignore or Shutdown. It will avoid strserv process shutdown by unknown access from other apps. If it does not solve the problem, switch it back to Shutdown (default).
2. Start FRep Setup Tool, and confirm “Server Started.” message.
3. Keep USB connection, and do not close the Window nor stop the script of FRep Setup Tool.
4. On Android device, launch FRep app and try operations.
5. If FRep stops with error of stopping strserv process (E icon in notification bar, or message of “No reply from strserv”), check the FRep Setup Tool’s message after “Server Started.” in PC or Mac.
If “invalid connection detected.” message is shown in FRep Setup Tool, other app, or device in same network accessed to the strserv process. Please specify the app or device, and/or switch On detecting unknown access in System Settings of FRep Options as workaround.
– FRep does not recognize current App. / The notification keeps “FRep Protected” on any Apps.
On Android 5.1.1~ or on Android 5.0.x of some devices, activating FRep Accessibility Service is required. Please switching ON it in Accessibility of Android Settings. Note that the FRep’s Current App Detection in System Settings must be Auto for Android 5.1.1~ or Only Package (Accessibility) for some devices with Android 5.0.x.
If the message when tapping the “FRep Protected” notification is only “FRep is Restricted for this App.” and no @(packagename) description, please try; 1. Once switch OFF FRep Accessibility Service in Accessibility of Android Settings. 2. Then, switch it ON again. It will fix the problem which caused by forced shutdown of FRep Service, such as memory shortage or app update on some environment.
If switching FRep Accessibility Service does not solve the issue, please reboot Android. Or, try Current App Detection: (Usage / with delay). From users of Galaxy series with Android 8 and 9, it is reported that the setting solved the problems about app detection.
If you find mismatch of current App. detection, please inform the support about the missed App., the message shown by tapping FRep Protected notification, and FRep System Info.
– On Android 6 or later, FRep console does not appear / crashes on starting service.
Open the Apps in Android Settings, and tap the gear icon at the top right corner, then select Draw over other apps (in Special access). Confirm “Yes” for FRep in the app list. If it is “No”, tap FRep in the list and switch ON the Permit drawing over other apps.
– How to cancel recording?
Tap the notification to cancel recording, instead of pushing power button.
– “Till Gap”/”Progress” recording mode does not finish/separate after designated seconds
Please check OFF “Detect Keep Pushing” in Options.
– How to record on Fullscreen app?
Before starting the fullscreen app, tap the FRep notification to show FRep floating console. Manually shown console will not be hidden.
Note that if console is already shown before starting fullscreen app, tap twice to hide and show console, to show console manually.
– After Android 4.4 update, FRep fails to play sequences, export data
Android 4.4 prohibit writing file at arbitrary path in SD cards. (ref.) So all output files for Database, Screenshot, exporting data should be written in /sdcard/data/com.x0.strai.frep/files/. Check followings and try the workarounds. (Feedback will be welcomed)
1. “Options -> System Settings -> Storage” is NOT “SD Card/strai”.
If it is, copy the files in /sdcad/strai/ to /sdcard/data/com.x0.strai.frep/files/, then change the option to “SD Card (App Storage)”.
2. Test playing after “Options -> System Settings -> Save Screenshot” is OFF.
3. If it is successful, set the path for Take Screenshot to /sdcard/data/com.x0.strai.frep/files/, then check ON the “Save Screenshot” and retry the test.
– How to copy whole record(sequence, procedure)?
As for operation record or sequence, open Manage Trace screen and then tap [+] Create Seq. button and select source one.
As for procedure, tap source one in Manage Trace screen and open Edit Sequence, then Check All in the menu and Clip Checked to duplicate the procedure as new one.
– Shortcut opens FRep app instead of starting replay
It occurs on some Android environments, when FRep app remains in the task. Please close the FRep app before you trigger the shortcuts, by pushing Back key at FRep app. If this does not solve the problem, please inform us.
– The replay interrupted without touching
Please try changing the Replay Settings as Uninterrupt for the record in Manage Traces screen. To set the Uninterrupt as default setting, check Off the “Default Interruption” in Options – Rec/Play Settings. If this does not solve the problem, please retry recording.
If the interruption occurs at Image (Wait Image) control, please try to add Wait control with 0.5 s before the Image control.
If the interruption occurs after addition of Loop or set Repeat, please try to add Wait control at the first or last position in the Loop or the sequence.
The screenshot of “System Info” in FRep app will be welcomed to fix the problem.
– FRep replays incorrectly
Please check the preview of the recorded operations from Manage Traces, by tapping the app icon of the record. Also, you can view actual replaying finger operation by Android’s Setting -> Developer options -> Show touches (Android ~9) or Pointer location (Android 10~). Basically FRep record/replay as it is, so please concern the variable delay time from CPU load or network speed, in recording operations. You can use Wait Image control to confirm the app phase, see here.
– Why FRep is protected in specific app?
To avoid problem, FRep do not work in FRep app, Call screen and Google Play app. You can check OFF “Safety App Lock” in Options to enable FRep in Call screen and Google Play app.
And unchecked apps in “Restrict App” screen will restrict FRep too. If FRep is restricted in other app, please inform us about the app name, and (class)@(package) info which is shown by tapping “FRep protected” notification.
– My Android does not respond after replay / interruption!
On some environment, the touching state remains after replay or interruption. Please try setting Clean up touch signals: Reassign all slots (or Reassign all slots on interruption) in System Settings of Options. If the problem is not solved, see also: Device Specific Info. If you found similar problem, please inform us with the screenshots of System Info and the preview of the record.
– Error occurs on copy the text or others
Current Android 4.3 has a bug on copy to clipboard. There is no workaround code, i.e. app developers cannot fix it. So please avoid to use the copy / paste function before the Android 4.3 is updated.
– How to trigger to play the record/sequence of FRep?
Please use a kind of triggering app. The record/sequence of FRep can be triggered by shortcut. If FRep is unlocked, they can also be triggered as Tasker/Locale plugin. Note that triggering the record/sequence does NOT need rooted device, but needs the FRep service already started.
Screenshot Image, Wait Image
– How to set faster Wait Image?
Screenshot Method: BMP in Screenshot Settings in Options will take faster screenshot.
Cancel Popup on Playing: None in Rec/Play Settings in Options will take screenshot even if the popup notification is showing. Please be careful that the notification may intersect with the target area. You can change the position of the popup notification by Position of Popup in the System Settings.
Or, Notify Play Process: OFF in Rec/Play Settings in Options will skip all automatic notification in playing. To show popup manually, you can add Variable control with setting the message content into single variable (for example of elapsed ms; var=num:@now – @start), and Show Popup with the variable (such as toast:var).
The speed of Wait Image control depends on the amount of calculation. Generally, Exact Match < Match Pixels Rate < Color Similarity; as for search method, Search(Exact) < Search(Similarity). However, the methods of Exact or Pixels Rate are not effective for recent devices or apps, because the subtle difference exists by the app’s drawing method / engine, even if you look the 2 images are same.
For faster matching calculation of Exact Match, Match Pixels Rate, and Color Similarity, set smaller matching area rectangle, and/or mask unnecessary area for distinguishing the images.
For faster matching calculation of Search(Exact), and Search(Similarity), set targeting area from the right-side button of Search method, to filter the unnecessary area (where no possibility the searching image appears). Please be careful that the masking of source image not necessary reduce the amount of calculation, because the candidates of matching area basically increases (by the method of characteristic points) though the cost of each matching with the candidate decreases.
– There is no Screenshot for the record, despite Save Screenshot is ON!
Since taking screenshot requires a few seconds (depends on the screen resolution and CPU load or such), early finish by Power push may result in imageless record. Try to finish recording after several seconds from “first operation”, when FRep start taking screenshot. Note that FRep automatically eliminate the interval time between last operation and power push or other finishing event.
From some reports, taking screenshot fails with default settings on some environment. Please try some related options in Screenshot Settings; Temporary Directory, Screenshot method.
– Screenshot files are not shown in the list of From file
FRep recognizes the screenshot files which have the same size with the device’s screen and png/bmp format. If your device saves the screenshots as jpg(jpeg) format, please try one of following workarounds.
If your device has settings about the file type of the screenshot, switch it to png or bmp format and retake the screenshots.
On Android 4 or later, switch the Include .jpg of the menu in Edit Sequence screen, to show jpg(jpeg) files in screenshot file list. Please be aware that jpg(jpeg) based Image control cannot match with Exact Match or such method, so use Similarity methods instead.
With FRep Unlock Key installed, and on Android 4 or later, you can take screenshot from FRep’s console. Screenshot Button setting of Console Settings in Options will show Shot button, which will save screenshot with current app package name in Pictures folder.
– Wait Image with Search(Similarity) takes too long time
For featureless image to be matched, such as small image, Search(Similarity) method calculates the pixel-based similarity for each candidates in screenshot. It is obviously takes longer time than one for image which has enough feature, because the amount of calculation is very different. To trim down the amount, try either of followings.
Set Search Area, if the location of the target image can be limited roughly.
Set higher threshold %, if you can determine it by testing other screenshots or result of actual replay.
Enlarge the Image Match Area to contain features, such as edge or pattern.
On FRep 4.93, the problem of endless calculation for Search(Similarity) of featureless image is fixed. If you encountered the endless calculation issue, please inform support with the screenshot when it occurs, and the settings of Wait Image control.
– Wait Image fails, in same situation / screen
First, check OFF the Match by All Bits of Screenshot Settings in Options and retry. If it does not solve the problem, try to switch the Image Matching mode from Exact Match to Color Similarity and set > 99% threshold. If it still fails, check your device has power-saving mode and set to OFF if it exists.
On high resolution screen devices such as Xperia Premium series, from many reports, the pixel size differs between the actual screen resolution for most apps (1080×1920) and the screenshot you take manually (2160×3840). Please retry creating the Image control after resizing the screenshot file. Or, if you have the settings about the resolution, please set it to lock the screen resolution.
Note that the screenshots which are taken in FRep’s recording and used for preview or such, have the size of actual screen resolution for the app. You can choose them for Image control by selecting From List on creating Image control. Or, if you have installed FRep Unlock Key, you can take screenshot by FRep manually with Screenshot button.
– Why Progress mode registers hole-shape Wait Image?
Try to Off the Android’s Settings | Developer options | Show touches. When it is On, screenshot contains white circle of the touch point. So FRep automatically mask the white circle and resulting Image Match control has hole-shape.
Rooted Device
– On Rooted mode, FRep does not start service!
First, check the title of app has ‘FRep (Root)’, which means Rooted mode is set. If it is not shown, choose ‘Recheck Rooted State‘ in menu of FRep front app.
Second, on Rooted mode, you can select starting method by ‘Recheck Rooted State‘.
– Does my rooted device need setup?
Check 2 points for self-startup by rooted device. 1: Confirm your root management app do not inhibit su of FRep. 2: In FRep MAIN MENU, push & open menu key to select “Recheck Rooted State“, which will attempt to switch the FRep setup mode for rooted device.
Note 1: first startup may take time, in some ROM/root management app.
Note 2: root management app may reset su settings for FRep by updating FRep app.
Sorry for inconvenience, some rooted device / rom cannot boot FRep service by itself. Please use setup tool or execute setup.sh from su shell to boot, until the fix.
– Can my rooted device start FRep service automatically?
Check ON “Start on Boot (Rooted)” in Options.
– Image / Take Screenshot control fails with Rooted mode.
First, try switching Temporary Directory in Screenshot Settings. If it does not solve the problem, check the settings of Use As-Is UID, Storage in System Settings. (Thanks for report)
– FRep console does not show up by tapping notification!
If your custom ROM has settings about popup window or overlay apps, please check them. As for MIUI, try Setting > Apps > FRep > Show Pop up windows. (Thanks for report)
Tasker Plugin, Shortcut
– How to use FRep plugin in Tasker?
To register the triggering FRep playing in Tasks in Tasker, please try followings.
2. Launch Tasker, and tap “+” to create/tap task item to edit in the Tasks tab, which will be started from the Profile.
3. In Task Edit, Tap “+” to add Action.
4. In Select Action Category, tap Plugin, and then tap FRep shortcut.
5. In Action Edit, tap top-right Edit button (or shown by pen icon).
6. Choose FRep record prepared in Step 1.
7. Push back button to return to Task Edit. Confirm your Task has FRep shortcut with chosen record label.
8. Now you can trigger the Task from any Profile in Tasker.
– FRep Shortcut is not registered by other app, on Android 8 or later
Try with checking OFF Shortcut for home app, at the top in FRep shortcut screen.
– Sometimes FRep plugin does not start playing
On Android 8 environment, the reception timing of signal (Intent) for starting Tasker plugin, seems to be delayed by some seconds or more. In such case the replay may fail, for example from report, the task of “1. screen ON and 2. FRep plugin” items, sometimes the screen ON delayed and FRep plugin is called on screen OFF state, then FRep fails to start replaying.
If you encounter the similar case, and your Task in Tasker has other item(s) before FRep plugin, try followings as a workaround. 1. Set the timeout 10 seconds of the item before FRep plugin. (to wait the execution delay) 2. Put the Task – Wait item with 10 seconds between the FRep plugin and the item before it. (to avoid inverted calling)
If the other item before FRep plugin can be executed twice, such as screen ON, it is reported that the Task becomes more stable with; 1. Plugin – screen ON with timeout: 5sec, 2. plugin – screen ON with timeout: 5sec, 3. Task – Wait with 10 sec, 4. Plugin – FRep Shortcut with replaying record.
– How to use FRep Event plugin in Tasker?
To register the detection of FRep finish playing in Profiles in Tasker, please try followings. Event plugin is available only on Tasker 4.3 or later.
When the event is detected, the temporal variables of Tasker will be set. %frepsuccess will be 1 for successful finish, or 0 for fail/interrupted replay. %frep0~%frep4 will be set from FRep’s variables of frep0~frep4. They can be referred in the Tasks triggered by the Profiles with FRep Event plugin.
2. Launch Tasker, and tap “+” to add profile item to edit in the Profiles tab.
3. Select “Event”, tap “Plugin”, and then tap “FRep”.
4. In Event Edit, tap top-right Edit button (or shown by pen icon).
5. Choose FRep record prepared in Step 1.
6. Push back button to return to Profiles.
7. In Enter Task, select task to trigger when the FRep replay finished.
Uninstall
– How to delete the binary and related files?
Uninstallation will erase all binary and related files. See also the following about strserv process.
– Strserv process remains after uninstallation
Since strserv starts with shell (for debug) authority, it remains after all files removed (even if strserv itself deleted). To terminate it, simply reboot Android or kill the process from adb commands of “adb shell ps strserv” to check PID# and “adb shell kill [PID#]”.
Contact/Inquiry
Please mail to support[at]strai.x0.com, if troubleshooting does not solve the problem. For setup error, please attach the error messages and your device name. For other error, the error messages and the contents of ‘Copy support info’ in the menu of FRep System Info will help our support.
Please feel free to inquire about enterprise use, such as volume licenses, support for automation/simplification.