Console Settings / Rec/Play Settings / Screenshot Settings / System Settings
General settings about UI (Console, Notification), Recording/Playing and Environment.
↓
Settings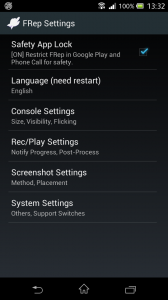
– Safety App Lock [System Environment]
To avoid problems, FRep restricts itself on Google Play and Phone Call screen: default is ON (restrict).
It requires FRep Unlock Key to OFF this option and record/replay on them.
– Language [UI]
Language settings within the app. To reflect this setting, restarting of Service and app is required.
– Console Settings
– Rec/Play Settings
– Screenshot Settings
– System Settings
↓
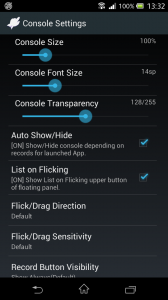 Console Settings
– Console Size 10~500%
Adjustable console panel size: default is 100% as a button size equals standard icon size.
– Console Font Size 2~48sp
Adjustable console text size: default is 14sp.
– Console Transparency 0(Opaque)~255(Transparent)
Adjustable visibility of below layer: default is 128 (half).
– Auto Show/Hide
Show console on app for which FRep has record, hide console for app of non record: default is ON (auto).
If this is OFF, console must be switched manually by tapping notification.
– List on Flicking
Show available records list by flicking upper button of console: default is ON (show).
– Flick/Drag Direction *Only for Android 4~
Direction of shift of record selection when flick/drag the upper button of the console: Default is Default (Start dragging sideways:↓/forward, vertically:↑/backward)
Default: With start dragging sideways, the selection will move to ↓/forward according to distance. It will move to ↑/backward when start dragging vertically.
Reverse: With start dragging sideways, the selection will move to ↑/backward according to distance. It will move to ↓/forward when start dragging vertically.
Always Forward: The selection will move to ↓/forward according to distance.
Always Backward: The selection will move to ↑/backward according to distance.
– Flick/Drag Sensitivity Lowest(dull)~Highest(very sensitive)
Distance to detect flick/drag operation for console operations: Default is Default (length of standard icon side)
For large screen device, higher option may useful to choose record/drag console.
– Record Button Visibility
When the record(Rec) button shows: default is Show Always
Default, Show Always: Rec item for record is always selectable.
Show Only on Main Console: Rec item is selectable only on Main console.
Hide when playable item exists: Rec item is selectable only when no playable items exist for Main console.
– Screenshot Button (Need Unlock Key) *Only for Android 4~
Show button for screenshot(Shot) in main console: Default is None (Do not show)
By using this button, FRep will take screenshot by FRep’s method to save as PNG (or BMP as the screenshot method), for Image control or such. The file name will be set as current app.
None: (default) Do not show the button.
PNG, Notify on success: Show Shot button which will save PNG file and notify popup.
As-is, Notify on success: Show Shot button which will save the as-is file for the screenshot method and notify popup.
PNG: Show Shot button which will save PNG file.
As-is: Show Shot button which will save the as-is file for the screenshot method.
– Use key console
Show virtual key console in another page, which is switchable by double-tapping upper button: default is ON (use).
↓
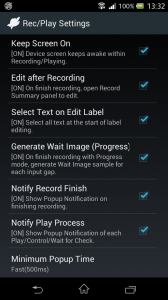 Rec/Play Settings
– Keep Screen On [Recording/Playing]
Device screen keeps awake within recording/playing: default is ON (keep).
If this is OFF, long gap (no input term) will make screen off by system.
– Edit after Recording [Recording]
FRep Record Summary panel will be shown after recording finished: default is ON (show).
– Select Text on Edit Label [Recording]
Select all text when text box of label pushed, in FRep Record Summary and some panels: default is ON for Android ~6, OFF for Android 7~.
*Set this OFF when ANR (App Not Responding) occurs after the recording or the editing label.
– Generate Wait Image (Progress) [Recording]
After recording in Progress mode, Wait Image controls are added at the input gap: default is ON (add).
*The target images are based on the the touched position at the taken screenshots, and the controls are set as skipped state.
– Notify Record Finish [UI/Notification]
Show recording finish, separation in Progress recording mode by popup: default is ON (show).
– Notify Play Process [UI/Notification]
Show playing start/finish, process of sequence by popup: default is ON (show).
– Minimum Popup Time [UI/Notification] 200ms~1000ms
Minimum popup term for continuous Notify Play Process: default is 500ms.
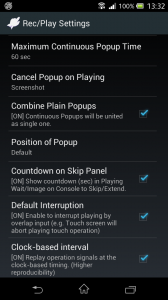 – Maximum Continuous Popup Time [UI/Notification] 4sec~60sec
Minimum popup term for continuous Notify Play Process: default is 60sec or 4sec (Android 7.1~).
*On Android 7.1, longer time will hide continuous popups.
– Cancel Popup on Playing [UI/Notification]
When specified controls are played, the showing and pending notifications are cancelled: default is Screenshot.
When this option cancels notification, the controls will be played after 500ms wait.
None (Keep Showing): Do not cancel popup.
Screenshot: (default) Cancel popup before taking screenshot*.
Touch control: Cancel popup before touch control.
Screenshot & Touch: Cancel popup before taking screenshot* or touch control.
*Includes Wait Image control’s taking screenshot.
– Combine Plain Popups [UI/Notification]
Show single unified popup for continuous notification: Default is ON (combine).
If this option is ON, successful (or just finishing) notifications are shown as combined one, but failure (timeout) notifications are shown individually. For 3 or more notifications, the combined notification has only first and last messages, omitting the middle ones.
If this option is OFF, all notifications are shown individually.
– Position of Popup [UI/Notification]
Position of popup notification in screen: default is Default.
– Countdown on Skip Panel [Playing]
In playing Wait/Wait Image control, show rest seconds to timeout on console: default is ON (show countdown)
*Wait Image will update the seconds by each image matching process.
– Default Interruption [Recording/Playing]
Set interruption settings for new records: default is ON.
If interruption settings is ON, overlapping input in playing the record will stop the playing.
– Clock-based interval [Playing]
Play the operation records at the clock-based timing: default is ON.
To use timing based on intervals of the operations (method of previous version for FRep ~3.94), switch this option to OFF.
– Log Only Last Error [Playing/Log] (Requires Unlock Key)
After playing the edited sequence, store/overwrite the log only when the playing is aborted by error or interruption: default is ON.
To get log for successful play, switch this option to OFF. Note that in either case, FRep will keep single log for each record.
– Log Last Matched Image [Playing/Log]
Store the matched part of the image for Wait Image control: default is OFF.
If this option is ON, the matched images will be stored in external storage, to see them in preview in Edit Sequence. The images will be deleted when start playing with this option is OFF, or without Unlock Key. With Unlock Key, the images for other record are stored up to ~25MB.
– Action when Playing Ends [UI/Notification]
Selectable notification when playing finishes: default is Silent (no notification).
Other options: Vibrate, Notification Sound (System default), and Both (vibration and sound).
– Notification Icon [UI/Notification]
Selectable notification icon at notification bar: default is Default, Show Rest Repeat No.
Default, Show Rest Repeat No.: Show FRep icon on stay, Show rest repeat No. in playing.
Show Plain icons: Show FRep icon on stay, Show simple playing triangle in playing.
Transparent in Playing*: Show FRep icon on stay, transparent icon in playing.
Transparent in Staying*: Transparent icon on stay, Show rest repeat No. in playing.
Transparent in Play/Stay*: Transparent icon on stay, transparent icon in playing.
*To apply these options, installation of unlock key needed.
– Display after Shortcut [UI/Console]
Show/Hide console after playing by shortcut or Tasker plugin: default is Auto.
Default, Auto: Show console if there is any playable record.
Hide console: Hide console regardless of playable records.
Show console: Show console regardless of playable records.
*Individual setting for each shortcut/Tasker plugin will override this setting.
↓
Screenshot Settings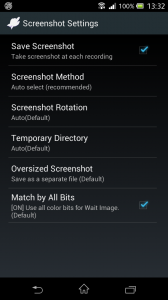
– Save Screenshot [Recording]
Take screenshot at each recording start: default is ON (take and save).
To decrease the size of record data, or when FRep fails take screenshot on Android 2.3.x, OFF this option.
– Screenshot Method [Recording/Playing]
Selectable screenshot method: default is Auto select (recommended).
BMP will take screenshots faster, and the screenshots will be compressed when you open the Manage Traces.
If the screenshot of Android 2.3.x has RGB exchanged color, choose Read FB(Reversed).
Screen API (Android 5~) will use Android’s capture API, which will request and prepare before starting recording / replaying, so it will take time before starting. See also Screen API Settings.
To save screenshot as file, choose options with (save as file), but note that the screenshot files cannot be included to exported file.
– Screenshot Rotation [Recording/Playing]
Rotation process after taking screenshot: default is Auto (recommended).
For only devices which FRep’s screenshots’ rotations in preview, Take Screenshot control, and Image control are incorrect by default settings.
– Temporary Directory [Recording/Playing]
Location for taking screenshot: default is Auto (recommended).
(Storage)/(App folder) will save the taken screenshot in App storage, for only devices which fail to take screenshot by default settings.
– Oversized Screenshot [System Environment]
Method to save screenshot data > 1.5Mbytes: default is Save as a separate file
Save as a separate file: Save the screenshot file.
Minify and store in database: Scale down the screenshot to 1/n scale to fit into the size limit.
Both: Save both of above.
*The large screenshot files cannot be exported. When they are included when you choose Export Db in Manage Traces screen, FRep will show warning panel. As for the preview images, tapping Add Minified Preview Image(s) in the panel will be appended the minified data which required for exporting.
– Match by All Bits [Playing]
Use 24 bit RGB color for Image Match evaluation: default is ON (use 8 bit for each R,G,B).
When lower bits do not match between screenshots in the same situation (on specific device such as Galaxy Tab 2), OFF this option to use only 15 bit (ignore lower 3 bit for each R,G,B).
[Screen API Settings] (Android 5~)
Advanced settings for Screenshot Method: Screen API.
In case the screenshot fails: The built-in encoder and/or decoder of your Android device may fail. First, switch ON Keep Cache Video and check the saved video file. If the video file is broken, retry after setting Screenshot on Recording: 1/1 video. If the video file can be played without problems, try switching ON Retrieve Sync Frame.
In case the screenshot timing is off: Adjust Frame Rate and Adjust Frame Pickup.
– Screenshot on Recording [Recording]
Record screen video on recording: Default is 1/2 video
Extract screenshot from video at the touched time.
None: Do not record or register screenshot on recording.
1/1 video: Record video of same screen size and register screenshot.
1/2~1/8 video: Record video of 1/n width and height screen size and register screenshot.
– Adjust video size [Recording]
Adjust data size for video encoding codec: Default is 16px
The input data size for each line of screen (depending on the orientation of the device) will be adjusted to a multiple of the specified px. If the preview image of the record operation by FRep is abnormal (slanted, out of color, etc.), try changing it.
None: Do not adjust.
4~32px: Adjust each line of screen data pixels to a multiple of the specified px.
– Frame Rate [Recording]
Frame per second of video on recording: Default is 4FPS
The number of image frames per second in video. However, on highly-loaded state, it may be under the set value.
– Bitrate Weighting Factor [Recording]
The weighting factor for bitrate of video: Default is 1.5
Higher bitrate will make higher image quality. Actual bitrate is calculated by width x height x factor. The width and height values depend on Screenshot on Recording.
– Keyframe Interval [Recording]
The interval seconds between the keyframes of video: Default is 4 sec
Keyframe has whole single image data, so the interval effects the quality and the video file size. Do not choose None, because it will generate very large size video file even with short time, it is only for support use.
– Adjust Frame Pickup [Recording]
The adjustment time when extract screenshot from video: Default is 100ms
The value to determine the timing of extraction frame as screenshot, from the video. The larger value will get more past frame from touched time.
– Keep Cache Video [Recording]
Keep video files after recording: Default is OFF
If this option is ON, the mp4 video files are not deleted in the app cache folder such as; (Storage)/Android/data/com.x0.strai.frep/cache/
– Retrieve Sync Frame [Recording]
Request SYNC frame when extracting frame from video: Default is OFF
If this option is ON, request Sync frame. It depends on the built-in decoder of Android device.
– BGR-type Screen [Recording/Replaying]
Convert screen buffer as BGR type: Default is OFF
If this option is ON, calculate screen buffer as BGR instead of RGB. Switch this option when the resulting image’s red and blue elements are reversed.
↓
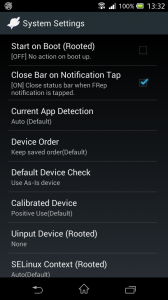 System Settings
For screenshot related options on Android 2.3~3, refer previous section of Screenshot Settings.
– Start on Boot (Rooted) [System Environment]
If the device is rooted, FRep Service will start on the device boot: default is OFF.
Since FRep Service need the setup, non-rooted device cannot start automatically.
– Close Bar on Notification Tap [UI/Console]
Automatically close status bar of Android when the FRep’s notification or button on notification is tapped: default is ON (close on tap).
– Current App Detection [System Environment]
The method of current App. detection: default is Auto.
The options depend on Android version.
Auto: Only Package (Accessibility) for Android 5.1.1 or later, Only Package (Android 5) for Android 5.0~5.1, Package and Class for before Android 5.0.
Only Package (Accessibility): Requires switching ON the FRep Accessibility Service in Accessibility of Android Settings. FRep will get the package information of current App from the accessibility service.
(Usage / with Delay): Requires permitting Usage access in Android Settings. FRep will get the package information of current App from Usage by Android OS. Note that the detection will be delayed because of the update timing of Usage.
Only Package (Android 5): FRep recognizes only package information of current App.
Package and Class: FRep recognizes the package and class information of current App.
– Device Order [Recording/Playing]
Designate device id for recording / playing: default is Keep saved order.
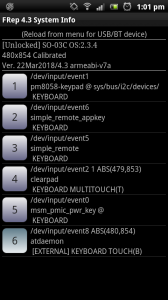
If problem occurs, please edit or initialize the device ids in System Info screen, or choose Use native order.
Use native order: Use native device order as id, instead of the stored order.
Keep saved order: Use stored order which saved at the first launch, or edited in System Info screen.
– Default Device Check [Playing]
Check device capacity before playing with default replay setting: default is Use As-Is device.
For Android which has replaceable device ids, Reallocate device is recommended.
Use As-Is device: Do not check device capacity, use recorded id to replay.
Reallocate device: Check device capacity before replay, and reallocate device id to replay.
– Calibrated Device [Playing]
Use the information by Calibrate Input: default is Positive Use.
Do not use: Never use calibrated information. With this option, some touching actions by controls are unavailable.
Positive Use: Use calibrated information for touching actions by controls designated in Edit Sequence, in priority to Uinput or adb input.
Passive Use: Use calibrated information for touching actions by controls only when the information is necessary. Uinput or adb input will be preferred.
– Uinput Device (Rooted) [Playing]
Create and use uinput virtual mouse for Tap center on Success of Image Match control, or Touch control designated in Edit Sequence*: default is Rapid Cursor. (If non-rooted, this option will be ignored)
If the cursor does not tap the designated position, try Slow Cursor instead. None will off the virtual mouse function.
*Note that when tapping by the virtual mouse, cursor will be appeared on the screen.
– SELinux Context (Rooted) [System Environment]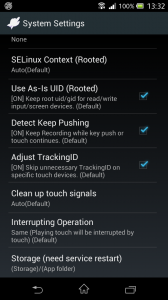
Only when the device with Android 4.3~, SuperSU 2.0~ is rooted and scrrenshot / key input do not work, try switching this option: default is Auto.
– Use As-Is UID (Rooted) [Recording/Playing]
Only when the device is rooted and FRep do not work, try to check OFF this option: default is ON (use as-is UID).
Normally rooted device can read/write and call debug commands by superuser (su) with this option is ON (default). There are some specific stock ROMs which kernels are altered as superuser cannot read/write input/screen devices.
– Detect Keep Pushing [Recording/Playing]
Keep recording while key push or touch continues: default is ON (keep).
Only when the device cannot detect gap, try to check Off this.
– Adjust TrackingID [Playing]
Adjust the signal when multiple TrackingIDs are assigned for single slot: default is ON (Adjust).
– Clean up touch signals [Playing]
The method to clean up touch signals after replaying touch operation: default is Auto.
Only when the touch remains after finishing/interrupted replay, try to set Reassign all slots.
Auto: Use default option for current app version.
Reset only used slots: Put touch up signals for only used touch slots.
Reset all slots: Put touch up signals for all touch slots.
Reassign only used slots: Put assign and up signals for only used touch slots.
Reassign all slots: Put assign and up signals for all touch slots.
Reassign used slots on interruption: Only when the replay is interrupted, put assign and up signals for only used touch slots. On normal replay finish, same with Reset only used slots.
Reassign all slots on interruption: Only when the replay is interrupted, put assign and up signals for all touch slots. On normal replay finish, same with Reset only used slots.
– Interrupting Operation [Playing]
The input type detected as interruption in playing operation record: default is Same (Playing touch will be interrupted by touch)
By setting as Any, any input operation in playing will be detected as interruption.
*On non-rooted Android 10~, this option is ignored.
– Screen Resolution Check [Playing]
Update screen resolution in playing operation record: default is Auto
(For environments where the screen resolution changes depending on the application)
Auto: Use default option for current app version and environment.
Never(Fixed): Do not update screen resolution info in playing.
On App Change: Check and update screen resolution info when current app is changed.
– On detecting unknown access [System Environment]
Behavior when strserv process receives invalid access from other app or machine (Android 7~): default is Shutdown.
Try switching this option only when strserv process shutdown.
Shutdown: the strserv process will shutdown (requires setup again) when any invalid access is detected.
Ignore or Shutdown: the strserv process keep running if the invalid access is ignorable. Or, the strserv process will shutdown (requires setup again) if the invalid access is not ignorable.
Ignore All: the strserv process keep running even when any invalid access is detected. (Not recommended)
– Log fatal error [System Environment]
Store internal error for support issues which does not show Android’s Report dialog: default is Trace
Trace: Watch internal error in FRep app, and store the last error for Copy support info in FRep System Info screen.
Ignore: Does not watch internal error.
– Storage [System Environment]
Physical location to save records: Default is (Storage)/(App folder).
(Storage)/(App folder): the data files will be saved at /sdcard/Android/data/com.x0.strai.frep/ or /storage/emulated/0/Android/data/com.x0.strai.frep/
(Storage)/strai: the data files will be saved at /sdcard/strai/ or /storage/emulated/0/strai/
Internal: the data files will be created to internal storage for App, which is safer.
↓
Tips/Notes
– To protect record data, set Storage to Internal before recording.


