
Starting Screen of FRep Launcher App, consists of Main Menu and Record Settings.
As for initial setting, see [Setup Tool].
Main Menu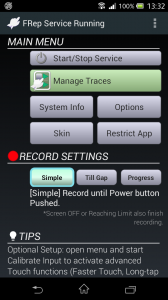

– Start/Stop Service
After initial setup, pushing Start/Stop Service will switch the running state as Service Running/(Not running). FRep is only available with Service Running state, which shows the FRep icon at notification bar.
– Manage Traces [Click for detail]
To configure, edit or delete records.
– System Info [Click for detail]
To confirm Android system information / reload the recognized input devices.
– Restrict App [Click for detail]
To designate apps where FRep is disabled, for safety and/or avoiding automatic operation. FRep self, Phone and Google Play apps are always restricted and not shown in the list.
– Skin [Click for detail]
To select skin for floating console panel.
– Options [Click for detail]
To adjust console display, notification and other settings.
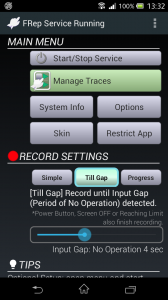 Record Settings

FRep has 3 recording mode, switchable here. In any mode, pushing Power button will finish recording.
– Mode: Simple (Default)
Basic mode which records input and initial screenshot, until the Power button push. Up to 15 minutes* or 1 MB data.
– Mode: Till Gap
Simpler mode which records input and initial screenshot, until FRep detects no input period designated by the slider “Input Gap” below. Up to 15 minutes* or 1 MB data.
– Mode: Progress
Advanced mode which records input and screenshot continuously, separated by “Input Gap” period. No limit for total time or data size, but long recording need separation to avoid single record > 15 min* or > 1 MB.
*Limit is 10 minutes for FRep version less than 5.0.
TIPS to choose Recording Mode:
Simple / Till Gap for short recording, simple repeat tap or operations without processing delays.
Progress for long-time recording, including CPU load and/or network connection wait, etc. This mode will automatically generate editable replay sequence with some controls. See posts in tutorial category.
Skin (requires FRep Unlock Key)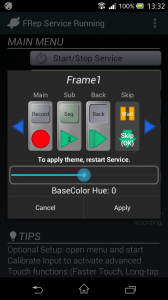

With FRep Unlock Key, the appearance of floating console can be changed from the Skin button. This function requires FRep Unlock Key.
– (Upper preview/chooser)
Selected skin is shown. By tapping the left/right blue triangles, skin will be changed.
– (Lower slider) BaseColor Hue
By sliding, the color hue for the skin can be adjusted.
To apply the skin, you need restart FRep Service. After tapping Apply in the panel, tap Start/Stop Service to stop once and restart the FRep service.
TIPS
Simple tips about how to use for FRep. Tap to see next tip.
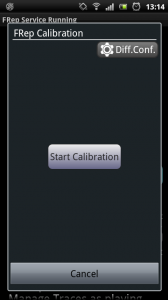 Calibrate Input
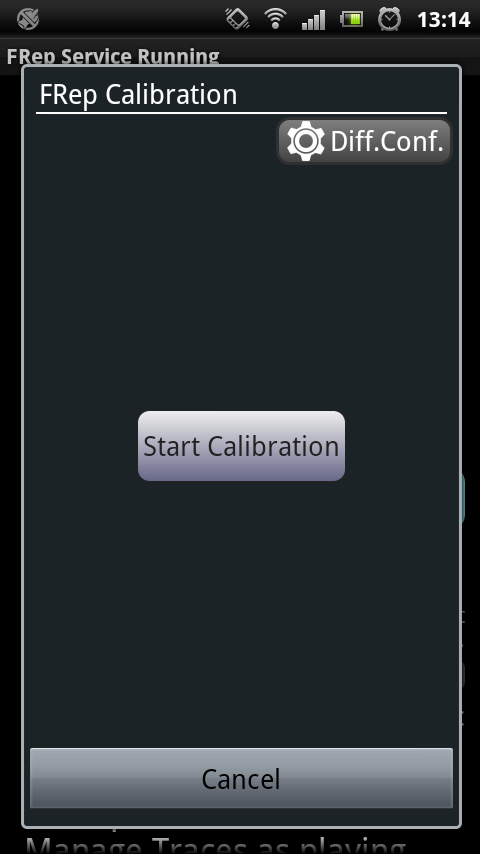
The dialog can be opened from menu. This collects Tap/Swipe/Long-tap/Double-tap signal information, to reuse on playing Touch control, or Tap Center on Success in Wait Image control designated by Edit Sequence.
– Start Calibration
Start collecting the touch signal information respectively. Do touches as shown in the dialog. After touches, push Test button and confirm the touch operations complete without stop, then save them.
Note that the first single tap may be difficult on highly-sensitive touch screen. Try a touch as quick as a flash, after waiting 1 second from retry notification. The threshold will be loosen as the single tap fails.
– Diff Conf.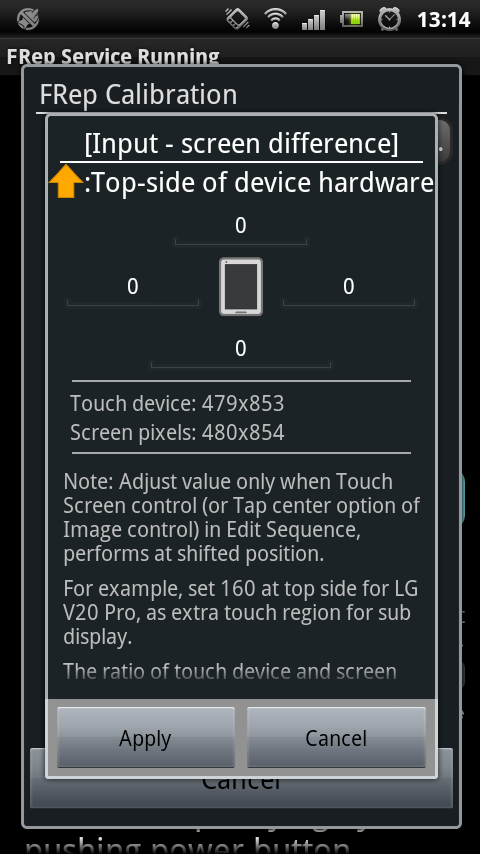
Only when the Touch control or Tap Center on Success in Wait Image control played at shifted position, push this button to configure offsets. If the functions have no problem, do not set values (i.e. set 0 for all directions).
By setting values at the box of each direction (based on the standard direction of device hardware), you can set the offset for the coordinates of touch device. If your device has sub-display, to adjust the input coordinates for main display, set the size of the input range for the sub-display. Since the size and direction depend on the machine, please try some values, by considering the rate and difference between Touch device and Screen pixels.
The size of Touch devices: are max value for each coordinate (so actually the device use 0~max), obtained from the touch input device. Since the input signals are adjusted by built-in method, the size are not necessarily matched with the Screen pixels. For example, some machine have precise touch device which has more than double the screen resolution, some have touch device which has same lengths for both of vertical and horizontal axes.
Menus
– Recheck Rooted State
By tapping this, FRep will retry booting up with “su” command in rooted device, without setup tool.
Note that most of su management tool needs to designate permission of su use for each app.
If FRep already started with rooted mode, you can choose booting method from Default or Legacy.
– Calibrate Input
Open Calibrate Input dialog.
– Send Stop Signal (only for support)
By tapping this, FRep will try stopping current recording/replaying by sending stop signal to the native program which records/replays.
– Terminate strserv (only for support)
By tapping this, FRep will try finishing process of native program which records/replays.
– Replace strserv (only for support)
By tapping this, FRep will try replacing files related with native program.
– Replace strserv (only for support, only for Android 4 or later)
By tapping this, FRep will try replacing files related with native program.
– Switch ABI (only for support, only for Android 4 or later and some CPUs)
By tapping this, FRep will try replacing files for designated CPU arch.
– Visit Support Site
Open this support site.
– Visit Tutorial Page
Open tutorial page.
– Visit FAQ Page
Open FAQ page.