FRep support archive

Author : str (11)

Edit Sequence

Categories: Edit Sequence
Tags: No Tags

Sequence / Record Item / Control Item / Common Settings / Popup Menus / Console to Skip/Extend / Adjust Interval / Edit Traces / Menus

Create more flexible record as sequence, consisting of multiple operation records and/or controls, in Edit Sequence screen. Concatenate records for longer replay, add control for reproducibility, and complete your sequence as item list.  By tapping sequence or [+] Create Seq. in Manage Traces will show this screen with the sequence data.

By tapping top (or top-right) record information will open Display Settings, Replay Settings, or Preview as Manage Traces screen.

Sequence as Item ListFRep Edit Sequence

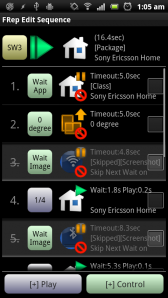
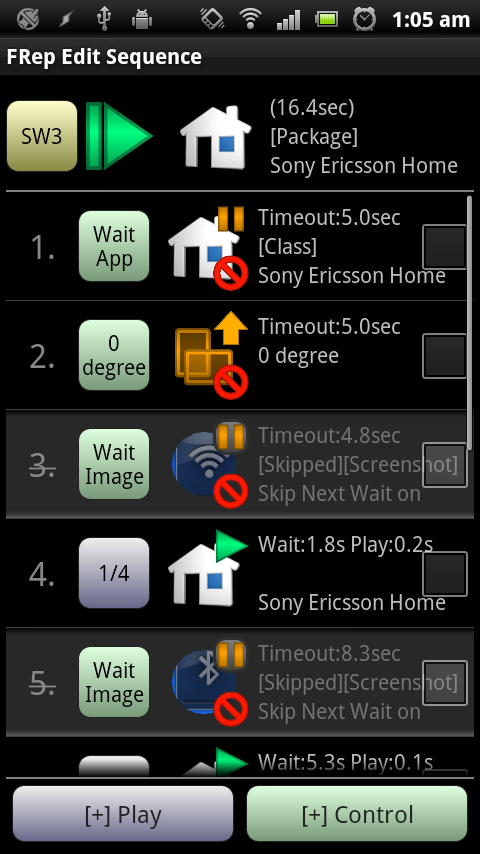
In the list of Edit Sequence, each operation record or control is shown as single item with #No., label button, icon (with small icons), description, and checkbox.

– #Sequence No.
The sequence will be played from 1. to last number. The Loop range or other control’s destination are described as this. Tapping switches skip, long-tapping switches bookmark (see below).

– Label button (gray:record, green:control, yellow:proc.)
With Notify Play Process options, the label will be shown in popup when the playing process reaches the item.  If the label is empty, the process will not be notified.

Active as button when Use Popup UI menu is OFF: Tapping will open the setting panel.

– Icon, superior small icon
FRep Edit Sequence (Android 4~)
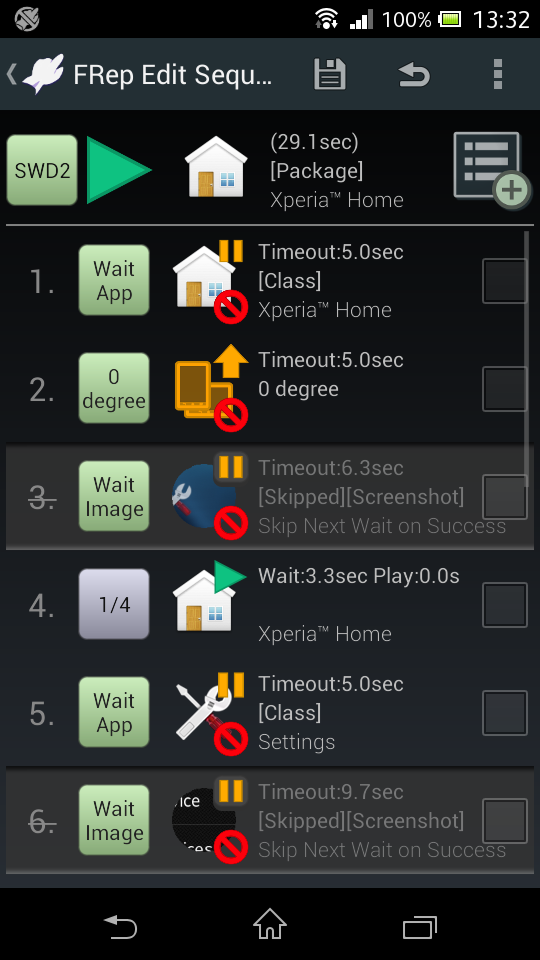
For operation record, the app icon or the screenshot on which was recorded will be shown (switchable by Show Preview Icon in menu), with small green triangle icon.

For control, each control will be shown as specific icon, app as its setting, image region for Image Match. If Show Console to Skip/Extend is ON for the control, superior icon will be orange pause icon.

Active as button when Use Popup UI menu is OFF: Tapping will show Edit Traces dialog (see below) for operation, the setting panel for control.

– Subscript small icon
Shown when any destination (#No., Abort or Return, see below) is set for replay finish or for control success/fail.  If the setting is Next, no icon will be shown.
Left icon (green): destination for On Finish or On Success settings.
Right icon (red): destination for On Fail settings.

– Description of 3 lines
The playing seconds or timeout, and item settings summary. To reorder the item in the list, long-tap here and drag to upper/lower row.

– Right-side checkbox (in the list)
To Delete, Copy&Append, Clip Checked, Toggle Skip, Set Wait Time, check and select menu/push button. By checking before adding operation record or control, the added item will be inserted at the checked items position.

Select recordOperation Record Item

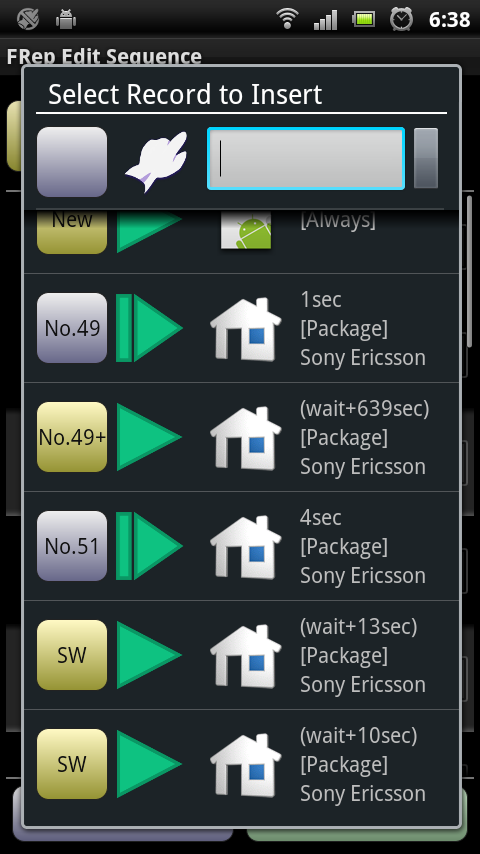
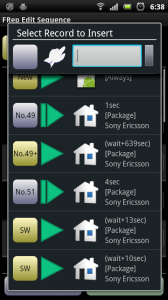
To append another operation record for sequential playing, push upper right or bottom [+] button and choose the record. If any checked items exist, the record will be inserted before them.  Appended items are independent, so edit / deletion of them do not affect the original record.

If there are many records, the filter will be shown at the top.

Left button: filter the type of the records.  By default, the normal records and sequences are shown.  By choosing Procedure, the procedures can be appended*.
App icon: filter the base app of the records as the same app of editing one.
Text: filter the label of the records which contain the text.

The right button will recall the last condition of the filter.

*Note that appended items from procedures are also independent.  So editing the appended items, or editing the original items, do not affect each other.

FRep Operation Record


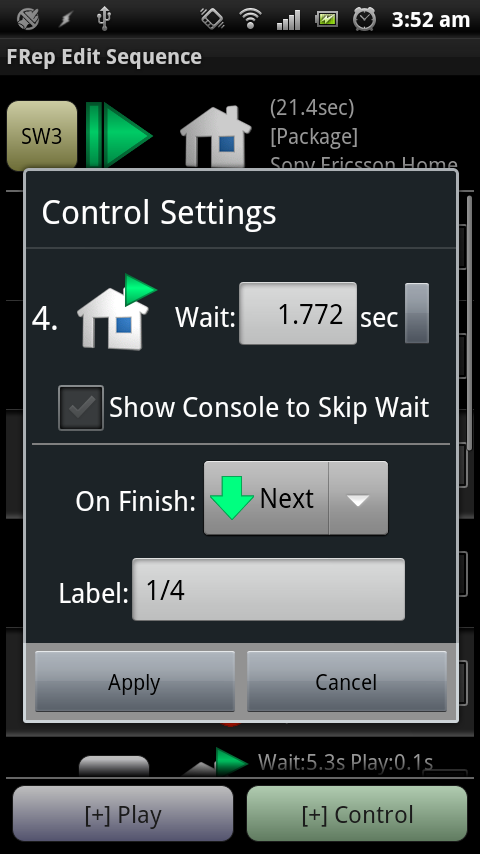
By tapping the gray label button of the operation record item, setting panel will show up. To preview/edit operations, tap the icon to open Edit Traces (see below).

Wait: initial wait time (second) before the first operation starts.  By pushing right-handed button, the value will be reset.

Show Console to Skip Wait, On Finish: optional common settings (see below).

Label: name of this item.


FRep Control ListControl Items

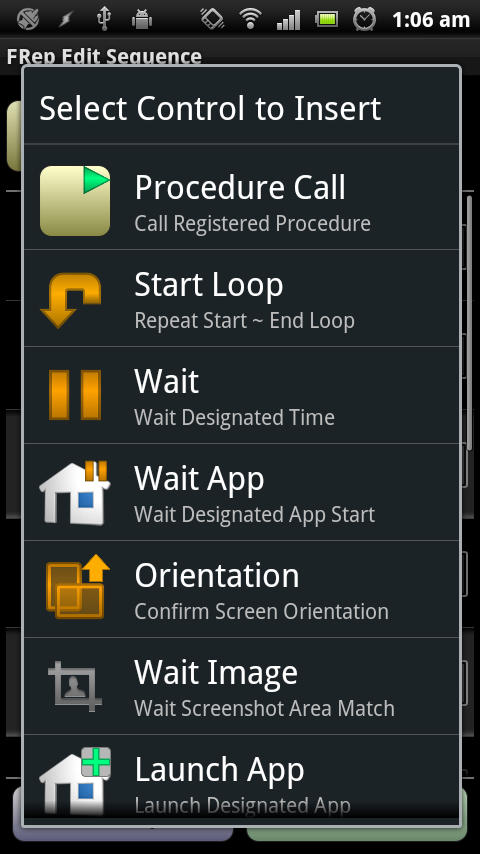
To append any control, tap upper right or bottom [+] button and choose control or shown control list directly.  Function and specific settings for each control will be described here.  As for common control settings, see section below.

– Procedure Call
To create complicated sequence, you can clip a part of the sequence as Procedure.  Once you clipped as procedure by Clip Checked menu, it is stored in Proc tab in Manage Traces, and you can call it as single control from any sequence.

– Loop / Section
Append Loop or Section Loop controls before and after checked items. If there is no checked items, they are appended at last position.  Loop control will repeat sequence from start to end with designated Loop ~ Times (Default: 3 times) or EndlessLoop: 0 Times will be also endless loop.

Collapse Loop / Section
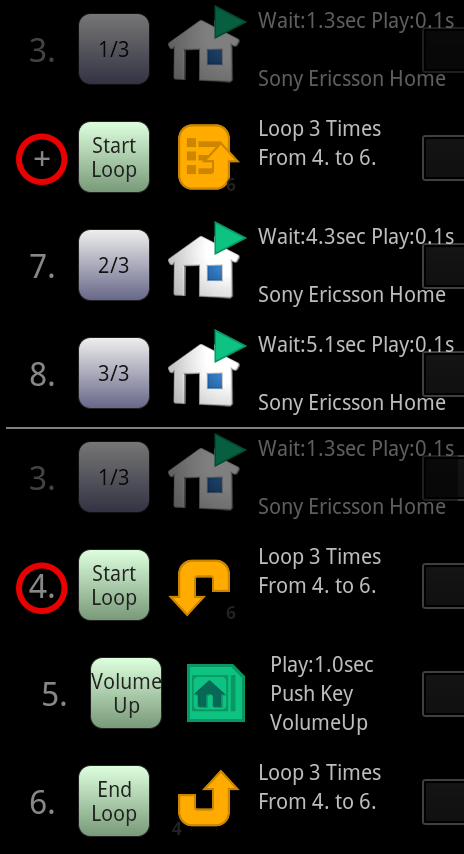
The items enclosed by the Loop / Section controls can be collapsed / expanded by tapping the #Sequence No. (or + as collapsed sign) at left side.  The collapsed items can be moved, checked, deleted together.

To label different name of start and end items, tap the icon at the right of label text box to unlink them.

– Wait
Simply wait designated seconds.

Wait: wait time (seconds)

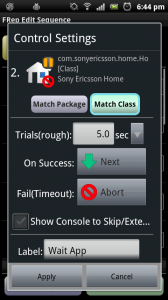
– App Change (Wait App)
Check current (front) app is selected app (in the sequence) or not, and wait until the app is front. By default, check 6 times for each second (total timeout 5 seconds).

Match Packages: check app package match (rough)
Match Class: check app class (Activity) match (strict)

– Orientation
Check current screen orientation is selected one or not, and wait until the orientation matches. By default, check 6 times for each second (total timeout 5 seconds).

Orientation: either of 0, 90, 180, 270, 0 or 180, 90 or 270 degree*
*degree is based on device default orientation as 0 degree.

– Image (Wait Image)
Check current screenshot contains with designated area of selected image or not, and wait until they matches. By default, continue screenshot and image matching test in timeout (Trials:) 10 seconds.

[Choose Image, Set Image Match Area]

FRep Image Match (Edit Mask)
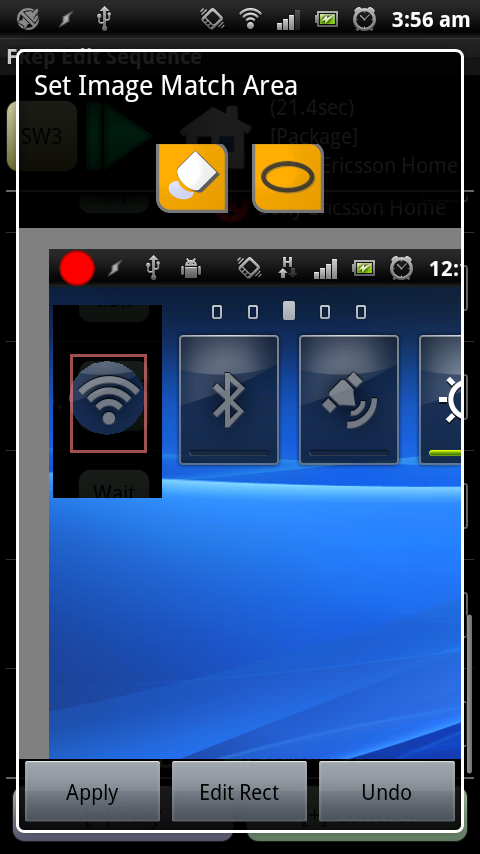
Image Match From List: select screenshot from operation records in the list
Image Match From File: select screenshot from png/bmp file*
*file must have same size of screen, and need to designate rotation.

Set Image Match Area/Edit Rect: From (left, top) To (right, bottom)
Drag background or rect: adjust position
Pinch-in/out: adjust size of matching rectangle (width/height will be fixed by initial 2 point position)

Set Image Match Area/Edit Mask: Paint/Erase, Rectangle/Oval/Square/Circle
Tap: paint/erase mask* around tapped area
2-point touch/drag: paint/erase mask by selected shape
*masked region will be ignored in image matching test.

**To remove the previously saved mask, tap Undo button after moving Edit Mask page.

Set Image Match Area/Adjust..: Auto Frame detection/adjustment, set Mask by Color range
Tap: set location of core frame or base color for each button function

[Control Settings]FRep Image Match Settings

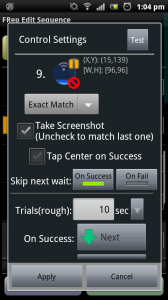
Exact Match: success when all pixels in the area have the same colors.
Match Pixels Rate: success when the rate of the same color pixels in the area is over the threshold.
Color Similarity: success when the color similarity in the area calculated from color distance is over the threshold.
Search(Exact): success when the area matching all pixels is found in current screenshot, and keep center position of found area. *If multiple areas found, only first one is used.
Search(Similarity): success when the area, which has similar edge points and color similarity over the threshold, is found in current screenshot. *If multiple areas found, most similar one is used. Search Area setting is recommended.

[Reference Screenshot Path] (Requires Unlock Key, available with Exact Match, Match Pixels Rate, Color Similarity)
To replace the matching image with the file on replay, set the path of another screenshot file.  For details, refer the section below.

Take Screenshot: newly take screenshot for this control. If OFF, last screenshot will be used and tested only once.

Tap Center on Success: tap center of the matched area on success. (Calibrate Input is required) By long-tap, offset from the matched center can be designated. (The offset coordinates are based on device standard orientation. Check preview to confirm the offset.)

Skip next wait/On Success: if image matches, skip next initial wait.
Skip next wait/On Fail: if image does not match within timeout, skip next initial wait.

By tapping Test button at top-right corner, you can test the current settings on other screenshots.  Note that testing Search method on multiple screenshots by selecting directory may take long time.

Edit Image button at the bottom is for replacement of the source screenshot or its match area.  Note that if the source screenshot is deleted, you cannot choose Edit Rect to change only the match area.

'Reference Screenshot Path' (Requires FRep Unlock Key)
Selecting the file from [Reference Screenshot Path] button, you can designate its file path to replace the reference image set in the control, keeping the areas and masks.  Available only with Exact Match, Match Pixels Rate, Color Similarity.
With Take Screenshot control, FRep will detect the screen (part) change in replay.

[EXAMPLE: At step N, check if the same object (image) exists from initial screen (at step 1).]

1. Take Screenshot; with (Pictures or such folder)/screenshot  [Overwrite (No Date in filename)*1] [Rotation 0° (For later reference)]

(snip)

n. Wait Image; with [Refer File] (Pictures or such folder)/screenshot.png (same path with step 1, added file extension ‘.png’ *2)

*1: By setting Overwrite, FRep will overwrite the file at every take.
*2: If the file does not exist or is not readable, the prepared image (for setting the areas) will be used for image matching.

– Launch App
When this control is played, launch the designated app or shortcut from FRep.

Clear Task/All: launch app with clear all task flag. (default)
Clear Task/Top: launch app with clear top task flag.

– Kill App
When this control is played, finish the designated app.  In next launch, the app starts newly, instead of resuming the last state.  When the current app is finished, the Android will show home screen.

Force stop: Stop app forcely, even the home app.

– Push Key
When this control is played, push function key.

Key: Home, Back, Menu, Enter, PageUp, PageDown, Space, (arrow key), VolumeUp, VolumeDown, VolumeMute, MediaPlay, MediaRecord, MediaPause, MediaStop, MediaNext, MediaPrev, MediaFFWD, Camera, Camera Focus, Search, (cursor)Home, (cursor)End, Tab, ESC, BS, Del.
Margin after Push: 0.3s~

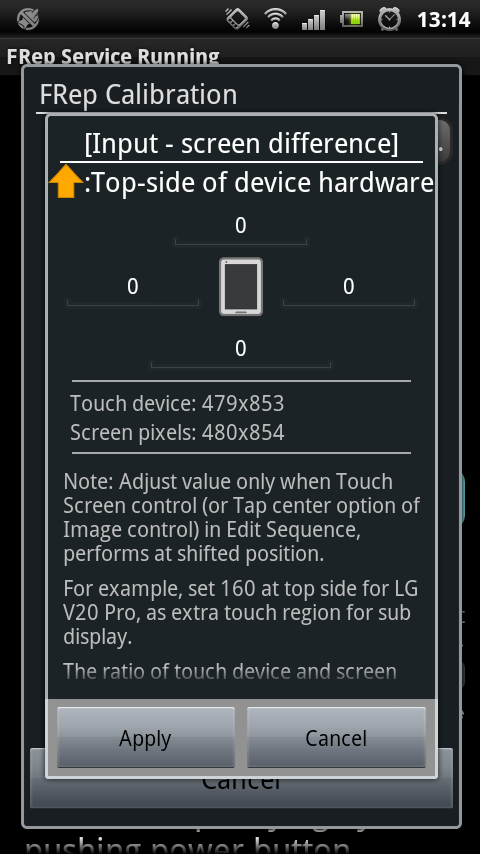
– Touch Screen (Calibrate Input is required)
When this control is played, tap designated position.FRep Touch Settings

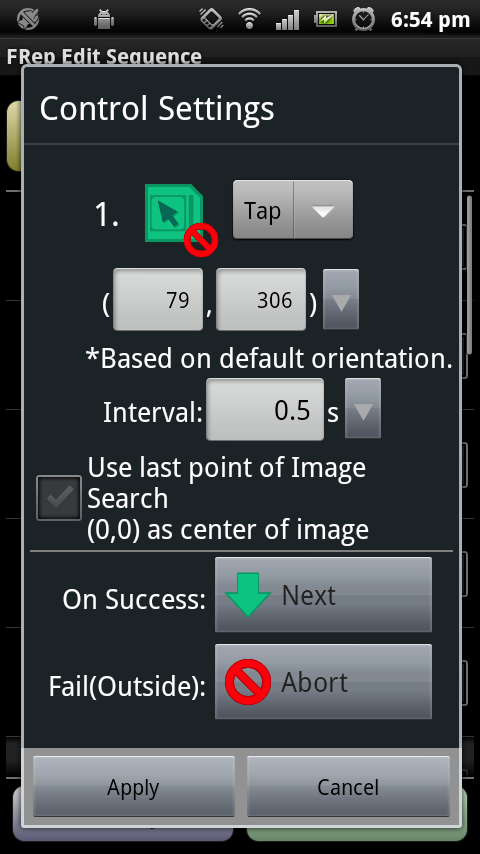
Touch Image From List: select screenshot from operation records in the list
Touch Image From File: select screenshot from png/jpg file*
Edit w/o Image: designate tap position manually
*file must have same size of screen, and need to designate rotation.

Set Touch Point: tap the position or drag green tapping point.
Designate Action Type*: Select from Tap / Long-Tap / Double-Tap / Swipe.
*Long-Tap, Double-Tap and Swipe require Calibrate Input.

(X, Y): coordinate of tap position based on device default orientation.
Interval: 0.04s~ (after Calibrate Input)
Use last point of Image Search: if ON, the last result of Wait Image control will be used to tap found center + (X ,Y) coordinate.

– Type Text (Does not work on Android 12)
When this control is played, type keyboard as designated.  Note that to use this control, the target editable area must be activated and designated keys must include IME operation keys such as enter.

Text: texts to be typed. Available characters are limited to ones in keyboard.

– Set Clipboard (do not use on Android 4.3)
When this control is played, clipboard text will be set as designated.

Set Clipboard: texts to be set. All characters are available.

– Take Screenshot
When this control is played, take screenshot and save to designated path.

Select Destination to Save: path to save screenshot.

Prefix: file name prefix. Saved screenshot name will be (Prefix)-(date)-(time).png.
Overwrite (No Date in filename): if ON, date and time will be omitted as (Prefix).png and the file will be overwritten at every take.
Rotation 0° (For later reference)
: if ON, save screenshot of device-default rotation.  The saved file can be used for [Reference Screenshot Path] of Wait Image control.
Use As-is File (Fast)
: if ON, save raw file in screenshot process, without rotation or format.
Do Not Save: if ON, screenshot will not be saved. Only for followed Wait Image control of Take Screenshot:OFF.

– Vibrate
When this control is played, vibrate device.

Type: selectable 1 or 2 vibration type.

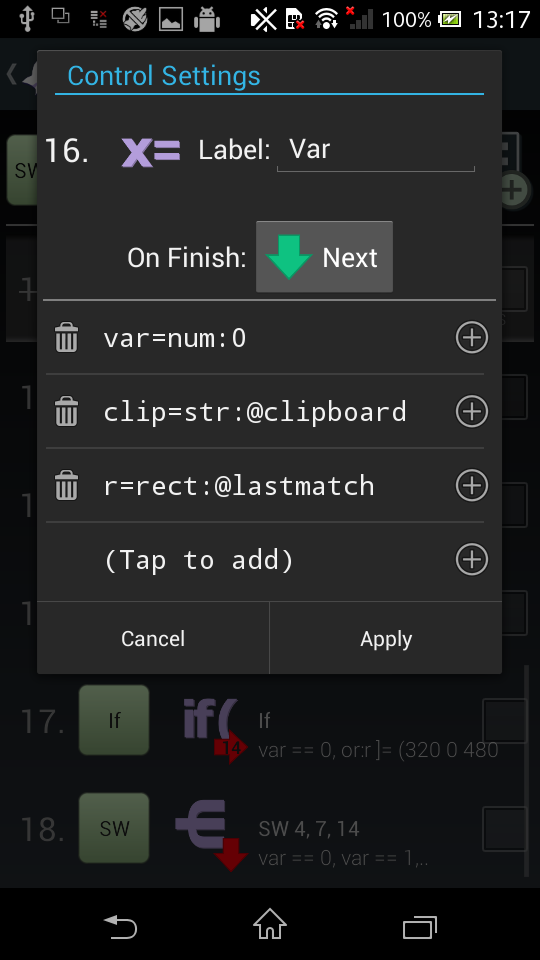
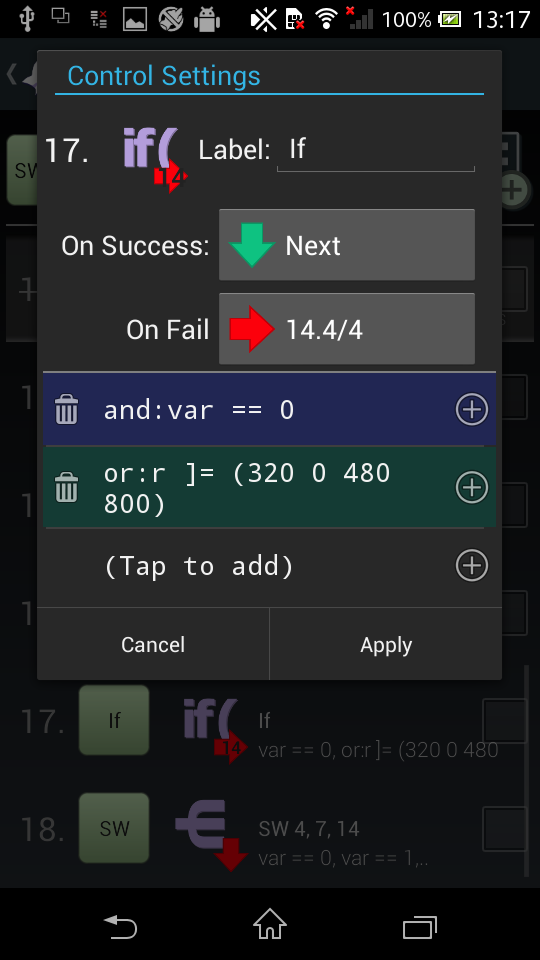
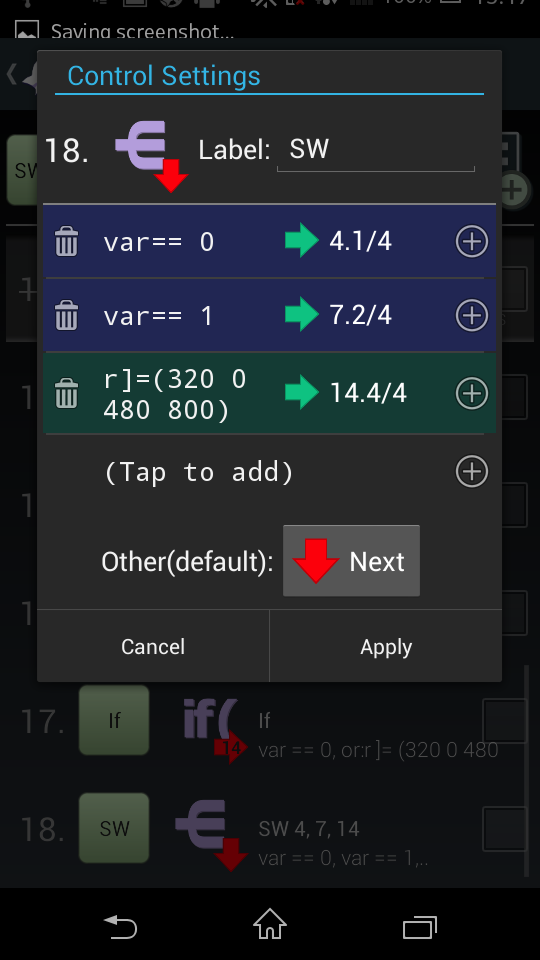
– Variables, If Statements, Switch Statement
Store the current state to variables, or branch by conditions with them.  See here for detail.

FRep Control SettingsCommon Control Settings

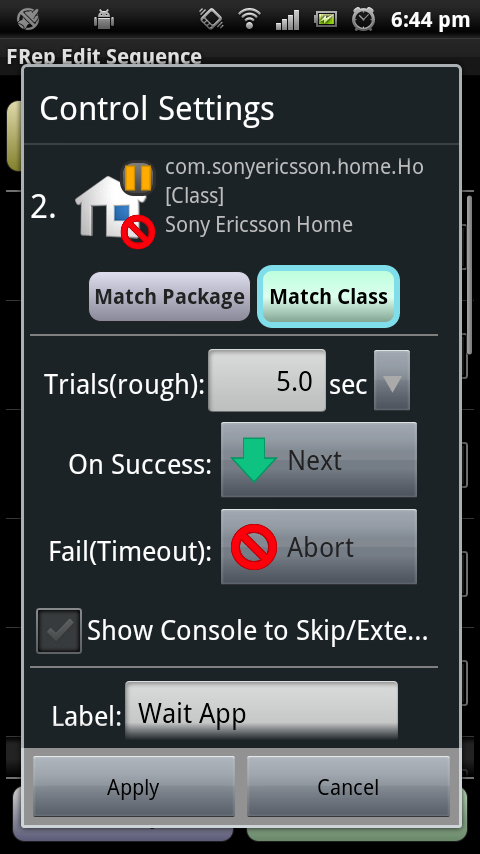
Controls have common settings of destination on success/fail, manual skip console availability, and label.  Destination will be one of #Sequence No. (go to specific No.), Abort (finish with aborted signal), Next (go to next sequence), Return (finish successfully).

On Success/On Finish: destination when this control finishes successfully.  Destination is shown in green icon at bottom left of the item’s icon. Default is Next (Next is not shown as icon).

Fail(Timeout): destination when this control finishes NOT successfully. Destination is shown in red icon at bottom right of the item’s icon. Default is Abort.

For Success or Fail, variables can be set by choosing [Set variable] for each case.

Show Console to Skip/Extend: With the check is ON, console for manual control will be shown within this control processing. See section below for detail.

Label: Shown label for the control.

Popup MenusPopup Menu in Edit Sequence

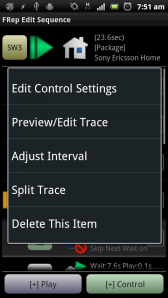
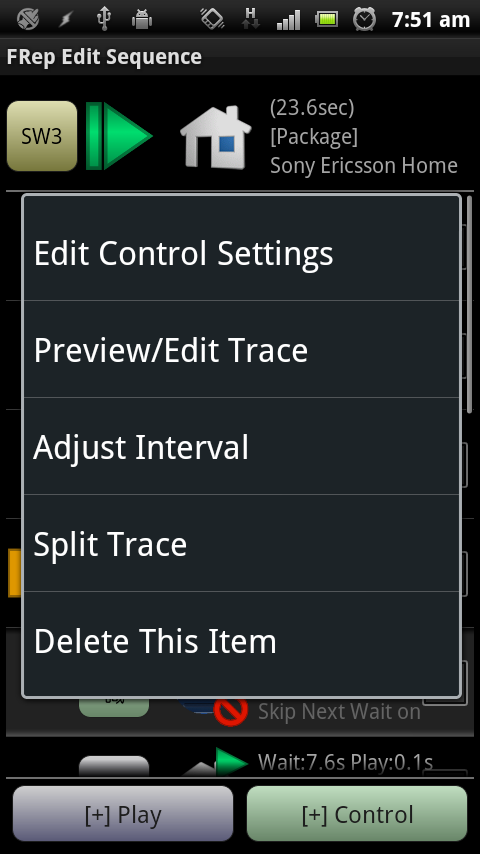
With Use Popup UI in Manage Traces is ON, each tap on listed item will show popup menu for edit / setting / preview / delete the item.

Edit Control Settings: Open Control Settings.

Preview/Edit Trace: Open Edit Trace.

Adjust Interval: Open Adjust Interval.

Split Trace: Open Split Trace.

Copy&Insert This to Checked (when 1 item is checked): Duplicate the tapped item to (before) the checked 1 item.

Copy&Insert Contents to Checked (when tapping collapsed section, 1 item is checked): Duplicate the contents of tapped section to (before) the checked 1 item.

Delete This Item: Remove the item in the list.  Note that the deletion will be reflected on app change or Save from menu.

FRep Bookmark/Skip

Skipped/Bookmark, Manual Console

By tapping #Sequence No. of item, the item state switches between Active and Skipped.  Long tapping will set it to Bookmark.

– Active (default state, no decoration)
Used in playing sequence.

– [Skipped] (gray-out, strike-through No.)
Do not used in playing sequence and skipped to next item. When recorded with Progress recording mode, generated Wait Image controls are all skipped by default.

– [Bookmark] (background arrow)
Mark for edit or target of manual destination in Manual Console below.

To change active/skipped state of multiple items, check items and select Toggle Skip menu.

FRep Manual Console

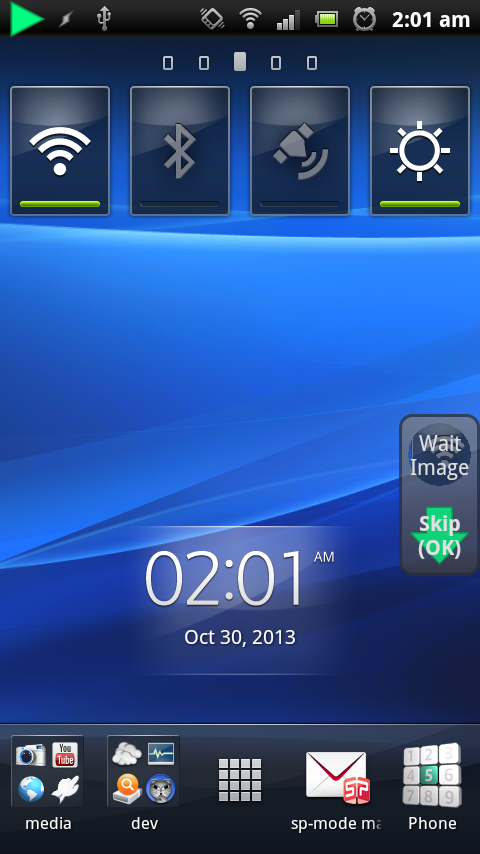
In processing controls with Show Console to Skip/Extend, the another floating console will be shown.  It contains 2 buttons to operate current processing control. By this console, the process can be forced to skip as success/fail, or to ignore timeout for extend.

– Upper button: choose operation
Shown the control’s label, and matching image as background if the control is Wait Image. By tapping/flicking upper button, selected operation in lower button will  change.

– Lower button: determine operation
By tapping lower button, the current process will be skipped/aborted as shown on the button.

Skip(OK): Force success (initial state)

Skip(NG): Force fail (tapping upper button once)

FRep Manual Console Tap/Flick
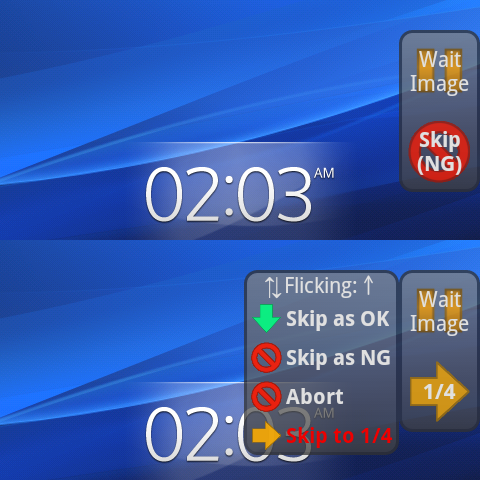
Abort: Force abort this playing (double-tap upper button)

(Bookmarked item): Go to the selected item (flicking upper button)

To extend current control’s timeout: Once tap or flick upper button, the upper button has pause icon which mean the timeout is ignored*. In this state, control continues its process. Note that once it succeed, soon the sequence goes to item designated in On Success:

*To restore to normal timeout, tap upper button again.

FRep Adjust IntervalAdjust Interval

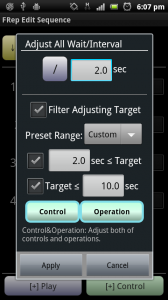
To change replay speed with shorten/set/extend the waits/intervals in operations, call from popup (for single item) or menu (for checked items).

(Sign and seconds): Divide(/), Set(=), Add(+), Subtract(-), Multiply(*) the waits/intervals of the target item(s) by the seconds.

Filter Adjusting Target: If checked, open the filter settings below to limit the adjusting waits/intervals. If this is not checked, all adjustable waits and intervals in the item(s) will be set or recalculated.

Preset range: Some presets for following time range filter, Custom (load last settings),  >2 sec (adjust only longer than 2 sec), 2-10sec (adjust only between 2 and 10 sec), <2 sec (only shorter than 2 sec), All (no time range filter).

(Lower limit)sec ≤ Target: Lower limit to ignore shorter waits/intervals than designated seconds.

Target ≤ (Upper limit)sec: Upper limit to ignore longer waits/intervals than designated seconds.

Control, Operation: If Control is ON, wait of Wait controls and intervals of Touch/Push Key controls will be adjusted.  If Operation is ON, initial wait and intervals in operation records will be adjusted.

Edit TracesFRep Edit Traces

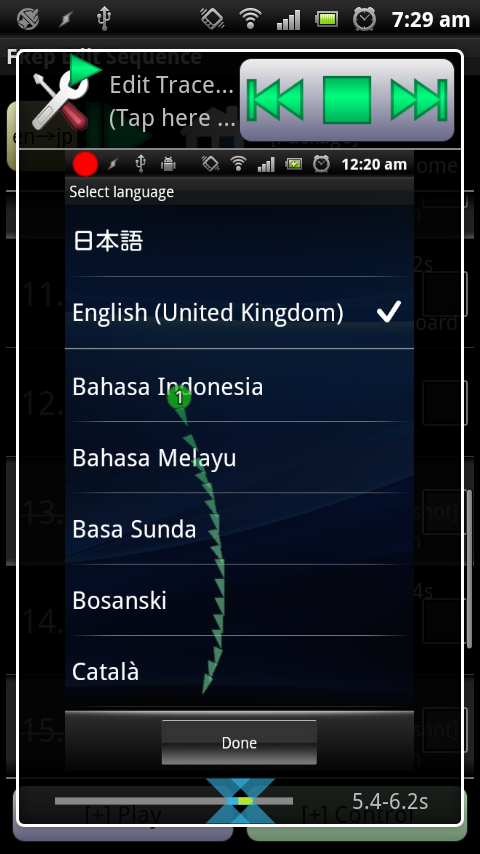
Preview and edit the strokes of the touch-screen trace on the screenshot background. The traces are separated as strokes, and shown in green point and direction triangles.

To edit, select strokes by bottom slider and drag or open submenu to adjust wait/interval, to clip or split strokes. To close and/or save, tap screen or push Back button. Saved trace will be stored separately from the original one, which will be set [Skipped].

– Bottom slider for stroke selection

Slider shows time range of the strokes. By dragging 2 slider tab of start and end, strokes in the range will be selected. Or, by tapping Prev/Fwd button of the top-right console, each stroke can be selected.

Colors in selected range: Each stroke has wait time as cyan, and touching time as green.

– Drag screen to move strokes
To move selected strokes, drag any position in the image.

FRep Edit Traces Stroke– Tap title icon/message to set wait/clip strokes
To open submenu, tap top-left icon or message.

Adjust First Wait: Set only first wait in selected strokes.

Adjust All Waits: Set all waits in selected strokes.

Clip Selected: Keep only selected strokes.

– Top-right 3-buttons of Prev/Clear&Play&Pause/Fwd

Prev/Fwd: select and show previous/forward stroke. When Prev in first or Fwd in last, select whole traces.

Clear(square): Clear drawn traces and reset.

Play(triangle): Start playing preview of selected strokes.

Pause(orange): Pause current playing.

Note: in playing, tapping top-left icon will change the preview speed as 1x, 2x, 3x, 5x and 10x.

Menus

– Save
Save current state.  Note that FRep will save on screen change or on sleep.

– Load
Load from last saved.

– Copy checked/Paste (only for Android 4~, requires FRep Unlock Key)
Copy/paste checked items. *Cannot be pasted to other sequences.

– Clip Checked (Clip as Proc)
Store checked items as a Procedure sequence, which can be called by single control: Procedure Call.  Note that stored Procedure is listed in Proc tab in Manage Traces.

– Delete Checked
Delete checked items.  Note that deletion will be realized on saving.

– Copy&Append
Copy checked items and append them to current sequence.

– Toggle Skip
Change Active/Skip state of checked items.

– Collapse / Expand
Switch the collapse / expand state of all or checked section / loop.
(*For support use, choose this to show all if there are any unexpected hidden items.)

– Clear Checked Label
Set empty the labels of checked items, to omit the popup for them in replay.

Adjust Wait/Interval
Set/add/subtract wait time of Wait controls and/or initial wait of operation records, intervals between strokes of operation records, in checked items.

– Check All / Uncheck All
Check or Uncheck all items in current tab.

– Inspect If Exportable (Android 4~)
Check if there is item which has too large image data to be exported, and mark the found ones.

– View Last Log (Requires FRep Unlock Key)
Open the log of the item on which last playing finished.  See here for details.

[Editor Settings]
– Show Preview Icon

If checked, the icons for operation records will be shown as screenshots for each record.

– Last Matched in Preview
If checked, parts of last matched images in last playing are overlaid in preview.

– Indent Loop / Section
If checked, the items surrounded by Loop or Section controls will be shown with indent.

– Auto section
If checked, the appended record will be surrounded by Section control when the record is a sequence which has some or more items.

– Include .jpg (only for Android 4~)
If checked, the jpg files will be shown in list for screenshot file selection.  In addition, the Color Similarity will be used as default settings of Image control.

– Hide Duplication menu (only for Android 4~, requires FRep Unlock Key)
If checked, the menus of Copy&Append, Copy&Insert will be hidden.

– Use Popup Dialog (only for Android 4~)
If checked, the menu or the list shown by tapping will open with dialog type instead of anchored popup type. This switch is applied to Manage Traces, too.

– Use Short Items
Switch for smaller list items. If ON, the listed items will be drawn shorter. This switch is applied to Manage Traces, too.

Tips/Notes

– To suppress popup notification for specific item, set its label as empty.

– In recording with Progress recording mode, try waiting the popup of “Ready to Continue Recording..” at the timing when you want to check screenshot, current app, or orientation before next operation.  FRep will generate each control in the record, and you can easily activate/deactivate them by tapping the #No. of the Wait Image or other generated controls.

– If Launch App results in increase the app process, try Clear Task: Top setting.  It may occur on apps which have separated activities of launcher and main.

– To create switch ~ case statement by using image match, place Save Screenshot first, and then put Wait Image controls with Take Screenshot:OFF and On Success: destination.  If some trial count needed, check them and add Loop Start control.

– To create long sequence, these are useful: Procedure (Clip Checked menu/Procedure Call control), Active/Skipped/Bookmark state, View Last Log menu.  Insert Wait control with Show Console to Skip/Extend check at first, then you can choose testing part by manual console. Of course Android’s Developer options | Show touches is very helpful.

– If coordinate with negative value set at Touch control, the value is converted to device size + value.  i.e. (-1,-1) will tap bottom right corner of the device.

– Popup UI mode and Delete confirmation switches are common in Manage Traces.

– To refer the screenshot image files in the external SD card, you can switch the storage by several tap of “Up” button which will become “Change” button in the file list dialog.

– In file list, you can switch the ellipsis type by long-tapping the button for sort mode.

Log / Reference of Variable

Categories: Variables
Tags: No Tags

View Last Log / Variable / If / Switch

The log for the edited sequence can be referred by menu View Last Log in Edit Sequence, which is available with FRep Unlock Key.  To get the details, you can add Variables control, or Set variables on success/fail for important phase.  The used variables can be referred in the log, too.

View Last Log in Edit Sequence (Requires Unlock Key)

FRep View Last LogShow success/fail, finished time, and last played item for last playing.  Variables referred in the sequence are also shown.  With Log Only Last Error option, successful playing does not overwrite the log.

– Date
The date of playing finished with rectangle of result color, green for success, red for fail or interrupted.

– Label, Result: Last played item
Label name on playing, result of success or fail/interruption, and #. label of item of last played.

– Error message
Information message about the issue for the failure or abort.

– Referred variables
The variables referred in the sequence with their values at finish playing.

FRep VariablesVariables

Retrieve and/or calculate values in playing sequence to store them to variables.  The variables can be used in specific control settings or IF / Switch branch (see next section).  The stored values are common in all sequences, i.e. all variables can be referred / overwritten by other sequences.

Registered statements in the list will perform from above.

Remove / prepend statements from left trash / right + buttons, edit by tapping the statement.  Long-tap the statement will start dragging to reorder in the list.

Format of statements;

(Destination Variable)=(Code):(Arg1)(Operator)(Arg2)

Variable name: [A-Za-z_@][0-9A-Za-z_]+

Definable variable name consists of alphanumerical characters and under bar(_).  First letter cannot be a number.  The reserved variables as environmental variables start with @, and they are used only for arguments and some settings.

frep0, frep1, frep2, frep3, frep4 are passed to Tasker as temporal variables %frep0, %frep1, %frep2, %frep3, %frep4 by Tasker Event Plugin (%frepsuccess will be 1 for success or 0 for fail to play).

Value Type [(Empty), Number, Rectangle, String]

There are 4 value types including empty value.  The type of variables are determined by the value they have.

Type Description Example
(Empty) The state of no value defined.
*Shown as null in Log.
var=num:
var=rect:
var=str:
Number Integer or decimal, including negative value. var=num:0
var=num:0.012
var=num:-0.5
Rectangle Rectangle defined by: (left top right bottom)
Each component must be integer or variable.
var=rect:(10 20 30 40)
String String defined by: “character sequence”
Escaped characters; (line feed)\n (tab)\t (\backslash)\\ (“quote)\”
var=str:”line1\nline2″

@reserved environmental variables

System variables for referring the state of device or playing sequence.

Name Type Description
@repeat Number Current repeat number (0 for first time)
@loop Number Last loop count number (0 for first time)
@lastif Number Last IF result (success/true:1, fail/false:0)
@rotation Number Current orientation of the device
(0: 0°, 1:90°, 2:180°, 3:270°)
@cpuusage Number Current CPU load (0~100) *Works on Android ~7
@start Number Starting time (ms)
@now Number Current time (ms)
@lastfinish
Number Success of failure of last replay
(0:not replayed, -1:failed/interrupted, 1:successful)
@laststep
Number Step No. in Edit Sequence on last replay finish
(0 if it is not replayed)
@lastmatch Rectangle Latest successful Image Match position
@screen Rectangle Screen size of the device (fixed for orientation 0°)
@clipboard String Contents of the clipboard text *Works on Android ~9
@tofrep
String Text passed by the caller, by FRep Tasker Plugin
(Empty when started manually or with shortcut)

Special modification for variables; var.left, var.x, var.length

For some types of variables, the derived values can be referred by special postfix modification.

Modification Description Example
(Rect).left
(Rect).top
(Rect).right
(Rect).bottom
Refer each component of the rectangle l=num:r.left
(Rect).x
(Rect).y
Refer the center x or y of the rectangle
x=(left+right)/2
y=(top+bottom)/2
centerx=num:r.x
(Rect).width
(Rect).height
Refer the width or height of the rectangle
width=right-left
height=bottom-top
w=num:r.width
(String).length Refer the length of the string len=num:s.length
(String).asnum
(String)
.asrect
Refer the number converted from numeric string
Refer the rectangle converted from “(left top right bottom)” type string
n=num:s.asnum
r=rect:s.asrect
(String).asint
(Num)
.asint
Refer the integer number (truncated after the decimal point) i=num:s.asint
i
=num:n.asint
(Num).asstr
(Rect)
.asstr
Refer the number / rectangle as string s=str:n.asstr
s=str:r.asstr
(Num).asdate
(Num)
.astime
Refer the time (ms) number as date string with format “yyyy/MM/dd kk:mm:ss”
Refer the time (ms) number as time difference string with format “hour:min:sec.ms”
s=str:@now.asdate
t=num:@now@start
s
=str:t.astime

Code references

num: Set / Calculate Number

Operator Arg1 Arg2 Description Example
(None) Variable, Number, (Empty) (None) Set number value var=num:0
+ – * Variable, Number Variable, Number Add Subtract Multiply var=num:var + 1
/ Variable, Number Variable, Number Divide
(If Arg2 is 0, returns Arg1 without change)
var=num:var / 3
% Variable, Number Variable, Number Residue
(If Arg2 is 0, returns 0)
var=num:var % 3
& | ^ Variable, Number Variable, Number Bit operation AND OR XOR
(Args are forced to be integer)
var=num:var & 7
~ Variable, Number Variable, Number Bit operation ANDNOT
(Args are forced to be integer)
var=num:var ~ 128

rect: Set / Calculate Rectangle

Operator Arg1 Arg2 Description Example
(None) Variable, Rectangle, (Empty) (Empty) Set rectangle value var=rect:(0 0 100 200)
+ – * Variable, Rectangle Variable, Number, Rectangle Add Subtract Multiply
*If Arg2 is rectangle, each component will be used for calculation.  If Arg2 is number, it is applied for all components.
var=rect:var + (10 20 10 20)
*Move the var rectangle by (10,20)
/ Variable, Rectangle Variable, Number, Rectangle Divide
*If Arg2 is rectangle, each component will be used for calculation.  If Arg2 is number, it is applied for all components.  When the component is divided by 0, it will not change.
var=rect:var / (2 2 0 0)
*Halve the (left,  top) coordinates
& Variable, Rectangle Variable, Rectangle Intersect
Retrieve common area in both rectangles.
var=rect:var & @screen
*Clip by screen size
| Variable, Rectangle Variable, Rectangle Union
Retrieve the minimum area which covers both rectangles.
var=rect:var | @lastmatch
*Expand rectangle to contain image matched area

str: Set / Calculate String

Operator Arg1 Arg2 Description Example
(None) Variable, Number, Rectangle,
String, (Empty)
(None) Set String value var=str:”char seq”
+ Variable, Number, Rectangle,
String
Variable, Number, Rectangle,
String
Concatenate 2 values as string var=str:var + “\n”
*Append line feed
sub Variable, String Rectangle Extract string from Arg1, as defined range of Arg2 (la ln ca cn).When ln>0, extract ln lines from offset:la.When cn>0, extract cn characters from offset:ca.*If la<0 or ca<0, each extraction starts from back position from tail. var=str:var sub (1 2 5 10)
*Extract 2 lines from var, offset:1 (#2,3 line) and then get 10 characters from 6th.var=str:var sub (a 1 0 0)
*Extract line #(a+1) from var.var=str:var sub (0 0 -5 5)
*Extract last 5 characters from var.
idx Variable, String Variable, String If Arg1 contains Arg2 string, the position of Arg2 start in Arg1 string (first is 0).
If Arg1 does not contain Arg2 string, -1.
var=str:”abcde” idx “cd”
*var is 2.var=str:”abcde” idx “f”
*var is -1.
read Variable, String (None) Read the file designated by the path of Arg1. (up to 1MB) var=str:”/sdcard/test.txt” read

Other Functional Codes

Code Arg1 Arg2 Description Example
toast: Variable, Number, Rectangle,
String
(None) Show the message by popup. toast:”message”
clean: (None) (None) Clear all variables except environmental ones(@~). clean:

IFFRep IF

Branch or finish the sequence by condition of variables.  If they meets the conditions, the sequence proceeds to On Success, and @lastif will be 1.  If not, the sequence proceeds to On Fail, and @lastif will be 0.

Registered statements in the list will perform from above.

Remove / prepend statements from left trash / right + buttons, edit by tapping the statement.  Long-tap the statement will start dragging to reorder in the list.

Format of statements;

and/or(not):(Arg1) (Operator) (Arg2)

Combined condition by and: or: (andnot: ornot:)

Multiple conditions can be combined with and: / or: cases.  With and:, previous condition must be met to succeed.  With or:, new condition check starts even if the above conditions fail.  The first condition ignores and: / or: cases because they make sense only with previous condition(s). Neither of and: or: cannot be nested.  If there are multiple conditions divided by or:, each section is colored in the list.

andnot: ornot: are variant of and: or:, they use the reversed result of each condition check.

Operators for condition

Operator Arg1,2 Description Example
==
!=
Variable, Number, Rectangle,
String, (Empty)
Check if the contents of Args are equal or not equal. and:var == “char seq”and:@loop == 0
*Check if first loop or not
> >=
< <=
Variable, Number Compare the number of Args. and:var > 0
& Variable, Number, Rectangle If Args are numbers, success on the result of BITAND operation is not zero.If Args are rectangle, success on any intersect area exists. and:var & 5and:r & @lastmatch
*Check if the result of Image Match hits on r or not
]= Variable, Rectangle, String If Args are rectangle, success when Arg1 equals or includes whole Arg2 area.If Args are string, success when Arg1 contains Arg2 string. and:r ]= @lastmatch
*Check if the result of Image Match is in r or notand:var ]= “ok”
*Check if var has string “ok” or not

SwitchFRep Switch

Branch the sequence by condition of variables.  Each condition has respective destination.  The conditions are evaluated from the top of the list, and the sequence proceeds to the destination of first met condition.  When all conditions do not match, it goes to Other(default): destination.

Remove / prepend statements from left trash / right + buttons, edit by tapping the statement and the destination.  Long-tap the statement will start dragging to reorder in the list.

The available operators are same with IF statements, except for combination (and: or: etc).

TIPS

– To confirm the contents of the variables on successful replay, set Log Only Last Error option to OFF and then play the sequence.

– To set the clipboard text as variable, add Clipboard control and assign the variable from ▼ button in its settings.

Protect App from FRep automation

Categories: For Developers
Tags: No Tags

Dear worrying developers,

We provide this protection interface for you, to prevent damage from who break your terms of service, and/or to prevent uninstallation of your app. In case you do not understand why you concluded your app needs these codes, please consult us.

Codes to Protect Activity from FRep

– Add following line in onResume() to send broadcast to stop/hide FRep 2.6 or later.

  sendBroadcast(new Intent("com.x0.strai.frep.action.PROTECTCLASS"));

Old FRep (2.5 or before) does not support broadcast.  Please refer the following method to check installed FRep support broadcast or not.

  private boolean isRecentFrep() {
    PackageManager packageManager = getPackageManager();
    try {
      PackageInfo info = packageManager.getPackageInfo("com.x0.strai.frep", PackageManager.GET_META_DATA);
      if (info.versionCode >= 24) return true; // PROTECTCLASS broadcast supported
    } catch (NameNotFoundException e) {}
    return false;
  }

Tutorial Movies

Categories: Tutorial
Tags: No Tags

FRep Tutorial 1 (Basic)

FRep Setup tool for Android

Options

Categories: Options
Tags: No Tags

Console Settings / Rec/Play Settings / Screenshot Settings / System Settings

General settings about UI (Console, Notification), Recording/Playing and Environment.

SettingsFRep Options

– Safety App Lock [System Environment]
To avoid problems, FRep restricts itself on Google Play and Phone Call screen: default is ON (restrict).
It requires FRep Unlock Key to OFF this option and record/replay on them.

– Language [UI]
Language settings within the app.  To reflect this setting, restarting of Service and app is required.

Console Settings

Rec/Play Settings

Screenshot Settings

System Settings

FRep Console SettingsConsole Settings

– Console Size 10~500%
Adjustable console panel size: default is 100% as a button size equals standard icon size.

– Console Font Size 2~48sp
Adjustable console text size: default is 14sp.

– Console Transparency 0(Opaque)~255(Transparent)
Adjustable visibility of below layer: default is 128 (half).

– Auto Show/Hide
Show console on app for which FRep has record, hide console for app of non record: default is ON (auto).
If this is OFF, console must be switched manually by tapping notification.

– List on Flicking
Show available records list by flicking upper button of console: default is ON (show).

– Flick/Drag Direction *Only for Android 4~
Direction of shift of record selection when flick/drag the upper button of the console: Default is Default (Start dragging sideways:↓/forward, vertically:↑/backward)

Default: With start dragging sideways, the selection will move to ↓/forward according to distance.  It will move to ↑/backward when start dragging vertically.
Reverse: With start dragging sideways, the selection will move to ↑/backward according to distance.  It will move to ↓/forward when start dragging vertically.
Always Forward: The selection will move to ↓/forward according to distance.
Always Backward: The selection will move to ↑/backward according to distance.

– Flick/Drag Sensitivity Lowest(dull)~Highest(very sensitive)
Distance to detect flick/drag operation for console operations: Default is Default (length of standard icon side)
For large screen device, higher option may useful to choose record/drag console.

Record Button Visibility
When the record(Rec) button shows: default is Show Always

Default, Show Always: Rec item for record is always selectable.
Show Only on Main Console: Rec item is selectable only on Main console.
Hide when playable item exists: Rec item is selectable only when no playable items exist for Main console.

Screenshot Button (Need Unlock Key) *Only for Android 4~
Show button for screenshot(Shot) in main console: Default is None (Do not show)
By using this button, FRep will take screenshot by FRep’s method to save as PNG (or BMP as the screenshot method), for Image control or such.  The file name will be set as current app.

None: (default) Do not show the button.
PNG, Notify on success: Show Shot button which will save PNG file and notify popup.
As-is, Notify on success: Show Shot button which will save the as-is file for the screenshot method and notify popup.
PNG: Show Shot button which will save PNG file.
As-is: Show Shot button which will save the as-is file for the screenshot method.

– Use key console
Show virtual key console in another page, which is switchable by double-tapping upper button: default is ON (use).

FRep Rec/Play SettingsRec/Play Settings

– Keep Screen On [Recording/Playing]
Device screen keeps awake within recording/playing: default is ON (keep).
If this is OFF, long gap (no input term) will make screen off by system.

Edit after Recording [Recording]
FRep Record Summary panel will be shown after recording finished: default is ON (show).

Select Text on Edit Label [Recording]
Select all text when text box of label pushed, in FRep Record Summary and some panels: default is ON for Android ~6, OFF for Android 7~.
*Set this OFF when ANR (App Not Responding) occurs after the recording or the editing label.

Generate Wait Image (Progress) [Recording]
After recording in Progress mode, Wait Image controls are added at the input gap: default is ON (add).
*The target images are based on the the touched position at the taken screenshots, and the controls are set as skipped state.

– Notify Record Finish [UI/Notification]
Show recording finish, separation in Progress recording mode by popup: default is ON (show).

– Notify Play Process [UI/Notification]
Show playing start/finish, process of sequence by popup: default is ON (show).

– Minimum Popup Time [UI/Notification] 200ms~1000ms
Minimum popup term for continuous Notify Play Process: default is 500ms.

FRep Rec/Play Settings (Continued)– Maximum Continuous Popup Time [UI/Notification] 4sec~60sec
Minimum popup term for continuous Notify Play Process: default is 60sec or 4sec (Android 7.1~).
*On Android 7.1, longer time will hide continuous popups.

– Cancel Popup on Playing [UI/Notification]
When specified controls are played, the showing and pending notifications are cancelled: default is Screenshot.
When this option cancels notification, the controls will be played after 500ms wait.

None (Keep Showing): Do not cancel popup.
Screenshot: (default) Cancel popup before taking screenshot*.
Touch control: Cancel popup before touch control.
Screenshot & Touch: Cancel popup before taking screenshot* or touch control.

*Includes Wait Image control’s taking screenshot.

Combine Plain Popups [UI/Notification]
Show single unified popup for continuous notification: Default is ON (combine).
If this option is ON, successful (or just finishing) notifications are shown as combined one, but failure (timeout) notifications are shown individually. For 3 or more notifications, the combined notification has only first and last messages, omitting the middle ones.
If this option is OFF, all notifications are shown individually.

– Position of Popup [UI/Notification]
Position of popup notification in screen: default is Default.

Countdown on Skip Panel [Playing]
In playing Wait/Wait Image control, show rest seconds to timeout on console: default is ON (show countdown)
*Wait Image will update the seconds by each image matching process.

– Default Interruption [Recording/Playing]
Set interruption settings for new records: default is ON.
If interruption settings is ON, overlapping input in playing the record will stop the playing.

– Clock-based interval [Playing]
Play the operation records at the clock-based timing: default is ON.
To use timing based on intervals of the operations (method of previous version for FRep ~3.94), switch this option to OFF.

– Log Only Last Error [Playing/Log] (Requires Unlock Key)
After playing the edited sequence, store/overwrite the log only when the playing is aborted by error or interruption: default is ON.
To get log for successful play, switch this option to OFF.  Note that in either case, FRep will keep single log for each record.

– Log Last Matched Image [Playing/Log]
Store the matched part of the image for Wait Image control: default is OFF.
If this option is ON, the matched images will be stored in external storage, to see them in preview in Edit Sequence. The images will be deleted when start playing with this option is OFF, or without Unlock Key. With Unlock Key, the images for other record are stored up to ~25MB.

– Action when Playing Ends [UI/Notification]
Selectable notification when playing finishes: default is Silent (no notification).
Other options: Vibrate, Notification Sound (System default), and Both (vibration and sound).

– Notification Icon [UI/Notification]
Selectable notification icon at notification bar: default is Default, Show Rest Repeat No.

Default, Show Rest Repeat No.: Show FRep icon on stay, Show rest repeat No. in playing.
Show Plain icons: Show FRep icon on stay, Show simple playing triangle in playing.
Transparent in Playing*: Show FRep icon on stay, transparent icon in playing.
Transparent in Staying*: Transparent icon on stay, Show rest repeat No. in playing.
Transparent in Play/Stay*: Transparent icon on stay, transparent icon in playing.

*To apply these options, installation of unlock key needed.

– Display after Shortcut [UI/Console]
Show/Hide console after playing by shortcut or Tasker plugin: default is Auto.

Default, Auto: Show console if there is any playable record.
Hide console: Hide console regardless of playable records.
Show console: Show console regardless of playable records.

*Individual setting for each shortcut/Tasker plugin will override this setting.

Screenshot SettingsFRep Screenshot Settings

– Save Screenshot [Recording]
Take screenshot at each recording start: default is ON (take and save).
To decrease the size of record data, or when FRep fails take screenshot on Android 2.3.x, OFF this option.

– Screenshot Method [Recording/Playing]
Selectable screenshot method: default is Auto select (recommended).
BMP will take screenshots faster, and the screenshots will be compressed when you open the Manage Traces.
If the screenshot of Android 2.3.x has RGB exchanged color, choose Read FB(Reversed).
Screen API (Android 5~) will use Android’s capture API, which will request and prepare before starting recording / replaying, so it will take time before starting. See also Screen API Settings.

To save screenshot as file, choose options with (save as file), but note that the screenshot files cannot be included to exported file.

– Screenshot Rotation [Recording/Playing]
Rotation process after taking screenshot: default is Auto (recommended).
For only devices which FRep’s screenshots’ rotations in preview, Take Screenshot control, and Image control are incorrect by default settings.

– Temporary Directory [Recording/Playing]
Location for taking screenshot: default is Auto (recommended).
(Storage)/(App folder) will save the taken screenshot in App storage, for only devices which fail to take screenshot by default settings.

– Oversized Screenshot [System Environment]
Method to save screenshot data > 1.5Mbytes: default is Save as a separate file

Save as a separate file: Save the screenshot file.
Minify and store in database: Scale down the screenshot to 1/n scale to fit into the size limit.
Both: Save both of above.
*The large screenshot files cannot be exported.  When they are included when you choose Export Db in Manage Traces screen, FRep will show warning panel.  As for the preview images, tapping Add Minified Preview Image(s) in the panel will be appended the minified data which required for exporting.

– Match by All Bits [Playing]
Use 24 bit RGB color for Image Match evaluation: default is ON (use 8 bit for each R,G,B).
When lower bits do not match between screenshots in the same situation (on specific device such as Galaxy Tab 2), OFF this option to use only 15 bit (ignore lower 3 bit for each R,G,B).

[Screen API Settings] (Android 5~)

Advanced settings for Screenshot Method: Screen API.

In case the screenshot fails: The built-in encoder and/or decoder of your Android device may fail. First, switch ON Keep Cache Video and check the saved video file.  If the video file is broken, retry after setting Screenshot on Recording: 1/1 video.  If the video file can be played without problems, try switching ON Retrieve Sync Frame.

In case the screenshot timing is off: Adjust Frame Rate and Adjust Frame Pickup.

– Screenshot on Recording [Recording]
Record screen video on recording: Default is 1/2 video
Extract screenshot from video at the touched time.

None: Do not record or register screenshot on recording.
1/1 video: Record video of same screen size and register screenshot.
1/2~1/8 video: Record video of 1/n width and height screen size and register screenshot.

– Adjust video size [Recording]
Adjust data size for video encoding codec: Default is 16px
The input data size for each line of screen (depending on the orientation of the device) will be adjusted to a multiple of the specified px.  If the preview image of the record operation by FRep is abnormal (slanted, out of color, etc.), try changing it.

None: Do not adjust.
4~32px: Adjust each line of screen data pixels to a multiple of the specified px.

– Frame Rate [Recording]
Frame per second of video on recording: Default is 4FPS
The number of image frames per second in video.  However, on highly-loaded state, it may be under the set value.

– Bitrate Weighting Factor [Recording]
The weighting factor for bitrate of video: Default is 1.5
Higher bitrate will make higher image quality.  Actual bitrate is calculated by width x height x factor.  The width and height values depend on Screenshot on Recording.

– Keyframe Interval [Recording]
The interval seconds between the keyframes of video: Default is 4 sec
Keyframe has whole single image data, so the interval effects the quality and the video file size. Do not choose None, because it will generate very large size video file even with short time, it is only for support use.

– Adjust Frame Pickup [Recording]
The adjustment time when extract screenshot from video: Default is 100ms
The value to determine the timing of extraction frame as screenshot, from the video.  The larger value will get more past frame from touched time.

– Keep Cache Video [Recording]
Keep video files after recording: Default is OFF
If this option is ON, the mp4 video files are not deleted in the app cache folder such as; (Storage)/Android/data/com.x0.strai.frep/cache/

– Retrieve Sync Frame [Recording]
Request SYNC frame when extracting frame from video: Default is OFF
If this option is ON, request Sync frame.  It depends on the built-in decoder of Android device.

– BGR-type Screen [Recording/Replaying]
Convert screen buffer as BGR type: Default is OFF
If this option is ON, calculate screen buffer as BGR instead of RGB.  Switch this option when the resulting image’s red and blue elements are reversed.

FRep System SettingsSystem Settings

For screenshot related options on Android 2.3~3, refer previous section of Screenshot Settings.

– Start on Boot (Rooted) [System Environment]
If the device is rooted, FRep Service will start on the device boot: default is OFF.
Since FRep Service need the setup, non-rooted device cannot start automatically.

– Close Bar on Notification Tap [UI/Console]
Automatically close status bar of Android when the FRep’s notification or button on notification is tapped: default is ON (close on tap).

– Current App Detection [System Environment]
The method of current App. detection: default is Auto.
The options depend on Android version.

Auto: Only Package (Accessibility) for Android 5.1.1 or later, Only Package (Android 5) for Android 5.0~5.1, Package and Class for before Android 5.0.
Only Package (Accessibility): Requires switching ON the FRep Accessibility Service in Accessibility of Android Settings. FRep will get the package information of current App from the accessibility service.
(Usage / with Delay): Requires permitting Usage access in Android Settings. FRep will get the package information of current App from Usage by Android OS. Note that the detection will be delayed because of the update timing of Usage.
Only Package (Android 5)
: FRep recognizes only package information of current App.
Package and Class: FRep recognizes the package and class information of current App.

– Device Order [Recording/Playing]
Designate device id for recording / playing: default is Keep saved order.
If problem occurs, please edit or initialize the device ids in System Info screen, or choose Use native order.

Use native order: Use native device order as id, instead of the stored order.
Keep saved order: Use stored order which saved at the first launch, or edited in System Info screen.

– Default Device Check [Playing]
Check device capacity before playing with default replay setting: default is Use As-Is device.
For Android which has replaceable device ids, Reallocate device is recommended.

Use As-Is device: Do not check device capacity, use recorded id to replay.
Reallocate device: Check device capacity before replay, and reallocate device id to replay.

– Calibrated Device [Playing]
Use the information by Calibrate Input: default is Positive Use.

Do not use: Never use calibrated information. With this option, some touching actions by controls are unavailable.
Positive Use
: Use calibrated information for touching actions by controls designated in Edit Sequence, in priority to Uinput or adb input.
Passive Use: Use calibrated information for touching actions by controls only when the information is necessary. Uinput or adb input will be preferred.

– Uinput Device (Rooted) [Playing]
Create and use uinput virtual mouse for Tap center on Success of Image Match control, or Touch control designated in Edit Sequence*: default is Rapid Cursor. (If non-rooted, this option will be ignored)
If the cursor does not tap the designated position, try Slow Cursor instead. None will off the virtual mouse function.
*Note that when tapping by the virtual mouse, cursor will be appeared on the screen.

– SELinux Context (Rooted) [System Environment]FRep System Settings (Continued)
Only when the device with Android 4.3~, SuperSU 2.0~ is rooted and scrrenshot / key input do not work, try switching this option: default is Auto.

– Use As-Is UID (Rooted) [Recording/Playing]
Only when the device is rooted and FRep do not work, try to check OFF this option: default is ON (use as-is UID).
Normally rooted device can read/write and call debug commands by superuser (su) with this option is ON (default). There are some specific stock ROMs which kernels are altered as superuser cannot read/write input/screen devices.

– Detect Keep Pushing [Recording/Playing]
Keep recording while key push or touch continues: default is ON (keep).
Only when the device cannot detect gap, try to check Off this.

– Adjust TrackingID [Playing]
Adjust the signal when multiple TrackingIDs are assigned for single slot: default is ON (Adjust).

– Clean up touch signals [Playing]
The method to clean up touch signals after replaying touch operation: default is Auto.
Only when the touch remains after finishing/interrupted replay, try to set Reassign all slots.

Auto: Use default option for current app version.
Reset only used slots: Put touch up signals for only used touch slots.
Reset all slots: Put touch up signals for all touch slots.
Reassign only used slots: Put assign and up signals for only used touch slots.
Reassign all slots: Put assign and up signals for all touch slots.
Reassign used slots on interruption: Only when the replay is interrupted, put assign and up signals for only used touch slots. On normal replay finish, same with Reset only used slots.
Reassign all slots on interruption: Only when the replay is interrupted, put assign and up signals for all touch slots. On normal replay finish, same with Reset only used slots.

– Interrupting Operation [Playing]
The input type detected as interruption in playing operation record: default is Same (Playing touch will be interrupted by touch)
By setting as Any, any input operation in playing will be detected as interruption.
*On non-rooted Android 10~, this option is ignored.

– Screen Resolution Check [Playing]
Update screen resolution in playing operation record: default is Auto
(For environments where the screen resolution changes depending on the application)

Auto: Use default option for current app version and environment.
Never(Fixed): Do not update screen resolution info in playing.
On App Change: Check and update screen resolution info when current app is changed.

– On detecting unknown access [System Environment]
Behavior when strserv process receives invalid access from other app or machine (Android 7~): default is Shutdown.
Try switching this option only when strserv process shutdown.

Shutdown: the strserv process will shutdown (requires setup again) when any invalid access is detected.
Ignore or Shutdown: the strserv process keep running if the invalid access is ignorable.  Or, the strserv process will shutdown (requires setup again) if the invalid access is not ignorable.
Ignore All: the strserv process keep running even when any invalid access is detected. (Not recommended)

– Log fatal error [System Environment]
Store internal error for support issues which does not show Android’s Report dialog: default is Trace

Trace: Watch internal error in FRep app, and store the last error for Copy support info in FRep System Info screen.
Ignore: Does not watch internal error.

– Storage [System Environment]
Physical location to save records: Default is (Storage)/(App folder).
(Storage)/(App folder): the data files will be saved at /sdcard/Android/data/com.x0.strai.frep/ or /storage/emulated/0/Android/data/com.x0.strai.frep/
(Storage)/strai: the data files will be saved at /sdcard/strai/ or /storage/emulated/0/strai/
Internal: the data files will be created to internal storage for App, which is safer.

Tips/Notes

– To protect record data, set Storage to Internal before recording.

Restrict App

Categories: Restrict App
Tags: No Tags

To prohibit the FRep’s recording/replaying in specific app, set available app list in this screen.
CHECKED apps are available, i.e. FRep can record/replay in CHECKED apps, and FRep stops recording/replaying soon when UNCHECKED apps are detected.

Screen LayoutFRep Available App

– (App List)
All apps in the device, except FRep, Phone and Google Play which are restricted by default.
Uncheck apps to restrict FRep operation.

Menus

– Restore
Reset to initial state.

– Check All
Check all apps to permit FRep in all apps.

– Uncheck All
Uncheck all apps to inhibit FRep in all apps.

Tips/Notes

– FRep notification will show “FRep protected”, in UNCHECKED (restricted) app and FRep self, Phone and Google Play.

– If you encountered unexpected “FRep protected” notification in CHECKED apps, tap the notification and send the shown popup message to support address.  (see FAQ/troubleshooting)

Main Menu (Launcher)

Categories: Main Menu (Launcher)
Tags: No Tags

Starting Screen of FRep Launcher App, consists of Main Menu and Record Settings.

As for initial setting, see [Setup Tool].

Main MenuFRep Main Menu (Simple)

Start/Stop Service
After initial setup, pushing Start/Stop Service will switch the running state as Service Running/(Not running).  FRep is only available with Service Running state, which shows the FRep icon at notification bar.

Manage Traces [Click for detail]
To configure, edit or delete records.

System Info [Click for detail]
To confirm Android system information / reload the recognized input devices.

Restrict App [Click for detail]
To designate apps where FRep is disabled, for safety and/or avoiding automatic operation.  FRep self, Phone and Google Play apps are always restricted and not shown in the list.

Skin [Click for detail]
To select skin for floating console panel.

Options [Click for detail]
To adjust console display, notification and other settings.

FRep Till GapRecord Settings

FRep has 3 recording mode, switchable here.  In any mode, pushing Power button will finish recording.

– Mode: Simple (Default)
Basic mode which records input and initial screenshot, until the Power button push.  Up to 15 minutes* or 1 MB data.

– Mode: Till Gap
Simpler mode which records input and initial screenshot, until FRep detects no input period designated by the slider “Input Gap” below.  Up to 15 minutes* or 1 MB data.

– Mode: Progress
Advanced mode which records input and screenshot continuously, separated by “Input Gap” period.  No limit for total time or data size, but long recording need separation to avoid single record > 15 min* or > 1 MB.

*Limit is 10 minutes for FRep version less than 5.0.


TIPS to choose Recording Mode:

Simple / Till Gap for short recording, simple repeat tap or operations without processing delays.

Progress for long-time recording, including CPU load and/or network connection wait, etc.  This mode will automatically generate editable replay sequence with some controls. See posts in tutorial category.

Skin (requires FRep Unlock Key)FRep Skin

With FRep Unlock Key, the appearance of floating console can be changed from the Skin button.  This function requires FRep Unlock Key.

(Upper preview/chooser)
Selected skin is shown.  By tapping the left/right blue triangles, skin will be changed.

(Lower slider) BaseColor Hue
By sliding, the color hue for the skin can be adjusted.

To apply the skin, you need restart FRep Service.  After tapping Apply in the panel, tap Start/Stop Service to stop once and restart the FRep service.

TIPS

Simple tips about how to use for FRep. Tap to see next tip.

FRep Calibrate InputCalibrate Input

The dialog can be opened from menu. This collects Tap/Swipe/Long-tap/Double-tap signal information, to reuse on playing Touch control, or Tap Center on Success in Wait Image control designated by Edit Sequence.

– Start Calibration
Start collecting the touch signal information respectively.  Do touches as shown in the dialog.  After touches, push Test button and confirm the touch operations complete without stop, then save them.

Note that the first single tap may be difficult on highly-sensitive touch screen. Try a touch as quick as a flash, after waiting 1 second from retry notification. The threshold will be loosen as the single tap fails.

– Diff Conf.FRep Input difference
Only when the Touch control or Tap Center on Success in Wait Image control played at shifted position, push this button to configure offsets.  If the functions have no problem, do not set values (i.e. set 0 for all directions).

By setting values at the box of each direction (based on the standard direction of device hardware), you can set the offset for the coordinates of touch device.  If your device has sub-display, to adjust the input coordinates for main display, set the size of the input range for the sub-display.  Since the size and direction depend on the machine, please try some values, by considering the rate and difference between Touch device and Screen pixels.

The size of Touch devices: are max value for each coordinate (so actually the device use 0~max), obtained from the touch input device.  Since the input signals are adjusted by built-in method, the size are not necessarily matched with the Screen pixels.  For example, some machine have precise touch device which has more than double the screen resolution, some have touch device which has same lengths for both of vertical and horizontal axes.

Menus

– Recheck Rooted State
By tapping this, FRep will retry booting up with “su” command in rooted device, without setup tool.
Note that most of su management tool needs to designate permission of su use for each app.

If FRep already started with rooted mode, you can choose booting method from Default or Legacy.

– Calibrate Input
Open Calibrate Input dialog.

Send Stop Signal (only for support)
By tapping this, FRep will try stopping current recording/replaying by sending stop signal to the native program which records/replays.

Terminate strserv (only for support)
By tapping this, FRep will try finishing process of native program which records/replays.

Replace strserv (only for support)
By tapping this, FRep will try replacing files related with native program.

Replace strserv (only for support, only for Android 4 or later)
By tapping this, FRep will try replacing files related with native program.

Switch ABI (only for support, only for Android 4 or later and some CPUs)
By tapping this, FRep will try replacing files for designated CPU arch.

Visit Support Site
Open this support site.

Visit Tutorial Page
Open tutorial page.

Visit FAQ Page
Open FAQ page.

System Info

Categories: System Info
Tags: No Tags

Confirm system information/reload input devices of FRep recognized.  This is mainly for support.
To reload devices, open menu and select “Reload devices”.

Device InformationFRep System Info

– (Unlock info)/Model Name/Android Version
– Screen resolution/Calibrated status/Touch difference/SELinux status/BatteryOpt/etc.

System information of FRep and Android for support.
BatteryOpt keyword means FRep app can be stopped by system because of the battery optimisation function of Android 6~.  (Related info)

– Ver. DDMMMYYYY/version [CPU type]
Version of internal program, which records/replays input devices such as touchscreen, switch, and keyboard.

– # input devices
Id and information of each supported input device.
The id of external devices (USB, Bluetooth) are shown as pushed button.

*The buttons cannot be pushed.

When the ids on buttons are shown as “A→B”, the previous input device id A changed to current id B.  If the id of the touch input device changes, the recorded data cannot be played. If you encounter the problem, please try followings to solve it.

– Push Reload in menu to refresh input device recognition.
– Change the setting as Device Order: Keep saved order (Default) in Options.
– (Machine dependent) Reboot Android with or without earphones.

If “A→B” ids shown but the previous record can be played without problem, you can store current input device ids as default by; 1. tapping the message “Unmatched device id found. Reload from menu or tap here to edit” to change to edit mode, 2. select menu “Save devices”.

(Only for support) To change device order id, you can move to edit mode by long-tapping the message “(Reload from menu for USB/BT device)”.  In edit mode, Long-tapping and dragging will change the order (id) of the device item.  You can reset or save current devices from menu.  Be aware that FRep cannot replay operations for the device which id is different at the recording from at the replaying.  So please do not edit the device id for regular use.

If you still have the problem, please inform us (support[at]strai.x0.com) about it with the screenshot of this System Info.

Menus

– Reload devices
By tapping this, FRep will reload and update device list.

– Copy support info
By tapping this, the information in the screen, traced last error and last replay/record are copied to clipboard.

– (Only in edit mode) Reset devices
Initialize all input devices by loading native order, then refresh the device id list.

– (Only in edit mode) Save devices
Store the current device ids. With Device Order: Keep saved order (Default) in Options, the stored ids will be used for recording / replaying.

Tips/Notes

– Android 2.3.x may always show external device, because they are patched version to support external devices.

– FRep does not support compass nor acceleration sensor.

Device Specific Info

Categories: Device Specific Info
Tags: No Tags

– Xiaomi

Recording cancelled, no input device in FRep System Info. (on Redmi, Mi series)
Replay cancelled, while input devices exist in FRep System Info.
(on Android 10 Mi 9T Pro, PocoF1)
Check ON USB debugging (Security settings)* in Developer options of Android settings, which is specific for Xiaomi devices.  After switching it ON, reboot Android and use FRep Setup Tool.

*USB debugging (Security settings) may require signing in Mi account.

– Huawei

Touch operations are ignored or confused by Android after interruption of replaying touch operations
Please try setting Clean up touch signals: Reassign all slots (or Reassign all slots on interruption) in System settings.

FRep Setup Tool does not work (after updating to Android 9, etc.)
If the error message is “/sdcard/Android/data/com.x0.strai.frep/files/strserv: No such file or directory”, check the Android Settings – Memory and Storage – Default location.  If it is set as SD card, switch it to Internal storage (Note: please be careful that it will affect other apps’ data location), then reboot Android device, start FRep app, try FRep Setup Tool.

– Asus Zenfone Max M2, Max Pro M2 (Android 8, 8.1)

FRep crashes on replaying records or sequences.
From the reports on some specific environments with Android 8 and 8.1, the notification popup (Toast) fails to be processed by Android OS (ref. StackOverflow).  Try switching OFF Notify Play Process in Rec/Play Settings option.

– LG LGS02, L-01J with Android 6

The screenshots in preview are rotated incorrectly / Wait Image always fail.
From some reports, the rotations of taken screenshots by FRep are different from ones on standard Android 6.  Try switching Screenshot Rotation to As-Is(Android ~5) in Screenshot Settings option.

LG V20 Pro, L-01J

The touch position is shifted when Touch Screen or Image (with Tap center option) control is played.
The touch position is shifted in preview.

It is caused by the offset of the range of touch input device and the main screen, i.e. touch input device has extra range for second screen.  Do Calibrate Input and push Diff Conf. button, then set 160 at the top box in the panel for the offset of second screen.

– Moto G5

After interruption of replay, FRep app does not respond.
Try switching Clean up touch signals to Reassign all slots in System Settings option.

– SAMSUNG Galaxy Series, Samsung DeX supported on Android 10

strserv stops when USB cable is disconnected after setup with PC/Mac
Galaxy Note 9 (Android 10), Galaxy S20 Fe do not keep strserv process even with USB connection mode: File transfer (MTP) as described in Galaxy devices specific workaround.   From user’s report, installing Samsung DeX to PC fixes the issue, to keep strserv process after the setup and USB disconnection.

SAMSUNG Galaxy Series (Samsung Knox installed)

Wait Image or Take Screenshot fails.
Workaround: try switching Temporary Directory in Screenshot Settings option.  If your device is rooted, see also the [Rooted] sections below.

‘An application has been forced to stop for an unauthorized attempt to access system in your device’ message shown
Obviously it is shown by Samsung Knox, which is specific security for Samsung’s devices/updates.  If you use stock ROM, please inform us whether FRep works or not, with the environments of Model No., Android version, Knox availability, and rooted or not. The results of following workarounds will be appreciated too!
reference about the message

[Rooted] Replay of Push Key, Type Text, Touch Screen fails
Try checking Off Use As-Is UID (Rooted) in System Settings option.

The recording stops soon after a touch / Cannot record or replay image match, with shown E icon at notification bar
Workaround 1. [Rooted only] Check Off “Use As-Is UID (Rooted)” in System Settings option.
Workaround 2. Switch “Temporary Directory” in Screenshot Settings option.
Workaround 3. Check Off “Save Screenshot” in Screenshot Settings option, to skip issue.  Or, please try to set “Screenshot Method” to Read Framebuffer instead of Off that, and then please report to us whether it works or not.
Workaround 4. [Rooted only] Do not use rooted mode launch.  Prohibit FRep to use su in SuperSU,  Superuser or such, and then connect PC/Mac/another Android to setup by FRep setup tool.

– SAMSUNG Galaxy S7 / edge

Touch or Wait Image fails after updating to Android 7.
Updating to Android 7, Galaxy S7 changes its screen resolution to FHD (Full HD) from previous one.  Please switch it back to previous resolution, and reboot Android to reset the resolution info of FRep app.

SAMSUNG Galaxy series (Common)

Touch operations over popup notification (toast) are ignored
Since the toasts of Galaxy series absorb the touch operation, take care when you replay/edit records including touch over/around them. You can suppress toast in playing either by setting Notify Play Process option OFF, or set the Label empty in Edit Sequence.

The setup tool fails and shows “error:device not found” even after installation of Samsung Switch/Kies.
Please try to install the 3rd party’s driver.  We hear from many S2 users succeeded with that.

– OnePlus One A0001

The setul tool exits without error message, or with “←7←[r←[999;999H←[6n←8”
Download and extract another setup tool script from following, and place it to the same folder with win(.bat), mac.sh or linux.sh.  Then, try it.
Windows) win_alt_custom.zip
Mac) mac_alt_custom.zip
Linux) linux_alt_custom.zip

– NEC CASIO Medias X

The record/replay includes sleep
Case 1. FRep records/replays SLEEP button. Please try to push POWER button to finish recording.
Case 2. Before recording, switch to “Till Gap” at RECORD SETTINGS in FRep launcher app.

– Sony (Sony Ericsson) Xperia series

Where is the driver for my Xperia?
Retrieve from here.

– Fujitsu Arrows series

Where is the driver for my Arrows?
Search and download from the bottom of here (Japanese).

F-05F, F-02G(after update to build V09R24D): Suddenly FRep fail to replay / record touch operations
This problem is modified but not solved (FRep 3.8).  Check the System Info screen and if there are not TOUCH (MULTITOUCH) devices, reload from menu to recover.

Touch operations are ignored by Android after interruption of replaying touch operations
This problem is fixed (FRep 3.8).  If you found similar problem, please inform us with the screenshots of System Info and the preview of the played record.

– Google nexus series

Where is the driver for my nexus?
Retrieve from here.

– Panasonic ELUGA

Where is the driver for my ELUGA?
Retrieve from here.

– Kyocera

Where is the driver for my device?
Search and download from here (Japanese).

– Models on which touch devices can not be access suddenly

This problem is modified but not solved (FRep 3.8).  From research on model F-05F, even on USB debugging connection, the touch input device disappears in the list irregularly, and the cause is unknown at present.

F-05F, F-02G(after build No. V09R24D)
HTL23
Y336-02, G6-L22
KYY24

To test the Image Match

Categories: Tutorial

Wait Image control is for better reproducibility of the replay, by comparing current screenshot with recorded one.  With Progress recording mode, you can get sample sequence with Wait Image for initial touch point for each recording term.

*Before trial, confirm the Option: Screenshot is ON.

1. Launch FRep app, and set RECORD SETTINGS as Progress.
2. Record some operation.
*Try pausing your operation at the timing of Image Match when you want, and confirm the popup “Ready to Continue Recording..”, then continue operation after the popup disappear.
3. Start Manage Traces and Tap the left label on yellow button of the record, to open Edit Sequence.
4. Confirm the “Wait Image” item exists, with [Skipped] and grayout.
5. Tap the image icon of the item, to check the contents of Image Match. (See the circle or hole shape image at first touch point on the record).
6. Tap the Number of the “Wait Image” to be tested, for enabling the it by release from [Skipped] state.
7. Back to app which it was recorded, and try replaying.

*If the Image Match do not generated with progress mode, see also Troubleshooting.

**You can generate your own Image Match area/mask by adding control manually.

«page 1 of 2


Amazon
USB OTG adapter

USB OTG cable

USB OTG (host) adapter to connect between 2 Android devices, for FRep setup tool for Android


Bluetooth Keyboard

Bluetooth keyboard for KeyTrigger


Tabletop smartphone stand

Tablet stand
AdSense