
[![]() OCR] (Requires
OCR] (Requires ![]() Unlock Key)
Unlock Key)
Status, Tag, Label, Post Process
In settings pane, tapping top icon opens settings to set the item’s state.
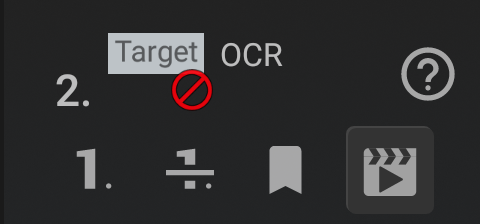
![]() Set normal state.
Set normal state.
![]() Set skipped state, to disable the item.
Set skipped state, to disable the item.
![]() Set marked state, as preferred destination.
Set marked state, as preferred destination.
![]() Set settings of Scene Check, “Start here if there is this OCR string”
Set settings of Scene Check, “Start here if there is this OCR string” ![]()
![]() .
.
*Skipped items are ignored in Scene Check.
 Insert first Scene.
 Append Scene.
 Set/Insert Scene number.
 Set as starting item when all Scenes do not match.
 Unset Scene setting.
 Add / Edit the one-line note. (Only when the state setting is closed)
In Label section, tag color and name of the item can be set.
![]() Set tag color. Default color is transparent, at the top-left in tag color palette.
Set tag color. Default color is transparent, at the top-left in tag color palette.
![]() Edit label.
Edit label.
In Post Process section, destinations after the item processed can be set;
On Finish, On Success, Fail(Empty)
After tapping the button, select from Next, Abort, Return, Item or tap the destination item directly in the item list of left pane.
 OCR
OCR
*Available only with Unlock Key![]()
Take a screenshot and then recognize strings by calculation on device (offline) with Google ML Kit (TextRecognizer) model.
Mode: Recognize 1 line will get string in designated location, and mode: Find word in screen will search all words in designated area in screen. If detected string / word passed the thresholds and/or the string condition (matching substring or regular expression), this control succeeds and you can set tapping center and/or storing the string/location to variable. If no strings found meet the criteria, this control fails, and can be used to branch the sequence.
When creating new OCR control, Select OCR Target will open.
OCR Settings
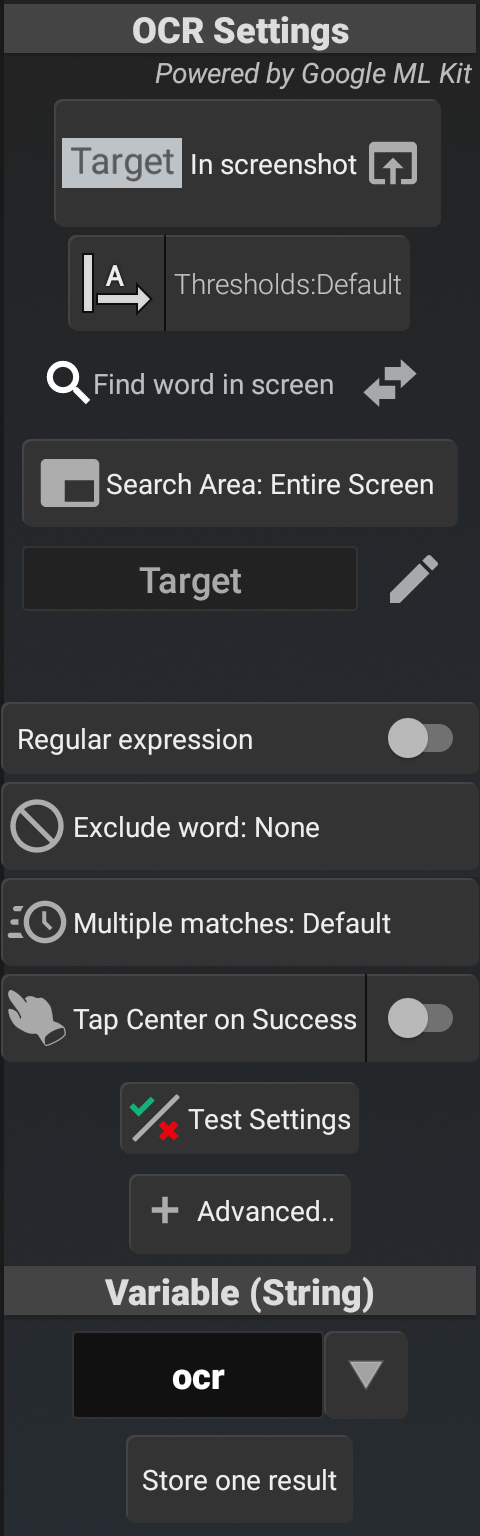
OCR area in screen, thresholds for ML Kit, and post OCR processing (of results) settings. The coordinate system is based on device standard screen rotation, the top-left is (0,0), X-axis is left-right (0~screen width), Y-axis is top-bottom (0~height: positive larger value means lower position).
![]() In Screenshot Open OCR Conditions to edit the configuration and the position of target with testing.
In Screenshot Open OCR Conditions to edit the configuration and the position of target with testing.
![]() Orientation, Letter set (language), Thresholds settings.
Orientation, Letter set (language), Thresholds settings.
![]() Find /
Find / ![]() Line mode
Line mode ![]() (Tap to switch)
(Tap to switch)
![]() Search Area Area in screen for search string(s) by Find mode (Tap to edit), or area for Line mode
Search Area Area in screen for search string(s) by Find mode (Tap to edit), or area for Line mode
(Any Word) ![]() Match string to filter result
Match string to filter result
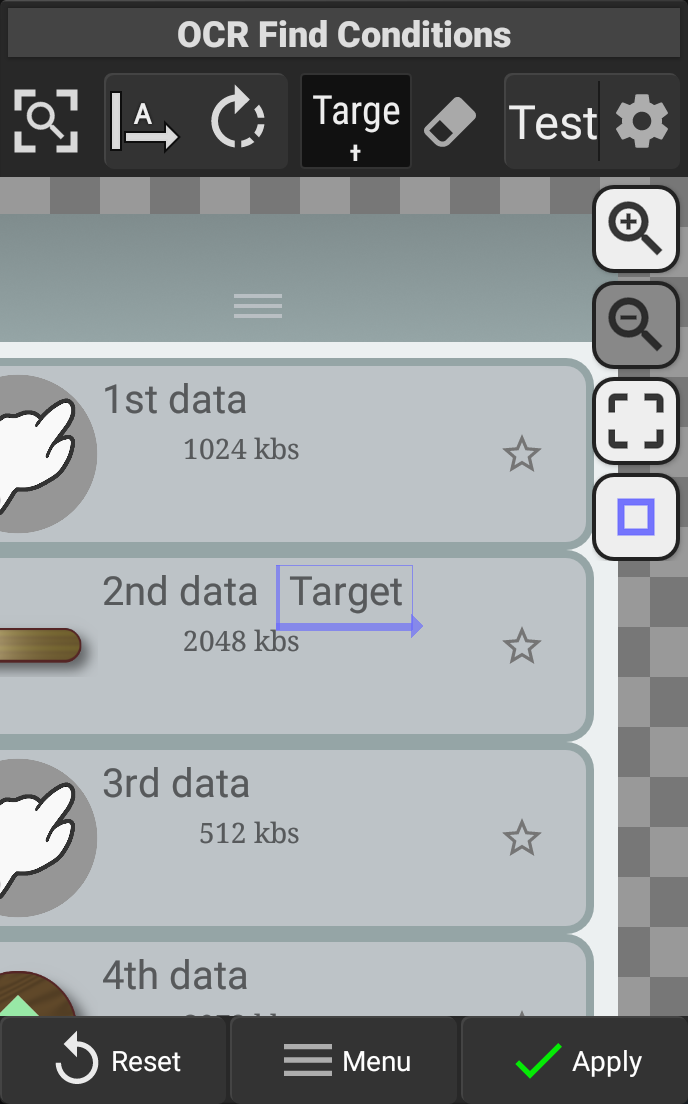
If no string is specified, any detected string will be considered as successfully matched, while it will fail (empty) if no result string is detected by OCR process.
*In the example, ‘Target’ is set for Find mode, which will succeeds when the screen has ‘Target’ string.
Regular expression If ON, use the match string above as a regular expression
![]() Exclude word Results containing this string will be excluded
Exclude word Results containing this string will be excluded
![]() Multiple matches Setting the priority when multiple results are obtained
Multiple matches Setting the priority when multiple results are obtained
![]() Tap Center on Success If the matching succeeds, tap the center position of the matched rectangle. (On Precision mode, it requires Calibrate Input.)
Tap Center on Success If the matching succeeds, tap the center position of the matched rectangle. (On Precision mode, it requires Calibrate Input.)
- To adjust the timing of the tap, open After: setting by tapping left button area, and designate the seconds to wait after successful match.
- To adjust the coordinate of the tap, set Adjust tap position in Advanced Settings below.
![]() Test Settings Test current match settings on screenshot image. To test Image File, requires Storage / Media access permission. When the test result is failed, you can
Test Settings Test current match settings on screenshot image. To test Image File, requires Storage / Media access permission. When the test result is failed, you can ![]() Retry with different thresholds.
Retry with different thresholds.
Variable (String)
Specify the variable that stores the result string.
*To store result rectangle, configure On Success: [Set variable] in Post Process, to store the value of @lastmatch in the variable of your choice.
To check the detected strings, tap to change Store one result to other setting;
Store one result (default) Stores final one result.
Store all results Stores all result strings after filtering (space delimited).
Store all recognized Stores all detected OCR strings before filtering.
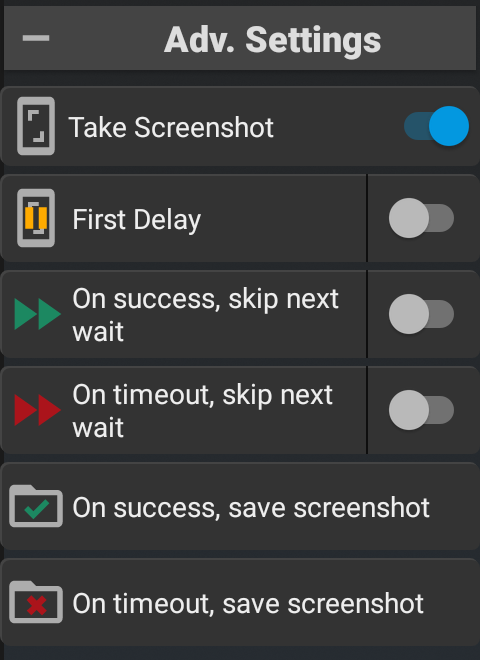
Advanced Settings (Adv. Settings)
![]() Adjust tap position (Only with
Adjust tap position (Only with ![]() Tap Center on Success) Set (±X, ±Y) to tap offset position from the center of the match rectangle.
Tap Center on Success) Set (±X, ±Y) to tap offset position from the center of the match rectangle.
![]() Take Screenshot Take screenshot(s) for OCR. If OFF
Take Screenshot Take screenshot(s) for OCR. If OFF ![]() , the control does not take screenshot, but only calculate for last screenshot which taken by other Image / OCR / Take Screenshot or such.
, the control does not take screenshot, but only calculate for last screenshot which taken by other Image / OCR / Take Screenshot or such.
![]() First Delay Wait designated seconds before taking screenshot, to wait screen change by previous operation.
First Delay Wait designated seconds before taking screenshot, to wait screen change by previous operation.
![]() On success,
On success, ![]() On timeout, skip next wait Skip or overwrite next wait seconds of Wait or operation record item, on success or timeout.
On timeout, skip next wait Skip or overwrite next wait seconds of Wait or operation record item, on success or timeout.
- Skip next wait (by tapping right toggle, or setting Next Wait: 0 sec): Ignore next wait seconds, to replay operation of next item.
- (Set) next wait (by tapping left button): Ignore next wait seconds, but wait designated seconds instead.
![]() On success,
On success, ![]() On timeout, save screenshot Save the screenshot to designated path on success or timeout, to check it after you get unexpected result. The saved screenshot can be tested by tapping the button.
On timeout, save screenshot Save the screenshot to designated path on success or timeout, to check it after you get unexpected result. The saved screenshot can be tested by tapping the button.
Select OCR Target
In the screenshot image, select one target as initial sample, from strings found by OCR calculation. The selected sample will be used for initial conditions of subsequent settings.
*If no string detected, Next will open Set OCR Target / Sample.
![]() Next Continue with initial conditions based on selected target and purpose.
Next Continue with initial conditions based on selected target and purpose.![]() Find word in screen (Find mode) Settings to check if target string exists or not in screen.
Find word in screen (Find mode) Settings to check if target string exists or not in screen.![]() Recognize 1 line (Line mode) Settings to read string at target location.
Recognize 1 line (Line mode) Settings to read string at target location.
A Latin (language) Change letter set of the model for OCR. (models in ML Kit)
Menu – Change Replace the base screenshot image by Existing Image (if the record has any screenshots) or Image file (requires Storage / Media access permission to Select Screenshot Image from file list).
OCR Line / Find Conditions
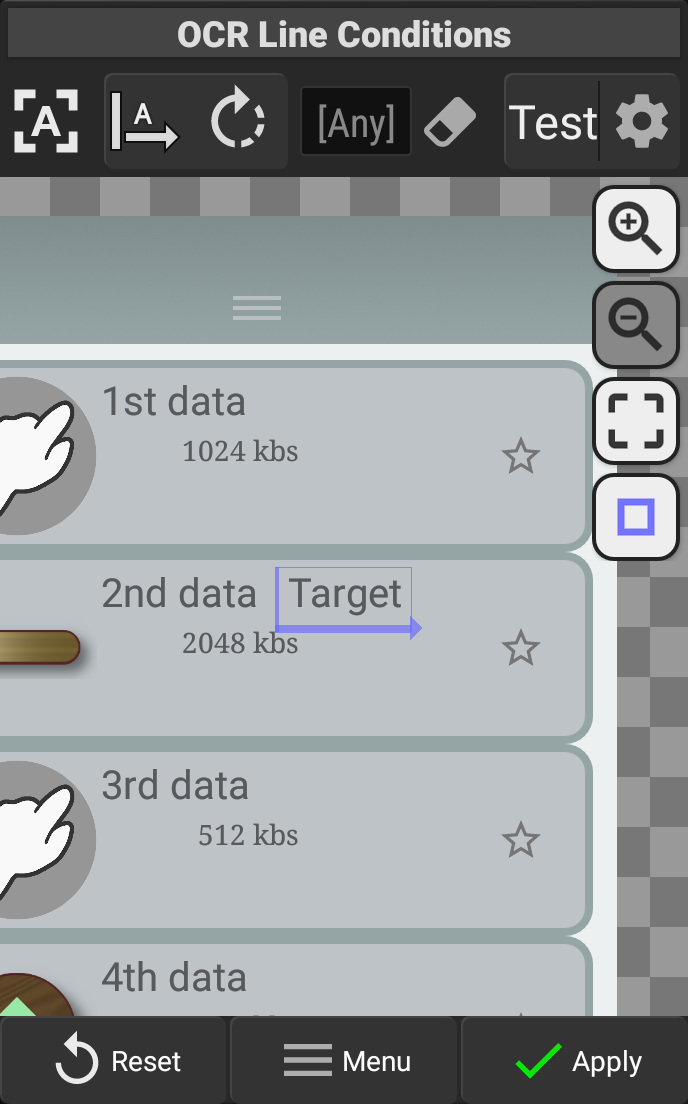
In the screenshot image, select one target as initial sample, from strings found by OCR calculation. The selected sample will be used for initial conditions of subsequent settings.
For 1 Line mode, the frame with orientation arrow is target location to recognize. For Find mode, the frame is sample area.
![]() (Find)/
(Find)/![]() (line) Current mode. Tap to switch.
(line) Current mode. Tap to switch.
![]() Current letter set (lang) and orientation for OCR process. Tap to change letter set.
Current letter set (lang) and orientation for OCR process. Tap to change letter set.
![]() Rotate the orientation for OCR.
Rotate the orientation for OCR.
[Any] Empty target string, to accept any detected string.
(String) The string that must be matched to the recognition result.![]() Clear target string.
Clear target string.
Test Run OCR process with current settings, and then show the result string. The green rectangle is the final result area, and red rectangles as others (if exist).
![]() Configure thresholds
Configure thresholds
Word Threshold: (default 40)~ The required confidence (%) for detected word.
Char Threshold: (default 10)~ The required confidence (%) for detected character.
Degree Threshold: ~(default 6°) The upper limit degree for detected word.
(Only for Find mode)![]() or other priority.
or other priority.
![]() Zoom In /
Zoom In / ![]() Zoom Out
Zoom Out
![]() Focus
Focus
![]() Change color of the frame
Change color of the frame
Menu – Edit Rect Open Set OCR Target / Sample, to edit target rectangle manually.
Menu – Change Replace the base screenshot image by Existing Image (if the record has any screenshots) or Image file (requires Storage / Media access permission to Select Screenshot Image from file list).
Set OCR Target (1 line)
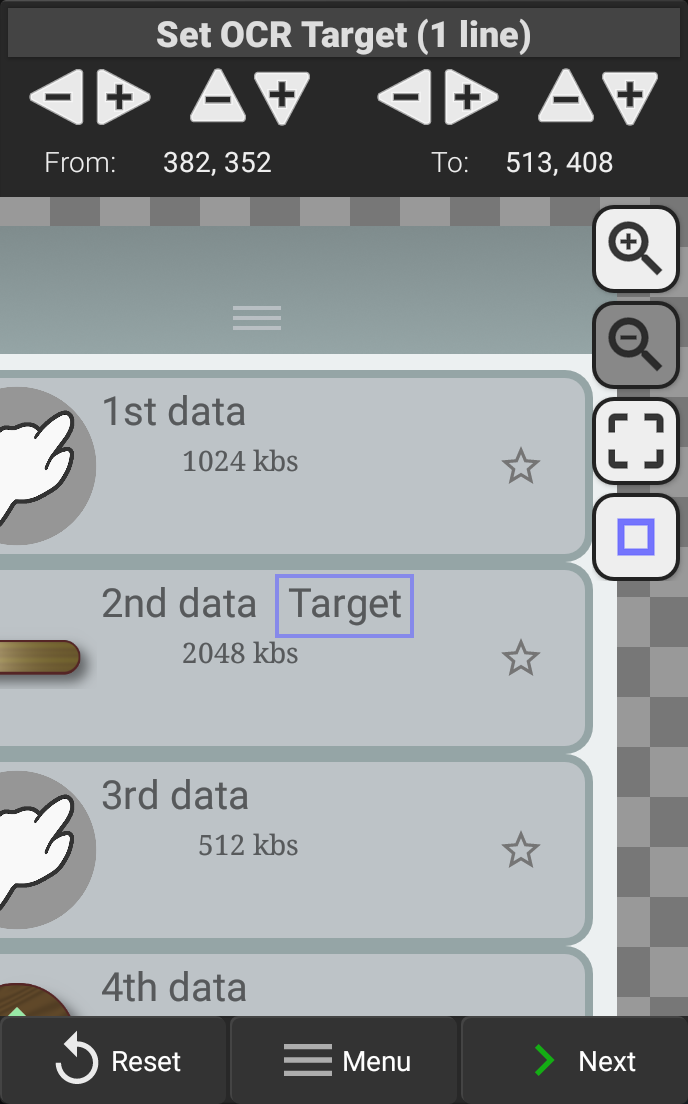
From the screenshot image, set the target area to detect characters.
*It is NOT the search area for Find mode.
The target area is the internal area of the frame. The coordinates of the frame can be changed by dragging or pinch.
From: (Left, Top) To: (Right, Bottom) Current coordinates (based on device standard screen rotation) of the frame. Tapping / flicking the upper ± button will adjust each value.
![]() Zoom In /
Zoom In / ![]() Zoom Out
Zoom Out
![]() Focus
Focus
![]() Change color of the frame
Change color of the frame
Menu – OCR Line Conditions Switch to conditions page.
Menu – Change Replace the base screenshot image by Existing Image (if the record has any screenshots) or Image file (requires Storage / Media access permission to Select Screenshot Image from file list).
Priority for OCR Find results
For ![]() OCR Find, if multiple results in screen (in search area), one of them will be selected.
OCR Find, if multiple results in screen (in search area), one of them will be selected.
By default ![]() , first result will be selected, but the location is uncertain.
, first result will be selected, but the location is uncertain.
To prioritize the find results (matched target) based on position from multiple targets, choose preferred position.
![]() Default Select first found as the result.
Default Select first found as the result.
![]() (Vertical Axis) Select the result closest to top, vertical center, or bottom of the search range.
(Vertical Axis) Select the result closest to top, vertical center, or bottom of the search range.
![]() (Horizontal Axis) Select the result closest to left, horizontal center, or right of the search range.
(Horizontal Axis) Select the result closest to left, horizontal center, or right of the search range.

(Point-based) Select the result closest to the edge* (or center ![]() ) of the search range.
) of the search range.
*The position, vertical axis, horizontal axis, are based on the device’s standard screen rotation.