
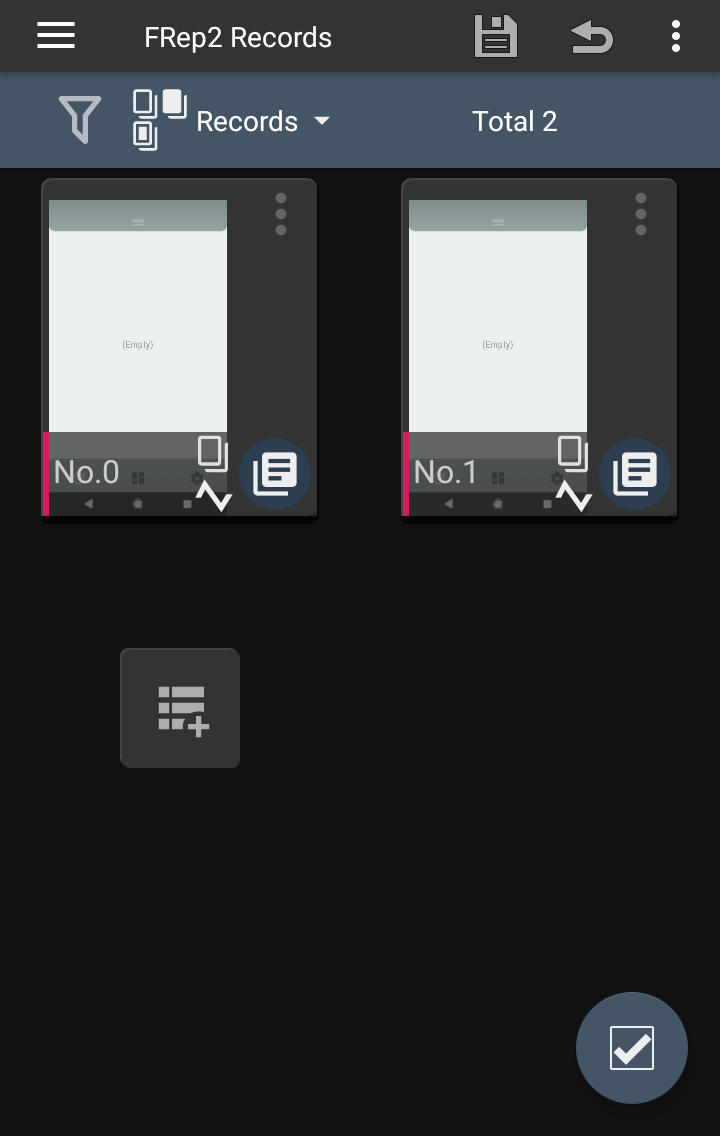
 Records
The operation records are shown in list. If there is no records, How to Record / Replay is shown.
By tapping a record, you can see and edit the details of it in Edit Record.
By long-tap and dragging*, you can replace the record position in list. The order of the records will be reflected to the list in console.
*To avoid dragging to move, long-tap circle button or set Disable Drag Move.
![]() button will add new empty record.
button will add new empty record.
![]() With Unlock Key, you store 4 or more records.
With Unlock Key, you store 4 or more records.
Record Item
Each record item has screenshot and some short information.

- Tag color for sorting
- Label
- Settings icons (refer the icons in Filter bar at top of screen)
- App icon on which the record appears

Filter
The list shows the records matching the filter, designated in the top bar. You can switch the filter and/or type.

Menus for Individuals, Selection
Tapping ![]() icon at top-right of each record will open the menus for the record.
icon at top-right of each record will open the menus for the record.
Tapping ![]() (or
(or ![]() ) at bottom-right button and records will select them, then tapping the same button
) at bottom-right button and records will select them, then tapping the same button ![]() will open the menus for the selected records.
will open the menus for the selected records.
![]() Tag Set tag color, which is shown at the left of the record.
Tag Set tag color, which is shown at the left of the record.
![]() Console Set the console type on which the record appears.
Console Set the console type on which the record appears.
![]() Flick To select record by flick the upper button of the console, set flick direction.
Flick To select record by flick the upper button of the console, set flick direction.
![]() Log shots (Only with Enable Log Screenshots: ON) If ON [
Log shots (Only with Enable Log Screenshots: ON) If ON [![]() shown on icon], trace log will also store the screenshots taken on next replay
shown on icon], trace log will also store the screenshots taken on next replay
![]() Add Simple (Only for record without operation data of Simple mode) Add operation data of Simple mode by converting.
Add Simple (Only for record without operation data of Simple mode) Add operation data of Simple mode by converting.
![]() Duplicate Duplicate the record.
Duplicate Duplicate the record.
![]() (Only with Unlock Key)
(Only with Unlock Key)![]() Export Export selected records to .frep2 file.
Export Export selected records to .frep2 file.
![]() Delete Delete the record.
Delete Delete the record.
Menus
![]() Save Apply edited / deleted items and save current list.
Save Apply edited / deleted items and save current list.
![]() Load Restore the saved list.
Load Restore the saved list.
Usage Show How to Record / Replay information.
Optimize DB Verify current data and remove unused one if exists.
Import .frep2/frepdb Import records from .frep2 file exported by Export menu, or .frepdb file which is exported by FRep – Finger Replayer. *
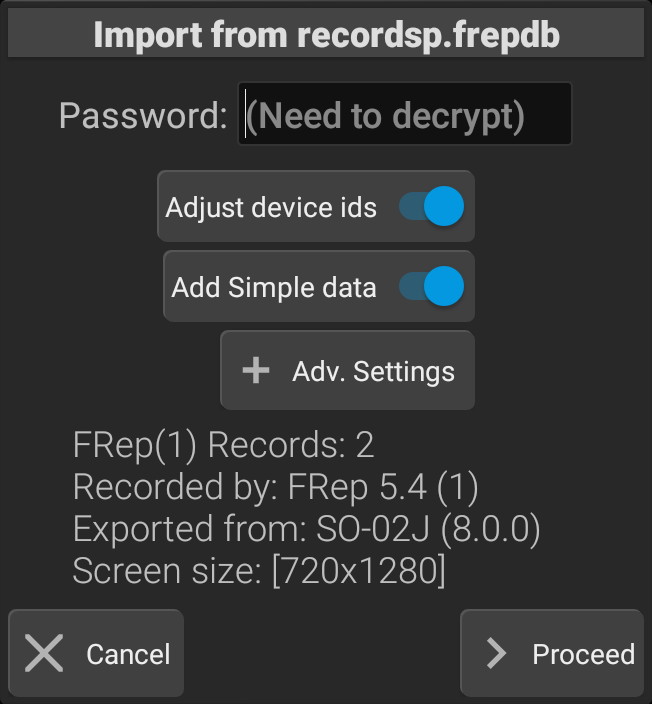
When choosing the menu, your device will launch the filer app to select file. Tap the .frep2 or .frepdb file to import records, then the dialog will be shown.
Password; to decrypt the encrypted file. (Shown only when the file is encrypted)
– Skip incompatible data (.frep2): If ON, ignore operation data for precision mode when the input devices in the file are incompatible.
– Adjust device ids (.frepdb): If ON, arrange the input device ids before import.
– Add Simple data: If ON, add data for Simple mode from the records and input device info. *Data including unsupported operations or controls for Simple mode cannot be added.
The default settings for force import are to try importing as the records of Simple mode. However, any force imported data may not work correctly. Please use them for reference, or for template which requires replacing operation items (because of different input devices), image matching controls (because of different screen resolution, rendering system), or such.
– Import Precision data: (Default is OFF) If ON, as-is operation data for precision mode will be imported, ignoring the compatibility. If OFF, the operation data for precision mode will not be imported.
– Add Simple data: (Default is ON) If ON, add data for Simple mode from the records and input device info. (same setting with above)
Proceed button will prepare importing and open records list. Check the records you want to import and push bottom-right button, and Import menu.
(For importing .frep2 after Precision mode setup) With Import Calibration data: ON, the data and settings of calibrated input are overwritten by ones of importing .frep2 file.
*Records calling procedure(s) must be imported at the same time. So checking caller record will also check the called procedure(s) in the list.
*If you need to adjust the touch position after importing, such as because the display position is different due to forced import or a notch, you can ![]() Adjust Coords all at once from Edit Sequence.
Adjust Coords all at once from Edit Sequence.
![]() (Only with Unlock Key)
(Only with Unlock Key)
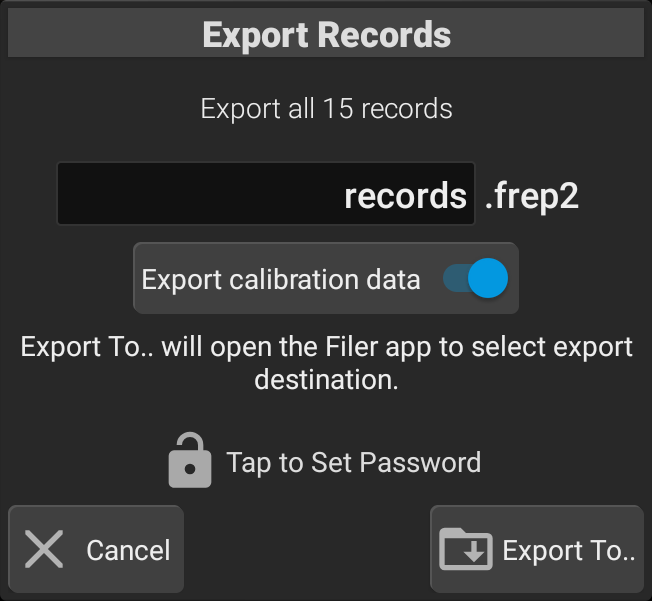
Export Write the records to .frep2 file for saving. The imported records from the exported .frep2, can only be replayed directly on devices with the same screen resolution (and compatible input devices for precision mode data).
(*If the display area is off due to a notch etc., adjustment is required after importing)
To export only some items, select the records to export and then choose Export in Menus for selection.
Tapping Export To button after designating file name, will launch the filer app to select file destination.
*Some filer app does not overwrite the file of the same name, until tapping the file of the same name in the filer app.
IMPORTANT: After selecting destination, WAIT for ‘Export completed.’ popup to avoid deficient exported file.
*External files are not included in the exported .frep2 file.
Editor Settings
- Switch Grid/List
 If many records, they are displayed in list format, without screenshot.
 - Skip Confirmation If ON, the confirmation dialog will be skipped, ex.) delete.
- Disable Drag Move If ON, the position of records are fixed. Shown as
 and long-tapping the circle button switches the state.
 - Edit Seq. on Tap If ON, tapping a record will open Edit Sequence directly. You can back to Edit Record from Edit Sequence.
- Auto Compress BMP If ON, the BMP type screenshots on recording are automatically compressed to PNG when the Records page opens.