
Status, Tag, Label, Memo, Post Process
In settings pane, tapping top icon opens settings to set the item’s state.
![]() Set normal state.
Set normal state.
![]() Set skipped state, to disable the item.
Set skipped state, to disable the item.
![]() Set marked state, as preferred destination.
Set marked state, as preferred destination.
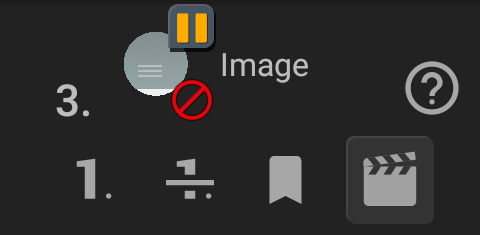
![]() Set settings of Scene Check, “Start here if there is this image”
Set settings of Scene Check, “Start here if there is this image” ![]()
![]() .
.
*Skipped items are ignored in Scene Check.
 Insert first Scene.
 Append Scene.
 Set/Insert Scene number.
 Set as starting item when all Scenes do not match.
 Unset Scene setting.
 Add / Edit the one-line note. (Only when the state setting is closed)
In Label section, tag color and name of the item can be set.
![]() Set tag color. Default color is transparent, at the top-left in tag color palette.
Set tag color. Default color is transparent, at the top-left in tag color palette.
![]() Edit label.
Edit label.
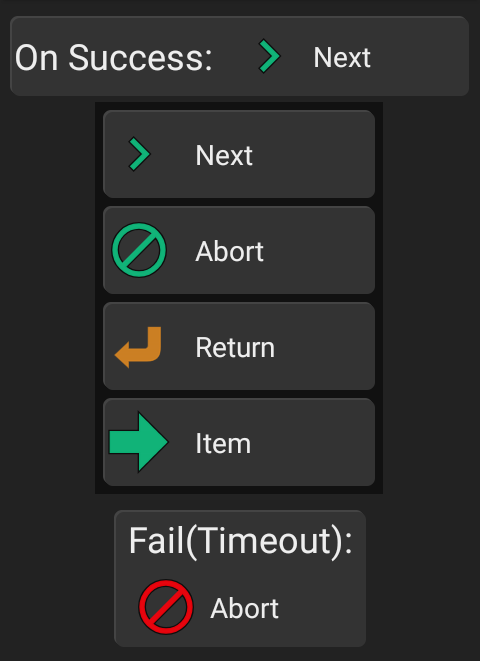
In Post Process section, destinations after the item processed can be set;
On Finish, On Success, Fail(Timeout etc.)
After tapping the button, select from Next, Abort, Return, Item or tap the destination item directly in the item list of left pane.
 Image
Image
Tips videos (CC)![]() List
List
#3 Scene Check for long sequence, #4 Automatic generation of image recognition, #5 For faster run, #6 For low-load run, #9 Cut out neatly, with both hands
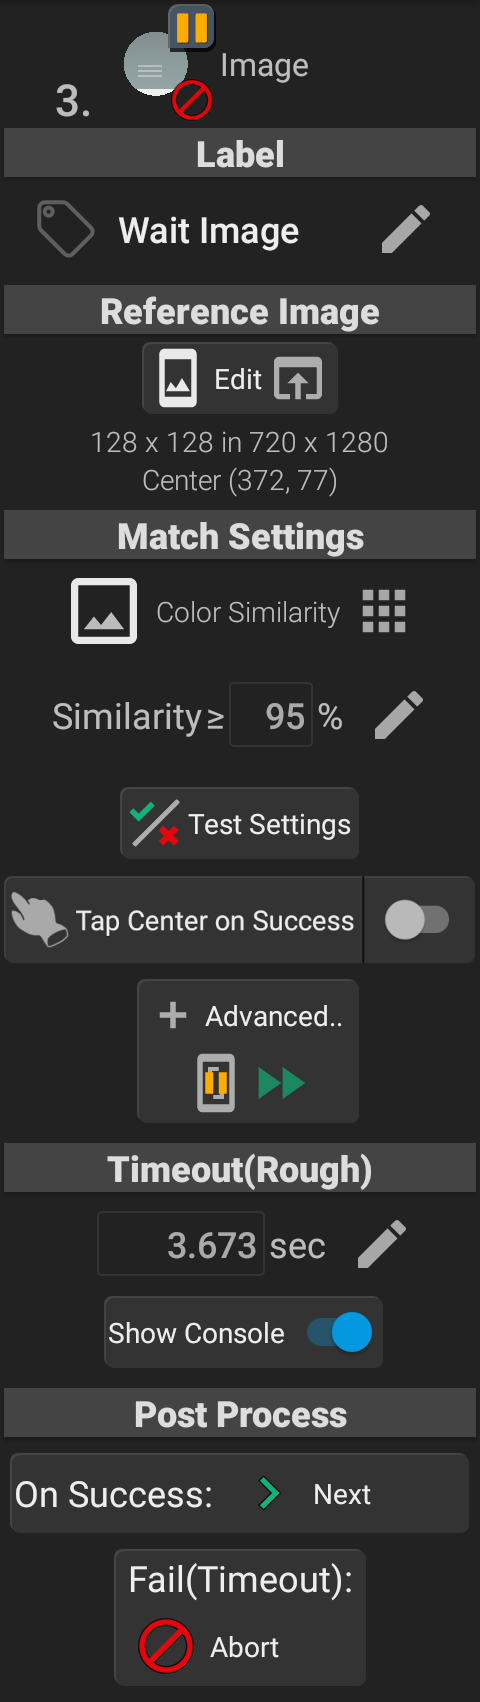
Take screenshot and then calculate recognition score with target image, to wait until / check if the screen has the image. If the score is low, taking screenshot and the calculation will be performed again within the specified Timeout. To check only once, set Timeout: 0 sec, which will execute the process once.
When creating new Image control, Set Target Image will open.
Reference Image
The rectangle of target image to recognize is described as [target image width x height] in [device screen width x height] and Center coordinates in screen.
*The coordinate system is based on device standard screen rotation, the top-left is (0,0), X-axis is left-right (0~screen width), Y-axis is top-bottom (0~height: positive larger value means lower position).
![]() Edit To change / edit the target image, open Set Target Image.
Edit To change / edit the target image, open Set Target Image.
Match Settings
Depending on the status of the apps or the device, the same image may not always be displayed, and slightly different image is displayed. You can choose match setting to allow some different image.
![]() Color Similarity Determine if the 2 images, the image at designated coordinates and the target image, match by the color similarity. Similarity 100% is same with exact match.
Color Similarity Determine if the 2 images, the image at designated coordinates and the target image, match by the color similarity. Similarity 100% is same with exact match.
![]() Match Pixels Rate Determine if the 2 images, the image at designated coordinates and the target image, match by the rate of exact match pixels rate. Rate 100% is same with exact match.
Match Pixels Rate Determine if the 2 images, the image at designated coordinates and the target image, match by the rate of exact match pixels rate. Rate 100% is same with exact match.
![]() Exact Match Determine if the 2 images, the image at designated coordinates and the target image, match by all pixels are same.
Exact Match Determine if the 2 images, the image at designated coordinates and the target image, match by all pixels are same.
![]() Search(Similarity) Search similar image with target image in screen, and determine if they match by the color similarity.
Search(Similarity) Search similar image with target image in screen, and determine if they match by the color similarity. ![]() Search Area,
Search Area, ![]()
![]() Priority for multiple matches are available.
Priority for multiple matches are available.
![]() Search(Exact) Search same image with target image in screen.
Search(Exact) Search same image with target image in screen. ![]() Search Area,
Search Area, ![]()
![]() Priority for multiple matches are available.
Priority for multiple matches are available.
![]() Test Settings Test current match settings on screenshot image. To test Image File, requires Storage / Media access permission. When the test result is failed, you can
Test Settings Test current match settings on screenshot image. To test Image File, requires Storage / Media access permission. When the test result is failed, you can ![]() Refer the reference image,
Refer the reference image, ![]() Retry with different method or threshold %.
Retry with different method or threshold %.
![]() Tap Center on Success If the matching succeeds, tap the center position of the matched rectangle. (On Precision mode, it requires Calibrate Input.)
Tap Center on Success If the matching succeeds, tap the center position of the matched rectangle. (On Precision mode, it requires Calibrate Input.)
- To adjust the timing of the tap, open After: setting by tapping left button area, and designate the seconds to wait after successful match.
- To adjust the coordinate of the tap, set Adjust tap position in Advanced Settings below.
Advanced Settings (Adv. Settings)
![]()
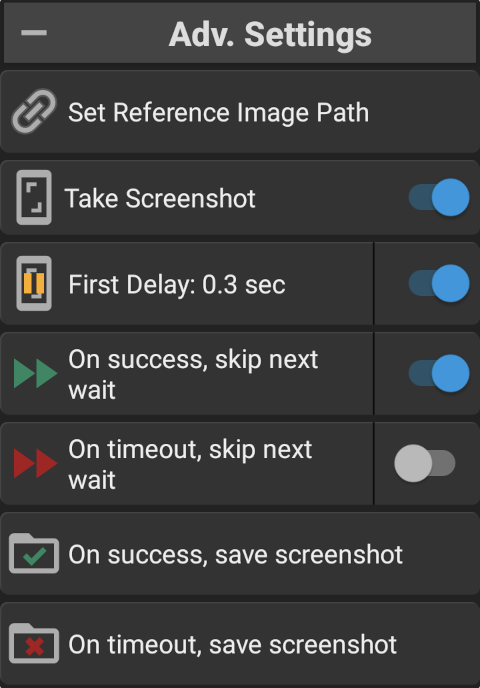
![]() Set Reference Image Path (Available only with Unlock Key) If set, FRep2 loads the image at the path before executing the Image control, to prepare target image from it, with designated rectangle coordinate and mask.
Set Reference Image Path (Available only with Unlock Key) If set, FRep2 loads the image at the path before executing the Image control, to prepare target image from it, with designated rectangle coordinate and mask.
![]() Adjust tap position (Only with
Adjust tap position (Only with ![]() Tap Center on Success) Set (±X, ±Y) to tap offset position from the center of the match rectangle.
Tap Center on Success) Set (±X, ±Y) to tap offset position from the center of the match rectangle.
![]() Take Screenshot Take screenshot(s) for image matching. If OFF
Take Screenshot Take screenshot(s) for image matching. If OFF ![]() , the control does not take screenshot, but only calculate recognition score for last screenshot which taken by other Image / OCR /Take Screenshot or such.
, the control does not take screenshot, but only calculate recognition score for last screenshot which taken by other Image / OCR /Take Screenshot or such.
![]() First Delay Wait designated seconds before taking screenshot, to wait screen change by previous operation.
First Delay Wait designated seconds before taking screenshot, to wait screen change by previous operation.
![]() On success,
On success, ![]() On timeout, skip next wait Skip or overwrite next wait seconds of Wait or operation record item, on success or timeout.
On timeout, skip next wait Skip or overwrite next wait seconds of Wait or operation record item, on success or timeout.
- Skip next wait (by tapping right toggle, or setting Next Wait: 0 sec): Ignore next wait seconds, to replay operation of next item.
- (Set) next wait (by tapping left button): Ignore next wait seconds, but wait designated seconds instead.
![]() On success,
On success, ![]() On timeout, save screenshot Save the screenshot to designated path on success or timeout, to check it after you get unexpected result. The saved screenshot can be tested by tapping the button.
On timeout, save screenshot Save the screenshot to designated path on success or timeout, to check it after you get unexpected result. The saved screenshot can be tested by tapping the button.
Timeout(Rough)
Timeout(Rough) Tap  to edit the timeout seconds. If the taking screenshot or matching calculation takes time, actual timeout may exceed the specified time.
Show Console If ON, Console in replay appears during wait the app.
The auto-generated Image controls are set Skipped by default.
As for auto-generation settings, see Generate Wait Image in Simple mode settings or Precision mode settings.
Set Target Image
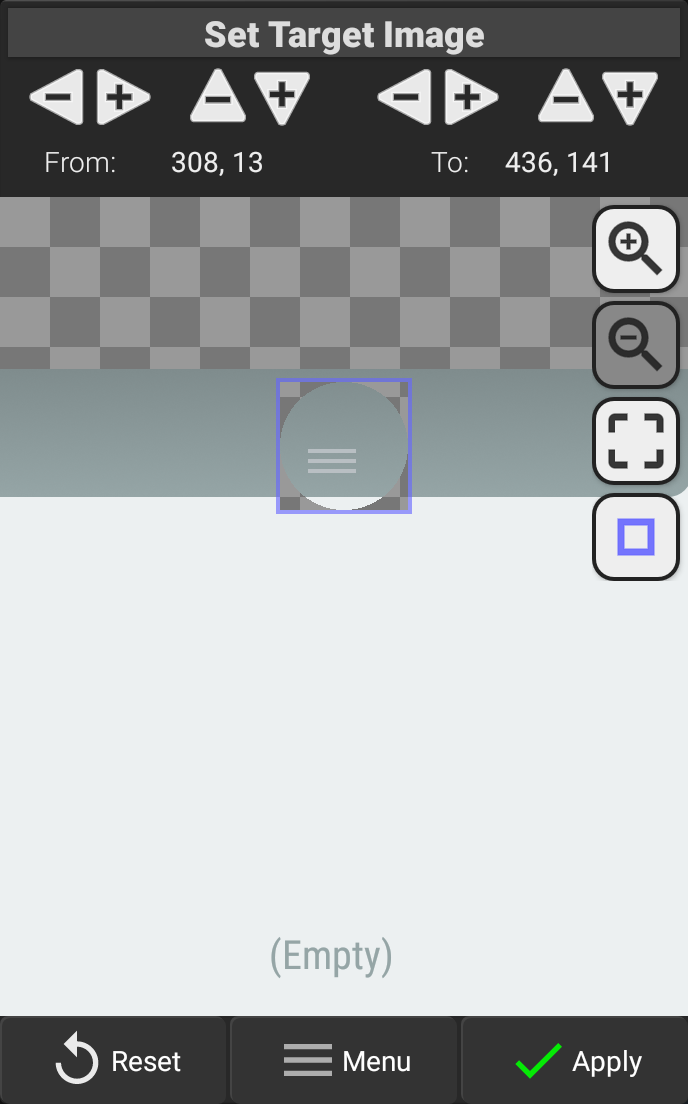
From the screenshot image, set the target image to detect.
The target image is the internal area of violet frame. The coordinates of the frame can be changed by dragging or pinch.
From: (Left, Top) To: (Right, Bottom) Current coordinates (based on device standard screen rotation) of the frame. Tapping / flicking the upper ± button will adjust each value.
![]() Zoom In /
Zoom In / ![]() Zoom Out
Zoom Out
![]() Focus
Focus
![]() Change color of the frame
Change color of the frame
Reset Reset both of the coordinates and the masks to initial ones.
Apply Apply current coordinates and masks and close.
Menu – Edit Mask Switch to Edit Target Mask, to set excluded pixels from recognition.
Menu – Change Replace the base screenshot image by Existing Image (if the record has any screenshots) or Image file (requires Storage / Media access permission to Select Screenshot Image from file list).
Edit Target Mask (Excluded part)
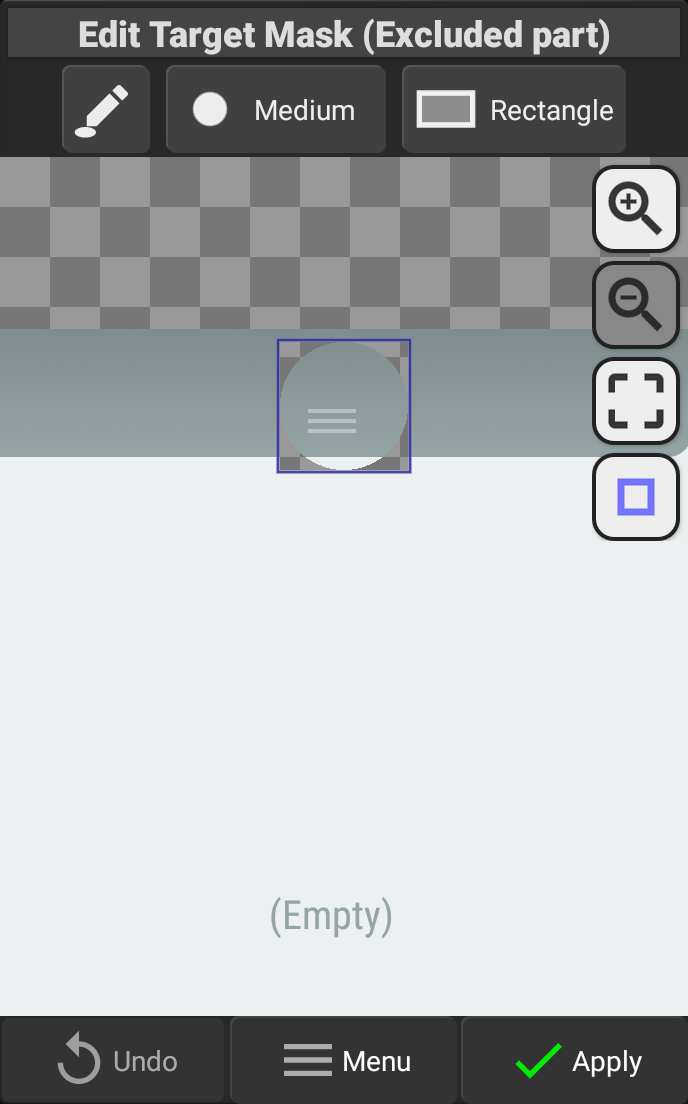
If the target is not rectangle or such case, you can exclude some regions such as background from image matching calculation by putting Mask on them. The masked pixels are shown as transparent, gray checkered pattern in edit screen.
![]() Put mask /
Put mask /![]() Erase mask (Tap to switch)
Erase mask (Tap to switch)
![]() Mask size /
Mask size /![]() Color range (Tap to change)
Color range (Tap to change)
![]() Mask shape for pinch (2-finger touch) operation (Tap to change)
Mask shape for pinch (2-finger touch) operation (Tap to change)
Undo Undo the edit mask (Long-tap to reset mask)
Apply Apply current coordinates and masks and close.
Menu – Edit Rect Switch to Set Target Image, to edit target rectangle.
Menu – Change Replace the base screenshot image by Existing Image (if the record has any screenshots) or Image file (requires Storage / Media access permission to Select Screenshot Image from file list).
Priority for multiple matches
If multiple target images appear in screen (in search area), Search methods ![]()
![]() choose one of them as a result.
choose one of them as a result.
By default ![]() , first found target, or best similar one will be selected. It depends on the calculation time and internal method for image search. So the result (matched target) may differ if there are multiple targets.
, first found target, or best similar one will be selected. It depends on the calculation time and internal method for image search. So the result (matched target) may differ if there are multiple targets.
To prioritize the search result (matched target) based on position from multiple targets, choose preferred position.
![]() Default First found target, or Best similar one will be selected as a result.
Default First found target, or Best similar one will be selected as a result.
![]() (Vertical Axis) Select the result closest to top, vertical center, or bottom of the search range.
(Vertical Axis) Select the result closest to top, vertical center, or bottom of the search range.
![]() (Horizontal Axis) Select the result closest to left, horizontal center, or right of the search range.
(Horizontal Axis) Select the result closest to left, horizontal center, or right of the search range.

(Point-based) Select the result closest to the edge* (or center ![]() ) of the search range.
) of the search range.
*The position, vertical axis, horizontal axis, are based on the device’s standard screen rotation.
Tips
– How to set faster Image control?
- For precision mode, open
 Options – Precision Mode Settings, to set Screenshot Method: Screen API for faster screenshot process.
- Set Notify Replay Process: Show On Finish (or Do not notify) in Options – Notification Settings, to start take screenshot without waiting for hiding popup message. To show popup manually with the setting, you can put Variable control with Show Popup setting. (toast:var etc.)
- The speed of recognition depends on the amount of calculation. Generally, Exact Match < Match Pixels Rate < Color Similarity; as for search method, Search(Exact) < Search(Similarity). However, the methods of Exact or Pixels Rate are not effective for recent devices or apps, because the subtle difference exists by the app’s drawing method / engine, even if you look the 2 images are same.
- For faster matching calculation of Exact Match, Match Pixels Rate, and Color Similarity, set smaller target rectangle, or mask unnecessary area for distinguishing the images in large target rectangle.
- For faster matching calculation of Search(Exact), and Search(Similarity), set
 Search Area to filter the unnecessary area where no possibility the searching image appears. Please be careful that the masking of source image not necessary reduce the amount of calculation, because the candidates of matching area basically increases (by the method of characteristic points), while the cost of each matching with the candidate decreases.
 Replace (Requires Unlock Key
 )
)
When the target app is updated and the target part of image recognition changes, you can easily replace only the target part.
Required Console Settings: ![]() Resume Sequence,
Resume Sequence, ![]() Screenshot Button,
Screenshot Button, ![]() Replace last Image by Screenshot
Replace last Image by Screenshot
When the screen you want to replace the image recognition content, try abort the running sequence at Image control (or after the control). Then, Replace becomes available instead of Shot on the panel. After replacement, the item with the original target part remains in skipped state in the sequence.
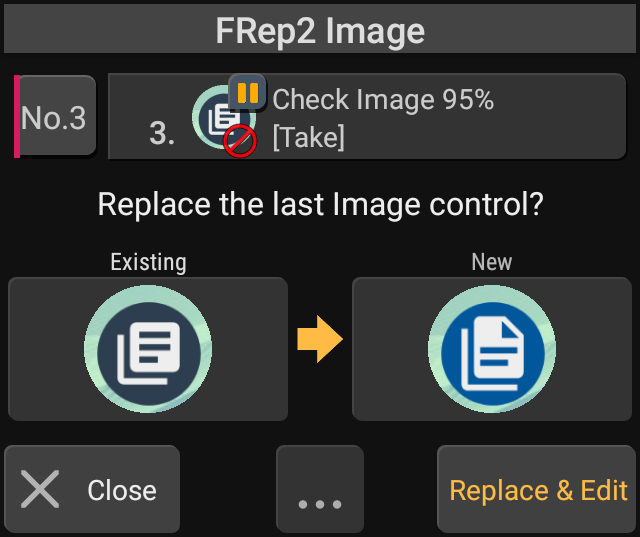
The left side shows the image recognition setting target before replacement (current), and the right side shows the replacement result with the same range and mask settings.
Close Close this screen without replacing image.
Long press to delete the screenshot file and close (if you captured the wrong screen)
Replace & Edit Replace the contents of image recognition and open the Edit Sequence screen.
Long press to replace and close (for editing later)
Replace Only Replace and close, without opening Edit Sequence.
Don’t replace image again Set not to show this screen again and close.