
Status, Tag, Label, Memo, Post Process (Common settings)
In settings pane, tapping top icon opens settings to set the item’s state.
![]() Set normal state.
Set normal state.
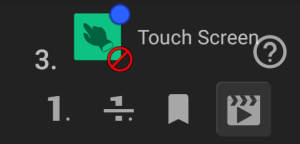
![]() Set skipped state, to disable the item.
Set skipped state, to disable the item.
![]() Set marked state, as preferred destination.
Set marked state, as preferred destination.
![]() Set last destination of Scene Check
Set last destination of Scene Check![]()
![]() . If Scene Check does not match any scenes, the sequence starts from the item.
. If Scene Check does not match any scenes, the sequence starts from the item.
 Add / Edit the one-line note. (Only when the state setting is closed)
In Label section, tag color and name of the item can be set.
![]() Set tag color. Default color is transparent, at the top-left in tag color palette.
Set tag color. Default color is transparent, at the top-left in tag color palette.
![]() Edit label.
Edit label.
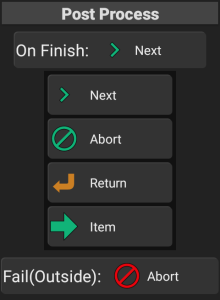
In Post Process section, destinations after the item processed can be set;
On Finish, Fail(Outside)
After tapping the button, select from Next, Abort, Return, Item or tap the destination item directly in the item list of left pane.
Note: Fail(Outside) is when the target coordinates have negative or outside of the screen range.
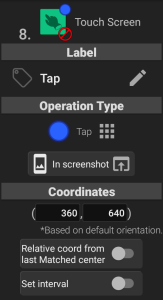
 Touch Screen
Perform Tap, Swipe, Drag at the designated position.
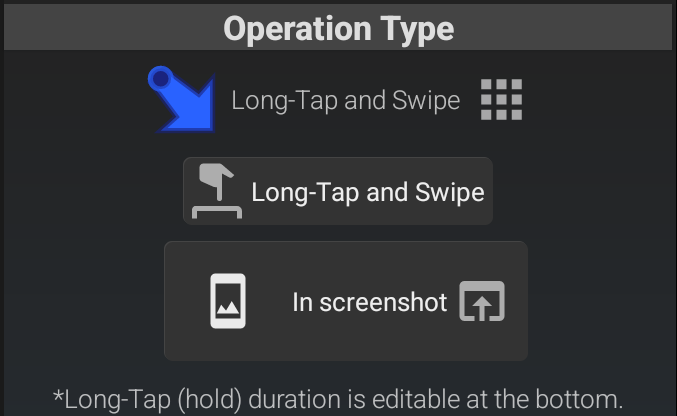
Operation Type Selectable from ![]() Tap,
Tap, ![]() Long-Tap,
Long-Tap, ![]() Double-Tap,
Double-Tap, ![]() Cont Tap (at 2~10 points),
Cont Tap (at 2~10 points), ![]() Swipe (fast drag between 2 points),
Swipe (fast drag between 2 points), ![]() Drag (trace up to 10 points)
Drag (trace up to 10 points)
For Precision mode, requires ![]() Calibrate Input.
Calibrate Input.
 Long-Tap Standard Long-Tap / Adjust Long-Tap duration can be switched. To adjust the duration, specify at the bottom Long-Tap Duration, in place of Interval.
 Swipe /
  Drag with long-press (hold touch) Select following subtype and set Long-Tap Duration, in place of Interval at the bottom.
- Standard Simple swipe / drag, without long-press.
- Long-Tap and Swipe/Drag

 Long-press (hold) at start point before swipe / drag.
 - Swipe/Drag and Long-Tap

 Long-press (hold) at end point, after swipe / drag.
 - Hold – Swipe/Drag – Hold

 Long-press (hold) at start and end point before and after swipe / drag.
- Standard
![]() In screenshot To set touch point(s) in screenshot image, open screen.
In screenshot To set touch point(s) in screenshot image, open screen.
Coordinates The position(s) to perform touch operation.
*The coordinate system is based on device standard screen rotation, the top-left is (0,0), X-axis is left-right (0~screen width), Y-axis is top-bottom (0~height: positive larger value means lower position).
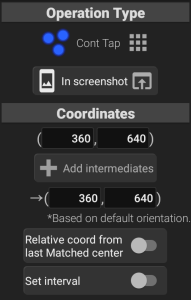
 Cont Tap requires 2 points, i.e. first and last points. To set 3 or more points, add Intermediates, up to 8 (total 10 points).
- Swipe and Drag requires 2 points, i.e. start and end points. Drag operation can have Intermediates, up to 8.
Add intermediates (Only for ![]() Cont Tap or
Cont Tap or ![]() Drag) Insert new point at the coordinates of the midpoint between previous and next points.
Drag) Insert new point at the coordinates of the midpoint between previous and next points.
*Unnecessary intermediate can be removed from the button at the right of each one.
Relative coord from last Matched center If ON, the coordinates are assumed as relative coordinates from the center of last matched by Image / OCR control. In other words, the control touches at (the center of last matched rectangle)+(designated coordinates).
Set interval Set the interval time between touch operations. If OFF, the shortest time for the mode and operation type will be used. *Too short time settings will be adjusted to the shortest time.
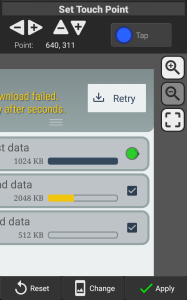
Set Touch Point
From the screenshot image, set the target coordinates to touch.
Touch target points are shown as circle colored with green, cyan, blue for first, intermediate, last points.
Point: Current coordinates (based on device standard screen rotation) of the first (green) touch. Tapping / flicking the upper ± button will adjust each value.
*The coordinate system is based on device standard screen rotation, the top-left is (0,0), X-axis is left-right (0~screen width), Y-axis is top-bottom (0~height: positive larger value means lower position).
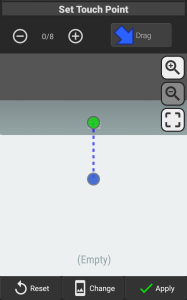
(Intermediates) / 8 (Only for ![]() Cont Tap or
Cont Tap or ![]() Drag) Current intermediate points. Tapping the side ± button will increase / decrease the points.
Drag) Current intermediate points. Tapping the side ± button will increase / decrease the points.
![]() Zoom In /
Zoom In / ![]() Zoom Out
Zoom Out
![]() Focus
Focus
Reset Reset the coordinates.
Change Replace the base screenshot image by Existing Image (if the record has any screenshots), Image file (requires Storage / Media access permission to Select Screenshot Image from file list) or Only grid (the image with only grids of 100 pixels separation).
Apply Apply current coordinates and close.
Tips
– To replay faster Tap.
- Do not put multiple Touch Screen controls with
 Tap, but use Touch Screen control with Cont Tap, instead.
 - For more faster touch operations, you need to 1. record touch operations of taps, 2. put the record in the sequence, 3. select Edit Strokes for the record, 4. adjust the intervals and the coordinates of the taps in the record.