
[![]() Number OCR] [Tips] [Video(CC)
Number OCR] [Tips] [Video(CC)![]() ]
]
Status, Tag, Label (Common settings)
In settings pane, tapping top icon opens settings to set the item’s state.
![]() Set normal state.
Set normal state.
![]() Set skipped state, to disable the item.
Set skipped state, to disable the item.
![]() Set marked state, as preferred destination.
Set marked state, as preferred destination.
![]() Set last destination of Scene Check
Set last destination of Scene Check![]()
![]() . If Scene Check does not match any scenes, the sequence starts from the item.
. If Scene Check does not match any scenes, the sequence starts from the item.
 Add / Edit the one-line note. (Only when the state setting is closed)
In Label section, tag color and name of the item can be set.
![]() Set tag color. Default color is transparent, at the top-left in tag color palette.
Set tag color. Default color is transparent, at the top-left in tag color palette.
![]() Edit label.
Edit label.
 Number OCR
Tips video (CC) ![]() When to use procedures
When to use procedures
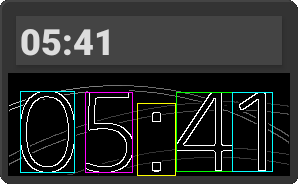
Take a screenshot and then recognize numeric characters and some symbols with target area (for 1 line), then store them in variable.
When creating new Number OCR control, Set OCR Area (1 line) will open.
OCR Settings
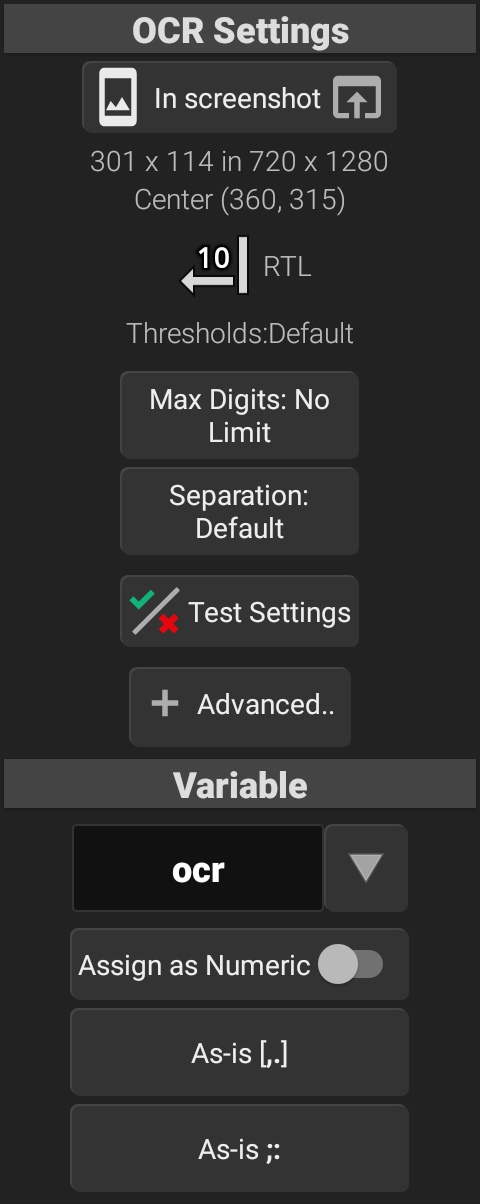
The rectangle of target image to recognize is described as [target image width x height] in [device screen width x height] and Center coordinates in screen. Other OCR settings edited in screenshot are also shown.
*The coordinate system is based on device standard screen rotation, the top-left is (0,0), X-axis is left-right (0~screen width), Y-axis is top-bottom (0~height: positive larger value means lower position).
![]() In Screenshot Open OCR Config to edit the configuration and the position of target.
In Screenshot Open OCR Config to edit the configuration and the position of target.
![]() Summary of current settings (rotation, orientation and color).
Summary of current settings (rotation, orientation and color).
Thresholds, Fonts: Default or (Edge Detection / Char Edge Detection, Char Recognition%)
Max Digits Max characters to be recognized, including numbers and symbols.
Separation Recognition process will stop when the distance to next character is more than this setting. Default is up to 2/3 of the height of target rectangle.
![]() Test Settings Test current match settings on screenshot image. To test Image File, requires Storage / Media access permission.
Test Settings Test current match settings on screenshot image. To test Image File, requires Storage / Media access permission.
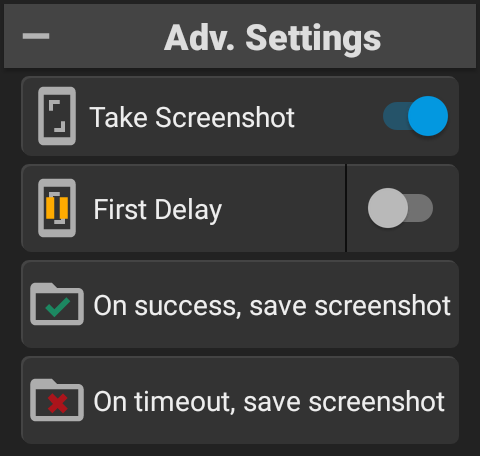
Advanced Settings (Adv. Settings)
![]() Take Screenshot Take screenshot(s) for recognition. If OFF
Take Screenshot Take screenshot(s) for recognition. If OFF ![]() , the control does not take screenshot, but only calculate recognition for last screenshot which taken by other Image / Take Screenshot / OCR control.
, the control does not take screenshot, but only calculate recognition for last screenshot which taken by other Image / Take Screenshot / OCR control.
![]() First Delay Wait designated seconds before taking screenshot, to wait screen change by previous operation.
First Delay Wait designated seconds before taking screenshot, to wait screen change by previous operation.
![]() On success,
On success, ![]() On timeout, save screenshot Save the screenshot to designated path on success or timeout, to check it after you get unexpected result. The saved screenshot can be tested by tapping the button.
On timeout, save screenshot Save the screenshot to designated path on success or timeout, to check it after you get unexpected result. The saved screenshot can be tested by tapping the button.
Variable
Specify the variable that stores the result, and settings to store processed value.
Assign as Numeric Convert the result string to numeric value, then store in the variable. *If the conversion failed because of symbol(s) or such, the control fails and goes to Empty/Invalid destination process.
[,.] Process If set, before storage / conversion process, comma(,) and dot(.) characters in the result string are processed.
;: Process If set, before storage / conversion process, semicolon(;) and colon(:) characters in the result string are processed.
Post Process
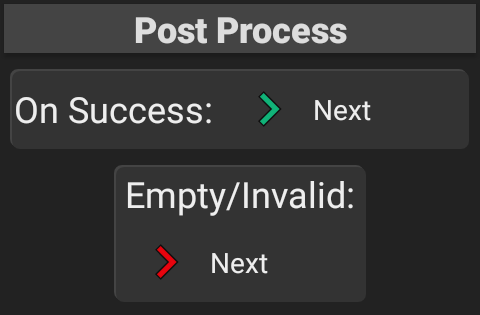
On Success: Destination when character(s) recognized successfully.
Empty/Invalid: Destination when no characters are detected, or failed to convert to Number type with Assign as Numeric setting.
After tapping the button, select from Next, Abort, Return, Item, or tap the destination item directly in the item list of left pane.
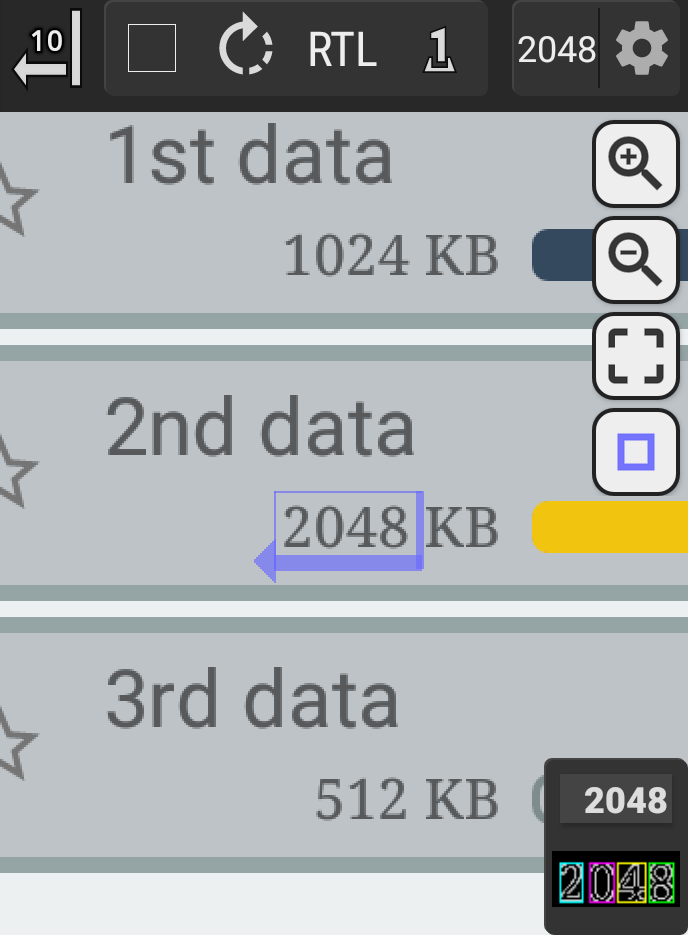
Set OCR Area (1 line)
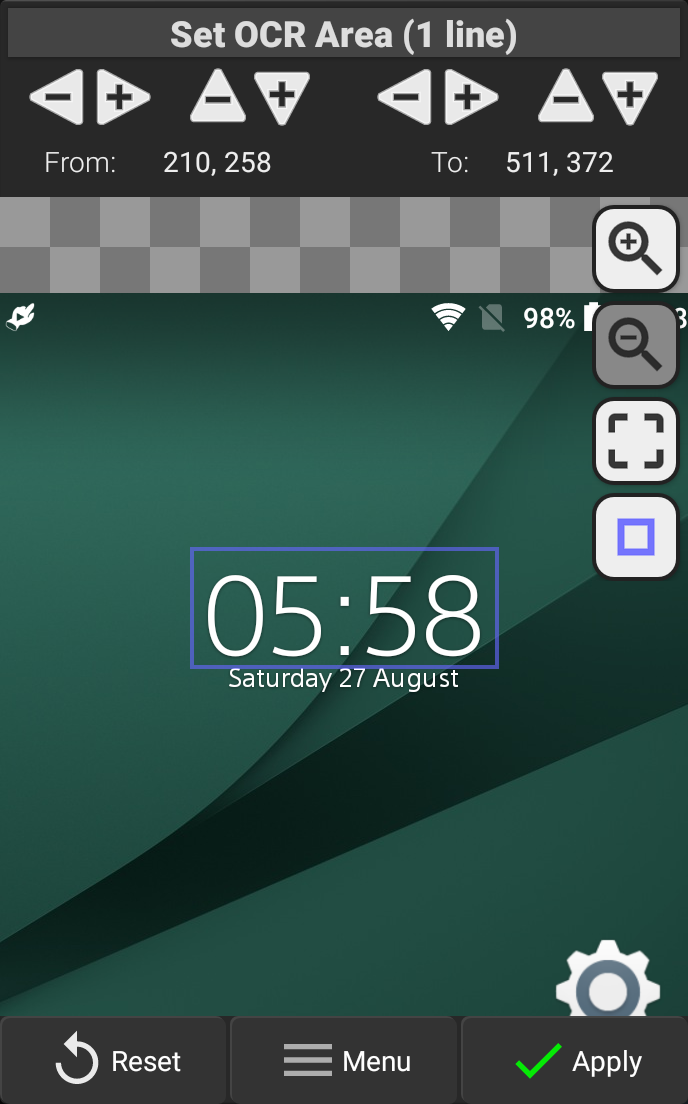
From the screenshot image, set the target area to detect numeric characters.
The target area is the internal area of the frame. The coordinates of the frame can be changed by dragging or pinch.
From: (Left, Top) To: (Right, Bottom) Current coordinates (based on device standard screen rotation) of the frame. Tapping / flicking the upper ± button will adjust each value.
![]() Zoom In /
Zoom In / ![]() Zoom Out
Zoom Out
![]() Focus
Focus
![]() Change color of the frame
Change color of the frame
Reset Reset both of the coordinates and the masks to initial ones.
Next Switch to OCR Config.
Apply Apply current coordinates, configs and masks and close.
Menu – Edit Mask Switch to Edit Target Mask, to set excluded pixels from recognition.
Menu – Change Replace the base screenshot image by Existing Image (if the record has any screenshots) or Image file (requires Storage / Media access permission to Select Screenshot Image from file list).

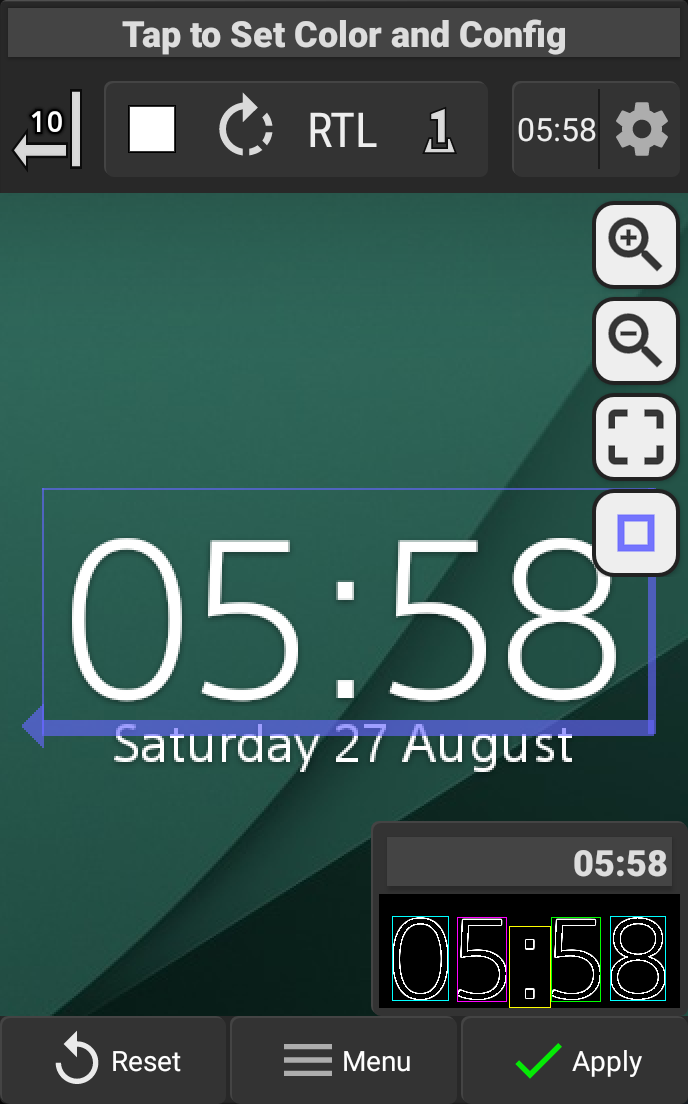
Tap to Set Color and Config (OCR Config)
Set color, orientation, max width, thresholds, etc. of the target characters.
Tap / Drag image will designate character color. Pinch will set max width of a character in OCR calculation.
![]()
![]() Summary of current settings (rotation, orientation and color).
Summary of current settings (rotation, orientation and color).
![]()
![]() Color of the target characters. (Tap to clear color setting)
Color of the target characters. (Tap to clear color setting)
![]() (Tap to rotate the target OCR line)
(Tap to rotate the target OCR line)
![]()
![]() Orientation of OCR line. (Tap to switch)
Orientation of OCR line. (Tap to switch)
![]() Auto-width detection /
Auto-width detection / ![]() Auto-width detection with max width (Tap to switch, pinch image to adjust)
Auto-width detection with max width (Tap to switch, pinch image to adjust)
Test Execute OCR with current image and show result and intermediate process (at bottom-right).
When OCR fails with default configuration (Tips)
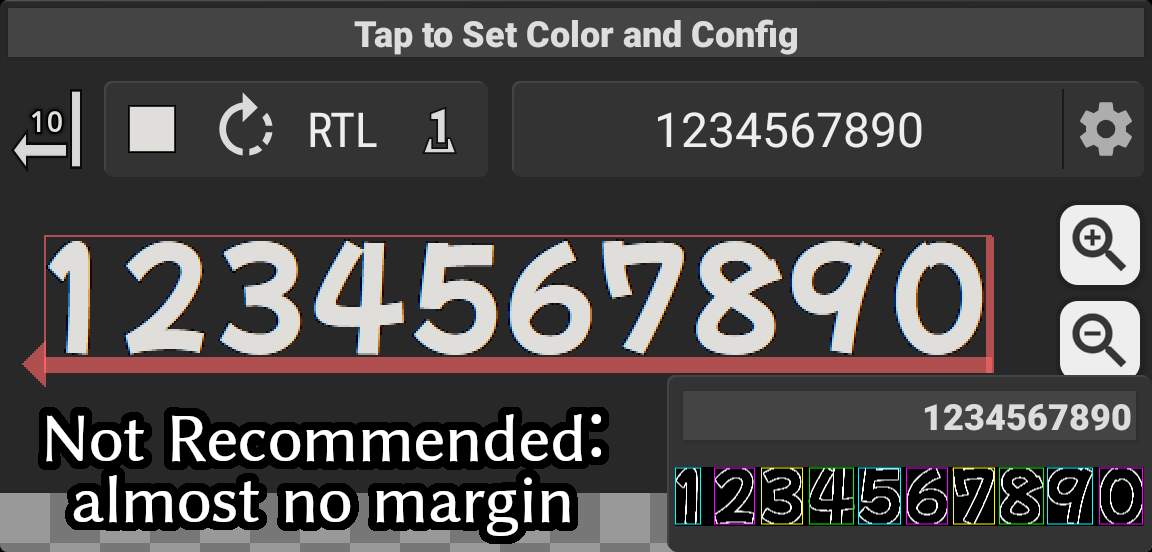
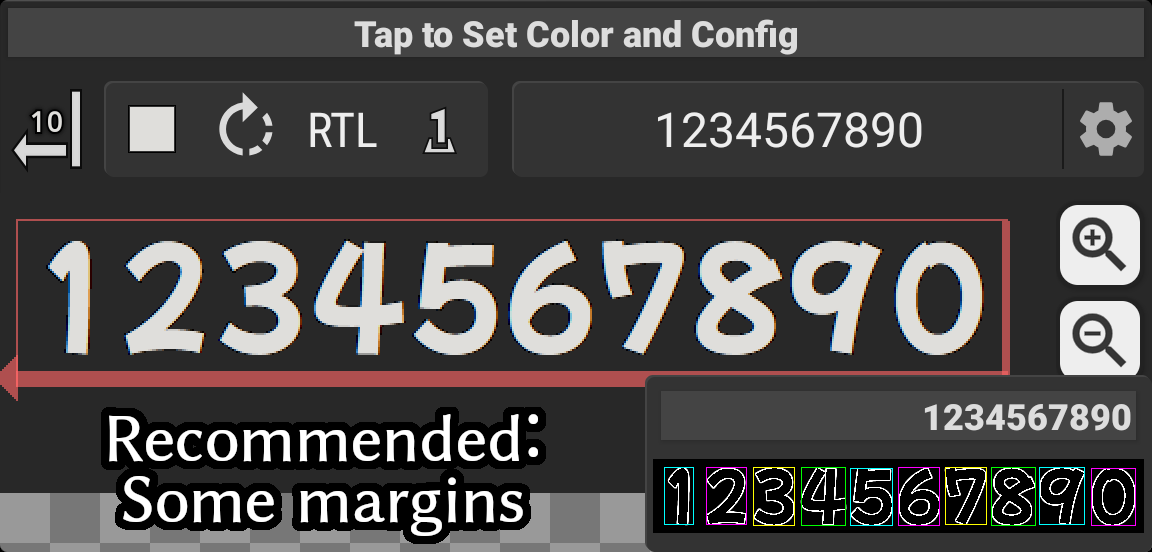
In most cases, including margins in the area improves accuracy of OCR.
*If adding margin will includes some non-target pixels (of frame, other letter, or such) with the target color, try specifying the mask to ignore them.
To adjust other configuration, tap ![]() to open menus of below. If the detected edges too much / little, the recognition frames of characters are incorrect in intermediate process, or the detected characters are incorrect, check followings.
to open menus of below. If the detected edges too much / little, the recognition frames of characters are incorrect in intermediate process, or the detected characters are incorrect, check followings.
Edge Detection Threshold for edges. Larger will detect less edges.
Char Edge Detection Threshold for frames of characters. Larger will use only high edges.
Char Recognition Threshold for character determination. Larger will be stricter.
Font Type Character shapes for recognition. Default will use all. Setting will filter reference shapes; Only Serif / No Serif, Only Pop / No Pop, Only Slashed Zero / No Slashed Zero.
Case: Background pattern is detected
Try ‘designating character color by tapping image’, ‘adjusting Edge Detection, Char Edge Det.’
Case: Thin / Small characters are not detected
Try ‘lower Char Edge Det.’, ‘clear character color by tapping color icon at top-left’, or ‘designating background color (to use outside edge)’.
Case: Result number is incorrect for heavy font
Try some ‘Font Type’ limitation such as Only Pop, Only Slashed Zero, higher ‘Edge Detection’ may reduce unnecessary edges.
Case: Result number is incorrect for angular (squarish) font
Try some ‘Font Type’ limitation such as No Serif, Pop, No Slashed Zero, lower ‘Char Edge Det.’ may emphasis edges in the corner.
Case: Characters in decorative font are not detected
It may be recognized after clearing character color by tapping color icon at top-left.
Case: Multiple letters are concatenated
Try ‘Split Type: Only MaxWidth’ and adjust max width ![]() for 1 character by pinch on the image, to find proper recognition frames for the characters.
for 1 character by pinch on the image, to find proper recognition frames for the characters.
Case: 1 letter is divided to multiple candidates
Try lowering ‘Char Edge Det.’ to 96 or something.
Case: 3 of Serif font is recognized as 8
Try ‘Font Type’ Only Serif, and if there are characters that are not recognized, try setting lower ‘Char Recognition’ to 80-90 etc.
Edit Target Mask (Excluded part)
If the target area has same color background objects which is not target character, you can exclude some regions by putting Mask on them. The masked pixels are shown as transparent, gray checkered pattern in edit screen.
![]() Put mask /
Put mask /![]() Erase mask (Tap to switch)
Erase mask (Tap to switch)
![]() Mask size /
Mask size /![]() Color gamut (Tap to change)
Color gamut (Tap to change)
![]() Mask shape for pinch (2-finger touch) operation (Tap to change)
Mask shape for pinch (2-finger touch) operation (Tap to change)
Undo Undo the edit mask (Long-tap to reset mask)
Apply Apply current coordinates and masks and close.
Menu – Char Config Switch to OCR Config, to edit several configurations.
Menu – Edit Rect Switch to Set OCR Area (1 line), to edit target rectangle.
Menu – Change Replace the base screenshot image by Existing Image (if the record has any screenshots) or Image file (requires Storage / Media access permission to Select Screenshot Image from file list).